JAVA Developer's Guide#
Overview#
This developer's guide describes how to develop applications that integrate with Altibase in the JAVA environment, and the matters to consider during development.
This document is based on Altibase 7.1, JRE or JDK 1.5 or later (1.8 or later for the driver that partially supports the JDBC 4.2 API), and Eclipse as the development IDE.
In addition to this document, please refer to the following documents during development.
Info
For errors and improvements related to this document, please contact the technical support portal or technical support center.
- Technical support portal: http://support.altibase.com/en
- Technical support center: +82-2-2082-1114
Info
This document is provided for informational purposes only and is subject to change without prior notice. It may contain errors, and Altibase makes no express or implied warranties of any kind, including but not limited to warranties of merchantability or fitness for a particular purpose.
The development, release, and timing of any features or functionality described for Altibase products in this document are at the sole discretion of Altibase.
Altibase may hold patents, trademarks, copyrights, or other intellectual property rights related to the contents of this document.
Settings before Development#
The Altibase JDBC Driver is required to integrate with Altibase in the JAVA environment.
This section describes the Altibase JDBC Driver.
Types of Altibase JDBC Drivers#
The Altibase 7.1 JDBC Driver is a Type 4 pure Java JDBC driver that conforms to the JDBC 3.0 API. The driver files are located in the $ALTIBASE_HOME/lib directory.
Altibase 7.1 provides the following five types of JDBC drivers.
| JDBC Driver | Purpose | JDBC API | Minimum JRE version | Driver class name |
|---|---|---|---|---|
| Altibase.jar | Default JDBC driver of Altibase 7.1 | 3.0 | 1.5 | Altibase.jdbc.driver.AltibaseDriver |
| Altibase7_1.jar | JDBC driver for distinguishing Altibase 7.1 in an application that connects to multiple versions of Altibase servers | 3.0 | 1.5 | Altibase7_1.jdbc.driver.AltibaseDriver |
| Altibase_t.jar | JDBC driver with the JDBC logging function (for Altibase.jar) | 3.0 | 1.5 | Altibase.jdbc.driver.AltibaseDriver |
| Altibase42.jar | JDBC driver that partially supports the JDBC 4.2 API | 4.2 (partial) | 1.8 | Altibase.jdbc.driver.AltibaseDriver |
| Altibase42_7_1.jar | JDBC driver that partially supports the JDBC 4.2 API, for distinguishing Altibase 7.1 in an application that connects to multiple versions of Altibase servers | 4.2 (partial) | 1.8 | Altibase7_1.jdbc.driver.AltibaseDriver |
Altibase42.jar is provided starting from Altibase 7.1.0.5.6.
How to connect to Altibase servers of different versions at the same time is described in Simultaneous connection to different Altibase versions below.
How to Check the Altibase JDBC Driver Version#
To verify the compatibility of the Altibase server and the Altibase JDBC Driver, the user must check the Altibase JDBC Driver version.
They are compatible if the cm protocol version of the Altibase server and the CMP version of the Altibase JDBC Driver are the same.
The command to check the Altibase JDBC Driver version is as follows.
$ java -jar $ALTIBASE_HOME/lib/Altibase.jar
Altibase 7.1.0.5.0 with CMP 7.1.7 for JDBC 3.0 compiled with JDK 5(sharding included)

$ java -jar $ALTIBASE_HOME/lib/Altibase42.jar
Altibase 7.1.0.5.0 with CMP 7.1.7 for JDBC 4.2 compiled with JDK 5, JDK 8(sharding included)
Check the Altibase server version with the following command, and compare the cm protocol version in the output with the CMP version of the JDBC Driver.
$ altibase -v
Generally, it is recommended to use the latest Altibase JDBC Driver file of the same or later version than the Altibase server version.
Setting up JDBC Driver#
This section describes how to set up the Altibase JDBC Driver.
How to Set It Up in JRE#
To use the Altibase JDBC Driver in a Java application, the Altibase JDBC Driver must be recognized by the JRE.
Use one of the three methods presented below.
Method 1. CLASSPATH environment variable#
Add the location of the Altibase JDBC Driver file to the CLASSPATH environment variable.
When using the driver that partially supports the JDBC 4.2 API, specify Altibase42.jar instead of Altibase.jar.
-
Windows
-
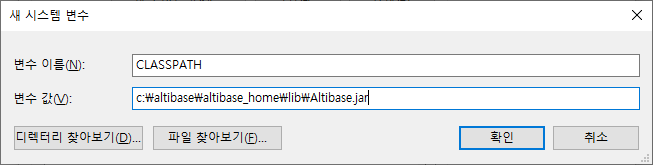
Create a new CLASSPATH: Register the CLASSPATH variable by clicking the [New] button in My Computer – Properties – Advanced – Environment Variables
-
Use the existing CLASSPATH: Add the Altibase JDBC Driver location to the end of the specified variable
-
-
Unix
Add the CLASSPATH to the environment configuration file (e.g. .profile).
export ALTIBASE_HOME=$HOME/altibase_home export CLASSPATH=$ALTIBASE_HOME/lib/Altibase.jar:.:$CLASSPATH -
Linux
Add the CLASSPATH to the environment configuration file (e.g. .bash_profile).
export ALTIBASE_HOME=$HOME/altibase_home
export CLASSPATH=$ALTIBASE_HOME/lib/Altibase.jar:.:$CLASSPATH
Method 2. JRE (Java Runtime Environment) directory#
Place the Altibase.jar file in the following directory so that the Altibase JDBC Driver (Altibase.jar) can be automatically referenced in the JRE environment.
$JAVA_HOME/jre/lib/ext directory
or
$JRE_HOME/lib/ext directory
$JAVA_HOME is the JDK installation directory and $JRE_HOME is the JRE installation directory.
Warning
The extension mechanism using the lib/ext directory works only in Java 8 or earlier. In Java 9 or later, use Method 1 or Method 3.
Method 3. -classpath option at run time#
When running a Java application with the java command, specify the Altibase JDBC Driver with the -cp or -classpath option.
$ java -classpath [directory path]/Altibase.jar ClassFileName

# Example
$ java -classpath $ALTIBASE_HOME/lib/Altibase.jar HelloApp
How to Set It Up in Eclipse#
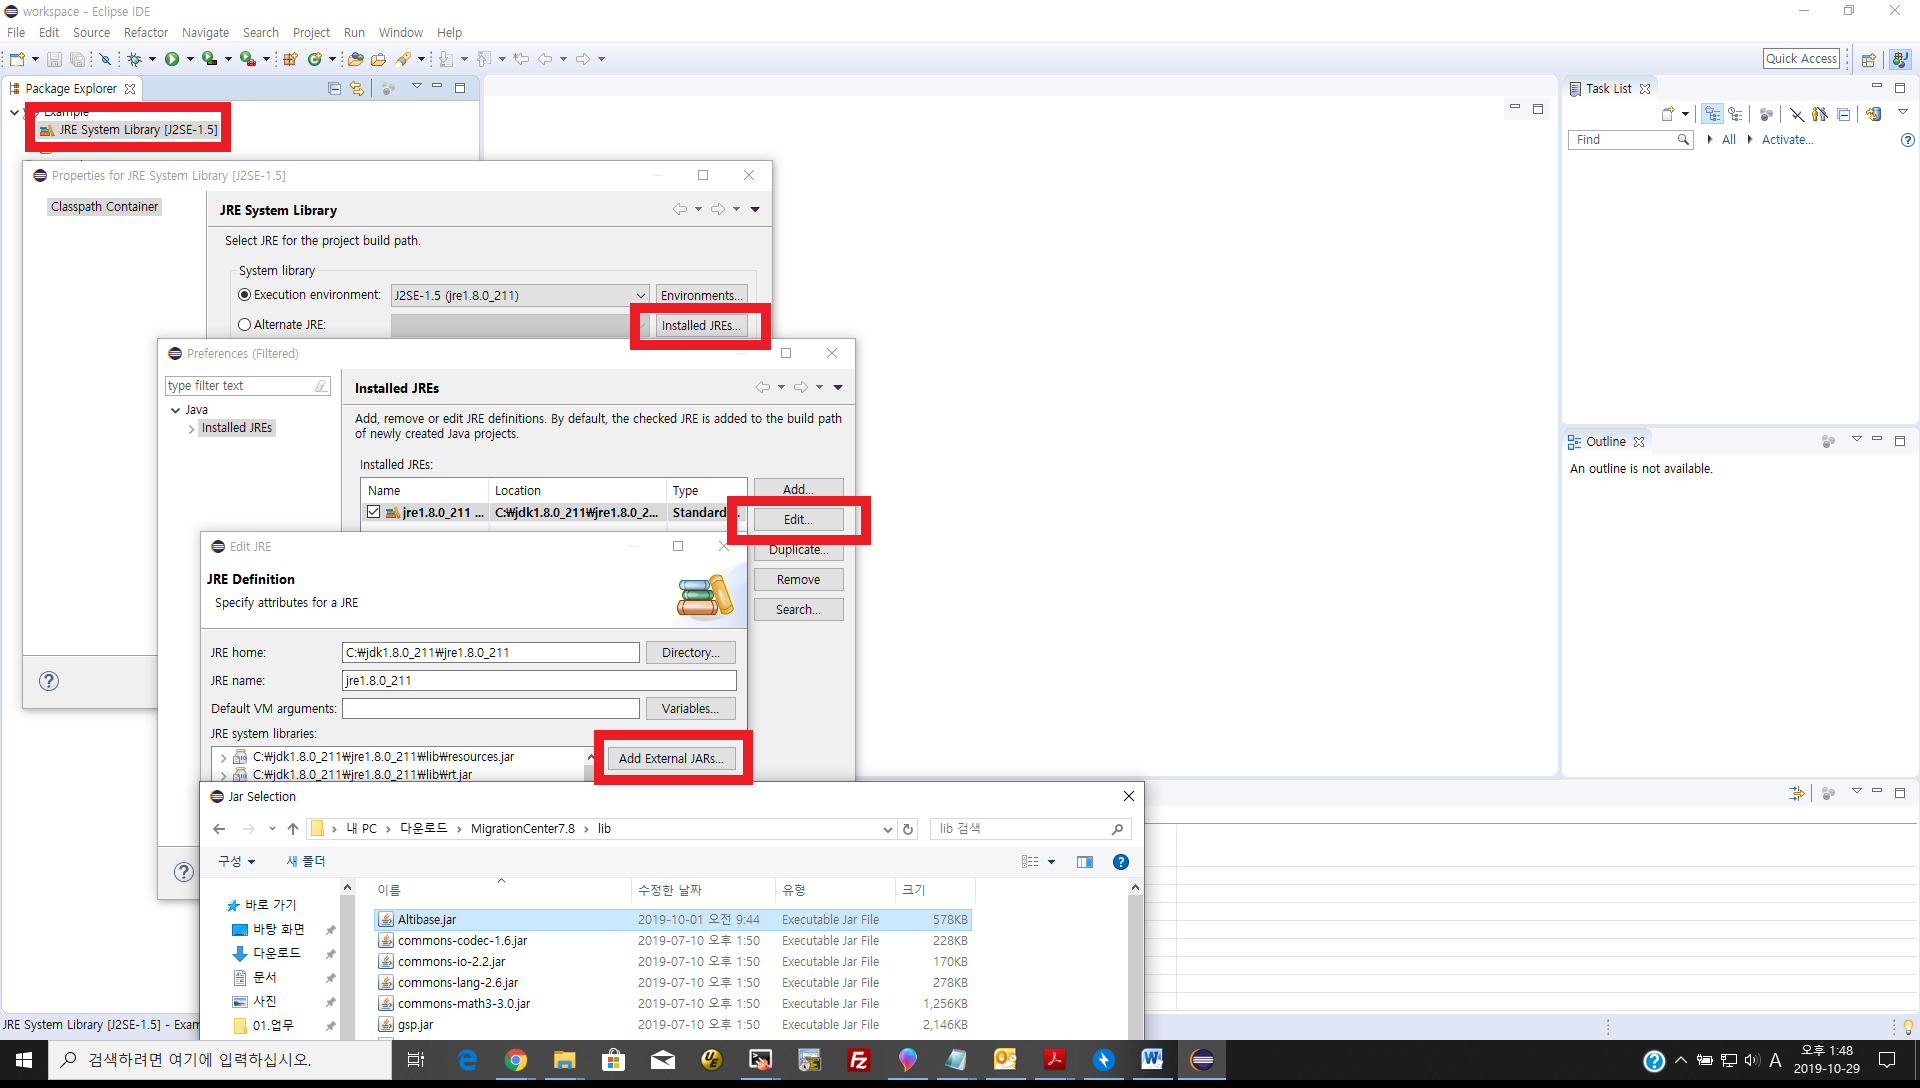
How to add the Altibase JDBC Driver in Eclipse is as follows.
-
Click
JRE System Libraryin the project -
Click
PropertiesofJRE System Library -
Click the
Installed JREsbutton -
Select a jre among
Installed JREsand click theEditbutton -
Click the
Add External JARsbutton -
Select
Altibase.jar(orAltibase42.jar) in the $ALTIBASE_HOME/lib directory
How to Use Driver Loading and Connection URL#
This section describes how to load the Altibase JDBC Driver and connect to Altibase.
Driver Loading#
The class name of the Altibase JDBC Driver is Altibase.jdbc.driver.AltibaseDriver.
The following is an example of code that loads the Driver by calling the Class.forName method.
Class.forName("Altibase.jdbc.driver.AltibaseDriver");
General Connection#
To get a Connection object in JDBC, call the DriverManager.getConnection method.
A String type URL must be passed as an argument. The format of the Altibase connection URL is as follows.
jdbc:Altibase://server_ip:server_port/dbname
  * server_ip : IP address or host name of the Altibase DB server
  * server_port : Port number of the Altibase DB (defined as the PORT_NO property in $ALTIBASE_HOME/conf/altibase.properties)
  * dbname : Name of the Altibase DB (defined as the DB_NAME property in $ALTIBASE_HOME/conf/altibase.properties)
The following is an example of getting a Connection object according to the above format. (Server IP is 192.168.1.111, port number is 20300, and DB name is mydb.)
AltibaseConnection.java
String db_url1 = "jdbc:Altibase://192.168.1.111:20300/mydb";
Properties props1 = new Properties();
props1.put("user", "sys");
props1.put("password", "manager");
Connection altibaseConnection1 = DriverManager.getConnection(db_url1, props1);
The following is how to look up the DB_NAME.
iSQL> SELECT DB_NAME FROM V$DATABASE;
DB_NAME
------------------------------------------------------------------------------------------------------------------------------------
mydb
1 row selected.
Connection Attributes#
When connecting, the user can specify various connection attributes, including the user name and password of the DB.
Connection attributes can be specified by using the java.util.Properties class, or by appending "?" to the end of the connection URL followed by key=value pairs. When specifying multiple attributes, connect them with "&".
The main connection attributes are as follows.
| Attribute name | Description | Default value |
|---|---|---|
| server | IP address or host name of the Altibase server to connect to | localhost |
| port | Port number of the Altibase server to connect to | 20300 (20443 if ssl_enable=true) |
| database | Name of the database to connect to | mydb |
| user | DB user ID | None (required) |
| password | DB user password | None (required) |
| conntype | Connection type 0 or TCP: TCP/IP 6 or SSL: SSL 8 or IB: InfiniBand |
0 |
| auto_commit | Whether to automatically commit the transaction when a statement completes | true |
| fetch_enough | Number of rows to fetch from the server in one fetch operation If 0, the driver fetches as much data as fits in one network packet |
0 |
| login_timeout | Maximum time to wait for login (seconds) | None |
| response_timeout | Maximum time to wait for a server response (seconds) | None |
For all connection attributes, refer to "About Connection Attributes" in the Altibase 7.1 JDBC User's Manual.
The following are examples of specifying connection attributes.
-
Using the Properties class
Properties props1 = new Properties(); props1.put("user", "sys"); props1.put("password", "manager"); Connection altibaseConnection1 = DriverManager.getConnection(db_url1, props1); -
Specifying in the URL
String db_url1 = "jdbc:Altibase://192.168.1.111:20300/mydb?user=sys&password=manager";
Connection altibaseConnection1 = DriverManager.getConnection(db_url1);
Connection Using the Altibase ConnectionPool#
By using the AltibaseConnectionPoolDataSource class provided by Altibase, the user can manage connections with a ConnectionPool.
AltibaseConnectionPoolDataSource is mainly specified in the JDBC connection pool settings of a WAS (Web Application Server), and is defined in the Altibase.jdbc.driver package.
After creating an AltibaseConnectionPoolDataSource object, set the connection URL with the setURL() method, or call the setXXX() method that sets each property.
AltibaseConnectionPool.java
import Altibase.jdbc.driver.*;
...
String db_url1 = "jdbc:Altibase://192.168.1.111:20300/mydb";
AltibaseConnectionPoolDataSource pool = new AltibaseConnectionPoolDataSource();
pool.setURL(db_url1);
pool.setUser("sys");
pool.setPassword("manager");
...
PooledConnection pooledConnection = pool.getPooledConnection();
Connection altibaseConnection1 = pooledConnection.getConnection();
...
The properties that can be set in AltibaseConnectionPoolDataSource are as follows.
| Property | Description |
|---|---|
| URL | Connection string information for connecting to Altibase (note the upper case) Enter in the form "jdbc:Altibase://IP:port_no/db_name" |
| serverName | Database server name |
| portNumber | Database port number |
| databaseName | Database name |
| user | Database user ID |
| password | Database password |
| dataSourceName | DataSource name |
| loginTimeout | Maximum waiting time for database login |
| logWriter | Log writer for the DataSource |
Note
In the Altibase JDBC Driver of version 6.3.1 or earlier, the name of this class is ABConnectionPoolDataSource.
If Connection objects are frequently created and destroyed, it is recommended to use the Connection Pool provided by the WAS (middleware).
When specifying a connection validation query (poolPingQuery, validationQuery, etc.) in a WAS, the user can use the PING query, which runs lighter than a regular query.
/* PING */ SELECT 1
The PING query requires a space between the comment symbols (/*, */) and PING, and between */ and SELECT. If other clauses are appended, as in /* ping */ select 1 from dual, it is not recognized as a PING query.
Connection Using XA#
To manage distributed transactions, the user can get a connection by using the AltibaseXADataSource class.
This class is defined in the Altibase.jdbc.driver package.
The following is an example of implementing XA by getting an XAConnection object through an AltibaseXADataSource object, and a Connection object through the XAConnection object.
AltibaseXAConnection.java
import Altibase.jdbc.driver.*;
...
AltibaseXADataSource axds1 = new AltibaseXADataSource();
axds1.setUrl("jdbc:Altibase://192.168.1.111:20300/mydb");
axds1.setUser("SYS");
axds1.setPassword("MANAGER");
AltibaseXADataSource axds2 = new AltibaseXADataSource();
axds2.setUrl("jdbc:Altibase://192.168.1.222:20300/mydb");
axds2.setUser("SYS");
axds2.setPassword("MANAGER");
// Get XA connections to the underlying data sources
XAConnection pc1 = axds1.getXAConnection();
XAConnection pc2 = axds2.getXAConnection();
// Get the physical connections
Connection conn1 = pc1.getConnection();
Connection conn2 = pc2.getConnection();
// Get the XA resources
XAResource axar1 = pc1.getXAResource();
XAResource axar2 = pc2.getXAResource();
Connection Using Failover#
The user can use the Failover function by defining Failover-related attributes in the connection URL or in the Properties object.
Failover works in the following two ways.
| Type | Description |
|---|---|
| CTF (Connection Time Failover) | If an attempt to connect to the database fails, the client retries the connection to another server. It can occur when the connect method of the Connection object is called. |
| STF (Session Time Failover) | If a connection error occurs after an SQL statement is executed but before the result is received from the server, the client connects to another server and continues the work specified by the user. It can occur in any method that communicates with the server, except connect. |
The following is an example of connecting to Altibase with CTF.
AltibaseFailOverConnection.java
String db_url1 = "jdbc:Altibase://192.168.1.111:20300/mydb";
Properties props1 = new Properties();
props1.put("user", "sys");
props1.put("password", "manager");
props1.put("alternateservers", "(192.168.1.111:20300,192.168.1.222:20300)");
props1.put("connectionretrycount", "3");
props1.put("connectionretrydelay", "3");
props1.put("sessionfailover", "off");
props1.put("loadbalance", "off");
Connection altibaseConnection1 = DriverManager.getConnection(db_url1, props1);
The Failover-related attributes are as follows.
| Attribute | Description | Default value |
|---|---|---|
| alternateservers | List of available servers to connect to in case of a failure Written in the format (host_name:port_number[/dbname], host_name:port_number[/dbname], ...) |
None |
| connectionretrycount | Number of connection retries when the connection to an available server fails | 0 |
| connectionretrydelay | Time to wait before retrying the connection when the connection to an available server fails (in seconds) | 0 |
| loadbalance | on: At the first connection, randomly selects a server among the default server and the available servers off: At the first connection, connects to the default server, and if the connection fails, connects to the servers described in alternateservers in order |
off |
| sessionfailover | Whether to use STF (Session Time Failover) on: STF, off: CTF |
off |
With STF, after detecting a failure, the client first restores the connection through the CTF process, executes the callback function registered by the user, and then raises a Failover Success Exception.
Therefore, when using STF, the application must be written to perform the work at the time of the failure again after receiving the Failover Success Exception.
For details such as how to implement the Failover callback, refer to the Altibase 7.1 JDBC User's Manual - JDBC and Failover and the Altibase 7.1 Replication Manual - Fail-Over.
Simultaneous Connection to Different Altibase Versions#
To connect to Altibase servers of different versions at the same time from one application, use Altibase7_1.jar (or Altibase42_7_1.jar), the JDBC driver for distinguishing versions.
This is because the default JDBC driver (Altibase.jar) has the same file name and driver class name regardless of the Altibase server version, so the server version cannot be distinguished.
The driver class name of Altibase7_1.jar is defined as Altibase7_1.jdbc.driver.AltibaseDriver.
When loading the driver classes with the Class.forName() method in the application, specify the class names Altibase7_1.jdbc.driver.AltibaseDriver and Altibase.jdbc.driver.AltibaseDriver separately to connect to different Altibase versions.
The following is an example of connecting to Altibase 7.1 and Altibase 6.5.1 servers at the same time. (Altibase.jar is assumed to be the Altibase 6.5.1 JDBC driver.)
AltibaseMultiversionConnection.java
// Altibase7_1.jar for distinguishing the Altibase 7.1 JDBC driver
Class.forName("Altibase7_1.jdbc.driver.AltibaseDriver");
// Altibase 6.5.1 JDBC driver class (Altibase.jar)
Class.forName("Altibase.jdbc.driver.AltibaseDriver");
// Altibase 7.1 connection URL
String db_url1 = "jdbc:Altibase://192.168.1.111:20300/mydb";
// Altibase 6.5.1 connection URL
String db_url2 = "jdbc:Altibase://192.168.1.222:20300/mydb";
Calling Stored Procedure/Function#
When calling a stored procedure created in the DB, write the call SQL statement as follows.
-
Stored Procedure
{ call procedure_name(?,?,....) } * ? is a parameter corresponding to a parameter of the procedure. -
Stored Function
{ call ? := function_name(?,?,....) }
* The '?' before := is a parameter indicating the result value after calling the function.
  The '?' in () is a parameter corresponding to a parameter of the function.
The following is an example of calling a stored procedure and a function.
AltibasePSMCall.java
// Calling Stored Procedure
String sql1 = "{call sum_proc(?,?,?)}";
CallableStatement altibaseStatement1 = altibaseConnection1.prepareCall(sql1);
altibaseStatement1.setInt(1, 10);
altibaseStatement1.setInt(2, 20);
altibaseStatement1.registerOutParameter(3, java.sql.Types.NUMERIC);
altibaseStatement1.execute();
System.out.println(altibaseStatement1.getDouble(3));
System.out.println();

// Calling Stored Function
String sql2 = "{call ? := sum_func(?,?)}";
CallableStatement altibaseStatement2 = altibaseConnection1.prepareCall(sql2);
altibaseStatement2.registerOutParameter(1, java.sql.Types.NUMERIC);
altibaseStatement2.setInt(2, 10);
altibaseStatement2.setInt(3, 20);
altibaseStatement2.execute();
System.out.println(altibaseStatement2.getDouble(1));
Considerations for Development#
This section describes the matters to consider when developing in JAVA.
Use of PreparedStatement#
PreparedStatement is an object that creates an SQL statement in advance and binds values through parameters when needed.
For SQL statements that can be processed with binding-execute using parameters, using a PreparedStatement object provides better performance than a Statement object, which processes the SQL statement in the prepare-execute method each time.
For example, it is recommended to use a PreparedStatement object for a statement that inserts n rows, or a statement that repeatedly selects with a specific value as a condition.
Use of executeBatch()#
When bulk DML processing is required, it is recommended to use executeBatch(), which uses array processing to put multiple rows of data into an array and send them to the server at once.
When the executeUpdate() method is used for bulk DML processing, communication costs with the DB server are incurred as many times as the method is called, whereas executeBatch() reduces the number of communications with the DB server, which improves performance.
To use it, first add n rows of data to the array with addBatch(), and then execute executeBatch().
If the batch processing of a large number of simple INSERT statements must also guarantee atomicity (all succeed or all fail), the user can use the Atomic Batch function.
Cast the PreparedStatement object to the AltibasePreparedStatement class type, and call setAtomicBatch(true).
PreparedStatement pstmt = altibaseConnection1.prepareStatement("INSERT INTO t1 VALUES (?, ?)");
((Altibase.jdbc.driver.AltibasePreparedStatement) pstmt).setAtomicBatch(true);
Atomic Batch is supported only for simple INSERT statements, and consistency is not guaranteed for complex INSERT statements or DML statements such as UPDATE and DELETE.
Use of setFetchSize()#
When the Altibase JDBC Driver gets the data of a ResultSet from the server, it fetches multiple rows at once and caches them on the client (prefetch).
With the setFetchSize() method, the user can specify the number of records to fetch from the DB server at one time. (It can also be specified with the fetch_enough connection attribute.)
If 0 is set, the Altibase server decides the size to return at one time, and the number of rows returned depends on the size of one row.
However, because the client memory increases in proportion to the number of records specified in setFetchSize, it is not recommended to set the value of setFetchSize too large.
For example, in a program that fetches 5000-byte records, setFetchSize(1000) uses about 5000*(1000-10)=4950K bytes more memory than setFetchSize(10).
Releasing Resources#
When finishing using a Connection, Statement, or ResultSet object, the close() method must be explicitly called to release the resource.
If close() is not called, unused Connection, Statement, and ResultSet objects may remain in the heap memory.
In particular, if a Statement object remains in the heap memory, the DB server must keep the prepared SQL, so unnecessary memory of the DB server increases. (The same is true for PreparedStatement.)
Handling NULL Values#
When using a PreparedStatement object, the setObject() and setNull() methods can be used to set a NULL value.
-
Use the setObject(parameterIndex, null, java.sql.Types.NULL) method
-
Use the setNull(parameterIndex, java.sql.Types.NULL) method
Altibase does not support the setObject(parameterIndex, null) method.
LOB Data Processing#
The LOB data types supported by Altibase are BLOB and CLOB, and each can have a maximum size of 4GB-1byte. (JDK 1.6 or later)
To process LOB data correctly, the autocommit mode of the session must meet one of the following conditions.
-
Disable autocommit by calling setAutoCommit(false) of the Connection object, and control transactions manually
-
Set the clientside_auto_commit connection attribute to on so that the JDBC Driver controls the autocommit of transactions
Since autocommit is on by default in JDBC, processing LOB data without setting one of the above conditions may cause an error or unwanted results.
Also consider the following when processing LOB data.
-
It is recommended to use a Stream or Writer object when manipulating LOB data. If the size of the LOB data is 8192 bytes or less, set the lob_cache_threshold connection attribute to an appropriate value.
-
When using a large number of LOB objects, the acquired LOB objects must be explicitly released with the free() method, regardless of whether the transaction is committed.
Blob blob = rs.getBlob(1);
...
// Freeing the LOB Locator
((Altibase.jdbc.driver.AltibaseLob) blob).free();
For examples of integrating LOB data, refer to the java source files in $ALTIBASE_HOME/sample/JDBC/CLOB and BLOB, and the Altibase 7.1 JDBC User's Manual - LOB.
How to Use REF CURSOR#
How to use REF CURSOR in a Java program is as follows.
First, define a TYPE and a procedure that returns a REF CURSOR.
-- Define TYPE
CREATE OR REPLACE TYPESET my_type
AS
TYPE my_cur IS REF CURSOR;
END;
/

-- Define REF CURSOR
CREATE OR REPLACE PROCEDURE my_ref_cursor
( v_result OUT my_type.my_cur, v_sql IN VARCHAR(1000) )
AS
BEGIN
OPEN v_result FOR v_sql;
END;
/
The following is Java code that calls the above procedure.
AltibaseRefCursor.java
...
String sql = "SELECT to_char(sysdate,'YYYY-MM-DD') FROM dual";
altibaseStatement3 = altibaseConnection1.prepareCall("{call my_ref_cursor(?)}");
altibaseStatement3.setString(1, sql);
altibaseStatement3.execute();
rs = altibaseStatement3.getResultSet();
while (rs.next()) {
    System.out.println(rs.getString(1));
}
Errors#
This section describes errors frequently encountered during development.
Communication link failure#
Causes#
-
When the DB is not running
-
When connection-related properties are incorrect
-
When the version of the Altibase JDBC Driver does not match the server (e.g. when the cm protocol version of the server and the CMP version of the JDBC Driver are different)
-
When the connection is lost due to a TIMEOUT during service
Solutions#
-
Error when connecting: Check the connection-related properties such as the DB server IP, port number, user, and password
-
Error during service: Check whether the session was terminated because a TIMEOUT occurred
No suitable driver#
Causes#
-
When the Altibase JDBC Driver is not in the CLASSPATH or the driver class is not loaded
-
When the format of the connection URL is incorrect (e.g. a typo in the jdbc:Altibase:// prefix)
Solutions#
-
Check the CLASSPATH and the driver class name (Altibase.jdbc.driver.AltibaseDriver)
-
Check the format of the connection URL
SQL-client unable to establish SQL-connection#
Causes#
When the Altibase server is not running, or the client cannot connect to the specified IP address or port number
Solutions#
Check whether the Altibase server is running, the connection information (IP address, port number), and the network status
Timeout-related Errors#
Causes#
When the defined Timeout value is exceeded
Solutions#
-
Adjust the Timeout value
-
Refer to the troubleshooting guide
When a client program requests a task from the DB server, the client receives an error message, and an error log is recorded on the server.
| Type | Client error message | Server error message (altibase_boot.log) | Result |
|---|---|---|---|
| QUERY_TIMEOUT | Client's query exceeded in the execution time limitation | [Notify : Query Timeout] Query Canceled by Server | ROLLBACK the statement and return an error |
| FETCH_TIMEOUT | Communication link failure. | [Notify : Fetch Timeout] Session Closed by Server | ROLLBACK the statement and close the session |
| IDLE_TIMEOUT | Communication link failure. | [Notify : Idle Timeout] Session Closed by Server | ROLLBACK the statement and close the session |
| UTRANS_TIMEOUT | The session has been closed by server. | [Notify : UTrans Timeout] Session Closed by Server | ROLLBACK the statement and close the session |
Location of server error messages: $ALTIBASE_HOME/trc/altibase_boot.log
Each Timeout value can be specified per session not only with server properties but also with JDBC connection attributes (query_timeout, fetch_timeout, idle_timeout, utrans_timeout).
| Connection attribute | Description | Default value |
|---|---|---|
| query_timeout | Limit of query execution time (seconds) | 600 |
| fetch_timeout | Limit of SELECT statement execution time (seconds) | 60 |
| idle_timeout | Limit of time to keep a connection without any work (seconds) | 0 |
| utrans_timeout | Limit of UPDATE statement execution time (seconds) | 3600 |
If the value of each attribute is 0, it means infinite.
The time the client waits for a connection and a response can be specified with the login_timeout and response_timeout connection attributes. For details, refer to the Altibase 7.1 JDBC User's Manual - Timeout.
Invalid descriptor index#
Causes#
When calling setXXX() with more values than the bind variables specified in the PreparedStatement
Solutions#
Adjust the bind variables
Optional feature not implemented#
Causes#
When calling a method not provided by Altibase
Solutions#
For JDBC API support, refer to the Altibase 7.1 JDBC User's Manual - JDBC 4.2 API References