Altibase ODBC Development Guide in Windows Environment#
Overview#
This document explains how to install and configure the Altibase ODBC Driver on Windows, and how to connect to Altibase from various development tools using the ODBC Driver.
Test Environment#
The examples in this document were tested in the following environment.
- Altibase version: Altibase 6.5.1
- Operating system: Windows 10
Info
For errors and improvements related to this document, please contact the technical support portal or technical support center.
- Technical support portal: http://support.altibase.com/en
- Technical support center: +82-2-2082-1114
Info
This document is provided for informational purposes only and is subject to change without prior notice. It may contain errors, and Altibase makes no express or implied warranties of any kind, including but not limited to warranties of merchantability or fitness for a particular purpose.
The development, release, and timing of any features or functionality described for Altibase products in this document are at the sole discretion of Altibase.
Altibase may hold patents, trademarks, copyrights, or other intellectual property rights related to the contents of this document.
Configuring the ODBC Driver#
To develop Altibase applications in an ODBC environment, you first need to install the ODBC Driver provided by Altibase.
The ODBC Driver for Altibase 6.5.1 is available for download from the Altibase Customer Support Portal. For Altibase 7.1 and Altibase 7.3, request the ODBC Driver installation package from Altibase.
Downloading the ODBC Driver#
Sign in to the Altibase Customer Support Portal and go to Download > Products to download the Windows ODBC Driver for your version.


If the version you need is not listed on the website, contact Altibase Customer Support Portal.
Installing the ODBC Driver#
For a first-time installation, download and install the Windows Client package. Installing the Windows Client package and the Altibase ODBC Driver is straightforward, so this document does not cover the steps in detail.
During the Windows Client installation, the following screen asks whether to install the ODBC Driver.

Setting Up an ODBC Data Source in Control Panel#
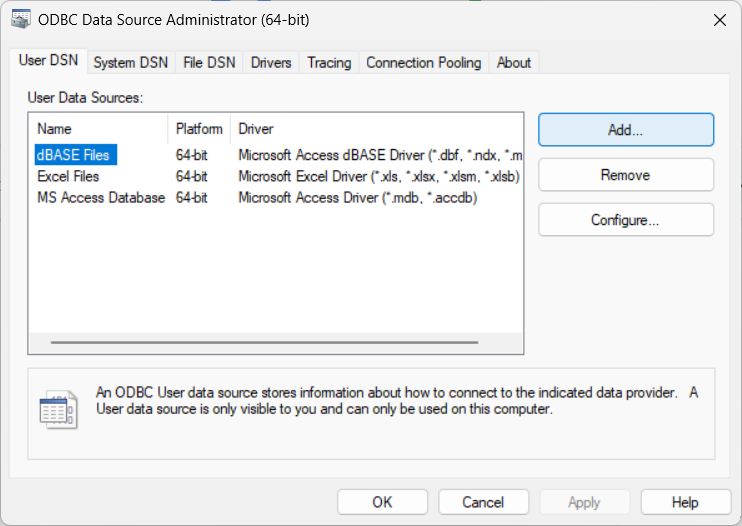
To register the Altibase ODBC Driver, open ODBC Data Sources (64-bit) and click Add.
Select ALTIBASE_HDB_ODBC_64bit from the driver list and click Finish.

When the connection settings dialog appears, enter your connection information.

| Item | Description | Example |
|---|---|---|
| Windows DSN Name | A unique name that identifies this DSN | SERVER1 |
| Host (name or IP) | IP address or host name of the Altibase server | 192.168.1.35 |
| Port (default 20300) | Port number of the Altibase server | 20300 |
| User | Database user account | sys |
| Password | Password for the database user account | manager |
| DB Name | Database name (DB_NAME) specified when the database was created | mydb |
| NLS_USE | Database character set | MS949 |
After you fill in all the fields, click Test Connection to check whether the ODBC Driver can connect to Altibase. The Altibase server must be running to test the connection.
Once the setup is complete, the new data source appears in the ODBC data source list as shown below.

Developing ODBC Applications#
When you connect to the Altibase server through the ODBC Driver, you rarely need to modify your source code. In most cases, you only need to change the ODBC connection string in your connection code.
Compile your application with the header files (such as windows.h, sql.h, sqlext.h, and afxdb.h) and libraries (such as odbc32.lib) required to use the ODBC Driver on Windows.
ODBC Connection String#
Applications that use the ODBC Driver specify a connection string in the following format.
DRIVER=ALTIBASE_HDB_ODBC_64bit;user=sys;password=manager;Server=127.0.0.1;PORT=20300;NLS_USE=MS949;LongDataCompat=on
Keep the keywords to the left of each = unchanged, and replace the values to the right with the connection information of your Altibase server and the name of your ODBC Driver.
| Keyword | Description |
|---|---|
DRIVER |
Name of the Altibase ODBC Driver as shown in the ODBC Data Source Administrator |
user |
Database user account |
password |
Password for the database user account |
Server |
IP address of the Altibase server |
PORT |
Port number of the Altibase server |
NLS_USE |
Database character set |
LongDataCompat |
on or off. Set this to on to work with large data such as BLOBs. |
Visual C++ Example#
The following example shows how to connect to Altibase using the MFC CDatabase class in Visual C++.
#include "stdafx.h"
#include <Afx.h>
#include <Afxdb.h>

int _tmain(int argc, _TCHAR* argv[])
{
    CDatabase db;

    try
    {
        db.OpenEx(_T("DRIVER=ALTIBASE_HDB_ODBC_64bit;user=sys;password=manager;Server=127.0.0.1;PORT=20300;NLS_USE=MS949;LongDataCompat=on"),
                  CDatabase::noOdbcDialog);
        AfxMessageBox(_T("Connect OK"));
    }
    catch (CDBException *e)
    {
        AfxMessageBox(e->m_strError);
    }

    return 0;
}
Visual C# Example#
The following example shows how to connect to Altibase using the OdbcConnection class in Visual C#.
using System;
using System.Collections.Generic;
using System.Linq;
using System.Text;

using System.Data.Odbc;

namespace ConsoleApplication1
{
    class Program
    {
        static void Main(string[] args)
        {
            OdbcConnection cn = new OdbcConnection();

            try
            {
                cn.ConnectionString = "DRIVER=ALTIBASE_HDB_ODBC_64bit;user=sys;password=manager;Server=127.0.0.1;PORT=20300;NLS_USE=MS949;LongDataCompat=on";
                cn.Open();
                Console.WriteLine("connect ok");
            }
            catch (OdbcException ex)
            {
                Console.WriteLine(ex.Message);
            }

            Console.ReadLine();
        }
    }
}
Visual Basic Example#
The following Visual Basic example connects to Altibase and retrieves the current date and time. You can achieve the same result with ADO objects.
Sub Main()

    Dim cn As Odbc.OdbcConnection
    Dim cmd As Odbc.OdbcCommand
    Dim dr As Odbc.OdbcDataReader

    cn = New Odbc.OdbcConnection
    cmd = New Odbc.OdbcCommand

    cn.ConnectionString = "DRIVER=ALTIBASE_HDB_ODBC_64bit;user=sys;password=manager;Server=127.0.0.1;PORT=20300;NLS_USE=MS949;LongDataCompat=on"

    Try
        cn.Open()
        Console.WriteLine("Successfully connected.")
        cmd.Connection = cn

        cmd.CommandText = "SELECT TO_CHAR(SYSDATE, 'YYYY-MM-DD HH:MI:SS') FROM DUAL"

        dr = cmd.ExecuteReader()
        While (dr.Read())
            Console.WriteLine(dr.GetString(0))
        End While
    Catch ex As Odbc.OdbcException
        Console.WriteLine("An error occurred while connecting. " + ex.Message)
    End Try

    Console.ReadLine()
End Sub
Notes on Using LOBs#
To use LOB data types in Altibase, you must switch the connection to non-autocommit mode.
If you work with LOB data in autocommit mode, queries return NULL for LOB columns, and INSERT or UPDATE statements fail with the following error.
Connection is in autocommit mode. One can not operate on LOB datas with autocommit mode on.
The following C# examples show how to insert BLOB data into a table and read it back.
- Inserting BLOB data: After connecting to the database, the example starts a transaction to switch to non-autocommit mode and then inserts the data. The
blobvariable is declared asByte[]. - Retrieving BLOB data: The example gets the length of the BLOB data with the Altibase
BINARY_LENGTHfunction, allocates aByte[]buffer of that length, reads the data into the buffer, and writes it to a file.
Example: Inserting BLOB Data#
// BLOB INSERT
FileStream fs = new FileStream("c:\\test.dat", FileMode.Open, FileAccess.Read);

Byte[] blob = new byte[fs.Length];
fs.Read(blob, 0, System.Convert.ToInt32(fs.Length));
fs.Close();

OdbcTransaction tx = cn.BeginTransaction();
cmd.Transaction = tx;
cmd.CommandText = "INSERT INTO T1 (C1, C2) VALUES (?, ?)";
cmd.Parameters.Add("C1", OdbcType.Int);
cmd.Parameters.Add("C2", OdbcType.Binary);
cmd.Parameters[0].Value = 1;
cmd.Parameters[1].Value = blob;
cmd.ExecuteNonQuery();
tx.Commit();
Example: Retrieving BLOB Data#
// BLOB SELECT
cmd.CommandText = "SELECT BINARY_LENGTH(C2), C2 FROM T1";
tx = cn.BeginTransaction();
cmd.Transaction = tx;
OdbcDataReader dr = cmd.ExecuteReader();
int len;

while (dr.Read())
{
    len = dr.GetInt32(0);
    Byte[] ff = new Byte[len];
    dr.GetBytes(1, 0, ff, 0, len);

    fs = new FileStream("c:\\test.dat", FileMode.CreateNew, FileAccess.Write);
    fs.Write(ff, 0, len);
    fs.Close();
}