Altibase Installation Guide#
Overview#
This document describes how to install Altibase products using the Altibase Package Installer.
This document is based on the native compiler of each platform. gcc/g++ is not covered separately because it requires no special precautions other than selecting the compilation bitness.
The test environment for this document is as follows.
- Altibase: Altibase 7.1
- OS: Linux (2.6.32-504.el6.x86_64)
Info
For errors and improvements related to this document, please contact the technical support portal or technical support center.
- Technical support portal: http://support.altibase.com/en
- Technical support center: +82-2-2082-1114
Info
This document is provided for informational purposes only and is subject to change without prior notice. It may contain errors, and Altibase makes no express or implied warranties of any kind, including but not limited to warranties of merchantability or fitness for a particular purpose.
The development, release, and timing of any features or functionality described for Altibase products in this document are at the sole discretion of Altibase.
Altibase may hold patents, trademarks, copyrights, or other intellectual property rights related to the contents of this document.
Altibase Package Installer#
The Altibase Package Installer is a Java-based installer. With the package installer, you can easily install Altibase products such as the database server, client libraries, and tools.
Altibase Home Directory#
The Altibase home directory is the base directory where the Altibase software is installed. When you install with the package installer, the home directory and an APatch directory under it are created.
The default home directory depends on the product being installed.
| Product | Default home directory |
|---|---|
| Altibase server | $HOME/altibase-HDB-server-<version> |
| Altibase client | $HOME/altibase-HDB-client-<version> |
APatch Directory#
The APatch directory is used by the package installer and is located under the Altibase home directory. It stores files containing information about the installed product and the applied patches.
The following shows the contents of the APatch directory after Altibase 7.1.0.0.0 is first installed.
$ ls -la
-rw-------  1 altibase altibase  157724 Jun 16  2023 altibase_base_install.log
-rw-rw-rw-  1 altibase altibase     503 May 31  2023 patchinfo
-rw-rw-rw-  1 altibase altibase      90 May 31  2023 pkg_patch_0_0_0_0.txt
-rwx------  1 altibase altibase 4159980 Jun 16  2023 uninstall-p0_0_0_0
Each file and directory is described below.
patchinfo#
This file records information about the currently installed Altibase product, including:
- The base release version and patch version
- The environment in which the product was built, such as the OS, OS patch, C/C++ compiler, and Java
PRODUCT_SIGNATURE=server-7.1.0-64-release
PATCH_VERSION=0_0_0_0
=======  OS INFO  =======
Linux rhel6-x64 2.6.32-71.el6.x86_64 #1 SMP Wed Sep 1 01:33:01 EDT 2010 x86_64 x86_64 x86_64 GNU/Linux
=======  PATCH INFO  =======
2.6.32-71.el6.x86_64
=======  COMPILER INFO  =======
gcc version 4.6.3 (GCC)
glibc 2.12
=======  JAVA INFO  =======
java version "1.5.0_22"
Java(TM) 2 Runtime Environment, Standard Edition (build 1.5.0_22-b03)
Java HotSpot(TM) 64-Bit Server VM (build 1.5.0_22-b03, mixed mode)
pkg_patch_x_x_x_x.txt#
This file is created automatically as pkg_patch_<installed version number>.txt each time the product is installed or patched. It records the revision number of the source code modified to build the patch.
The following example shows the directory right after installing base release 7.1.0.0.0.
$ ls -la
-rw-rw-rw-  1 altibase altibase      90 May 31  2023 pkg_patch_0_0_0_0.txt
The following shows the contents of the APatch directory after applying patch 7.1.0.0.10.
$ ls -la
-rw-rw-rw-  1 altibase altibase      90 May 31  2023 pkg_patch_0_0_0_0.txt
-rw-r--r--  1 altibase altibase      90 May 19 03:54 pkg_patch_0_0_0_10.txt

$ cat pkg_patch_0_0_0_10.txt
Repository: /altidev4/tags/altibase_7_1_0_0_10_tag/
Revision: xxxxx
Last Changed Rev: xxxxx
altibase_base_install.log#
This file records every action performed during the most recent installation.
Backup Directories and Uninstall Files#
When installing a patch, the package installer backs up the files that the patch modifies and stores them in the $ALTIBASE_HOME/APatch directory. A separate backup directory (rollback-p<patch version>) is created for each patch and is used later to roll back that patch.
The executables used to uninstall the product or roll back a patch (uninstall-p<version>) are also created in the $ALTIBASE_HOME/APatch directory when the product is installed or a patch is applied.
Caution
- On HP-UX, automatic backup and rollback are not supported when installing a patch. You must back up data files and log files yourself.
- Only files installed by the package installer are backed up to the backup directory. Files created after installation, such as data files and log files, are not backed up.
The following shows the contents of the APatch directory after installing base release 7.1.0.0.0.
$ ls -la
-rw-------  1 altibase altibase  157724 Jun 16  2023 altibase_base_install.log
-rw-rw-rw-  1 altibase altibase     503 May 31  2023 patchinfo
-rw-rw-rw-  1 altibase altibase      90 May 31  2023 pkg_patch_0_0_0_0.txt
-rwx------  1 altibase altibase 4159980 Jun 16  2023 uninstall-p0_0_0_0     # Executable that uninstalls base release 7.1.0.0.0
The following shows the contents of the APatch directory after applying patch 7.1.0.0.10.
$ ls -la
-rw-------  1 altibase altibase   38817 May 24 08:10 altibase_base_install.log
-rw-r--r--  1 altibase altibase     503 May 19 03:54 patchinfo
-rw-rw-rw-  1 altibase altibase      90 May 31  2021 pkg_patch_0_0_0_0.txt
-rw-r--r--  1 altibase altibase      90 May 19 03:54 pkg_patch_0_0_0_10.txt
drwx------  3 altibase altibase    4096 May 24 08:10 rollback-p0_0_0_10     # Backup of the files modified by patch 7.1.0.0.10
-rwx------  1 altibase altibase 4159911 Jan 28  2022 uninstall-p0_0_0_0
-rwx------  1 altibase altibase 4159851 May 24 08:10 uninstall-p0_0_0_10    # Executable that removes patch 7.1.0.0.10 and restores the previous version
Installing Products with the Package Installer#
This chapter describes how to install Altibase products on Unix/Linux.
System Requirements#
The requirements and recommendations below assume a general-purpose database. They may vary depending on your database system and usage, so contact the Technical Support Portal for details.
| Item | Requirement |
|---|---|
| Memory | 64-bit OS: at least 1GB (recommended: 2GB or more, no maximum limit) |
| CPU | 1 CPU or more (recommended: 2 CPUs or more) |
| Hard disk | Enough space is required for tablespaces, transaction logs, and the Altibase software. The Altibase software and transaction logs each require at least 1GB. At least 12GB of free space is recommended for smooth operation. |
| Network | A dedicated line is recommended when using replication. |
Installation Steps#
Altibase products are installed by following steps 1 to 11 below.
1. Pre-check the Installation Environment#
Before installing the product, the package installer checks whether the machine meets the installation requirements. This check runs internally without being shown on screen and verifies the following:
- OS name and version
- OS mode (64-bit or 32-bit)
If the checked information does not match the package, the installer prints an error message and stops the installation. This catches system configuration problems early and reduces the chance of problems during installation.
2. Download the Package Installer#
Download the package installer for your OS from the Technical Support Portal.
Package installer file names follow these rules.
# Altibase server package installer
altibase-server-7.1.0.0.0-LINUX-X86-64bit-release.run

# Altibase client package installer
altibase-client-7.1.0.0.0-LINUX-X86-64bit-release.run
The server and client packages are provided separately, and the server package includes the client package.
Package installers are provided for each OS. Refer to the Altibase Supported Platforms page for the OS and CPU supported by each version, and choose the appropriate package installer.
3. Run the Package Installer#
The package installer can run in either of two modes:
- Interactive command-line mode: used when the DISPLAY environment variable is not set
- GUI (Graphical User Interface) mode: used when the DISPLAY environment variable is set
Caution
If the DISPLAY environment variable is set to an incorrect IP or port, the installer may appear to hang. In that case, use one of the following:
- Unset the DISPLAY environment variable and then run the .run file.
- Run the .run file with the
--mode textoption.
On Unix, grant execute permission to the package installer after downloading it.
$ chmod +x altibase-server-7.1.0.0.0-LINUX-X86-64bit-release.run
Run the package installer.
$ ./altibase-server-7.1.0.0.0-LINUX-X86-64bit-release.run
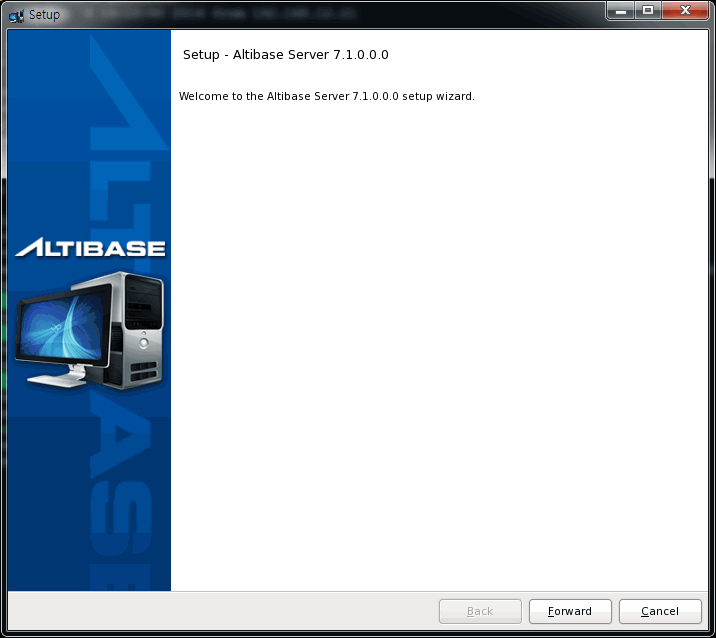
In GUI mode, the following start screen appears.
4. Enter the Installation Directory and Select the Installation Type#
On the installation directory screen, enter the Altibase home directory (the directory where Altibase will be installed) and select the installation type.
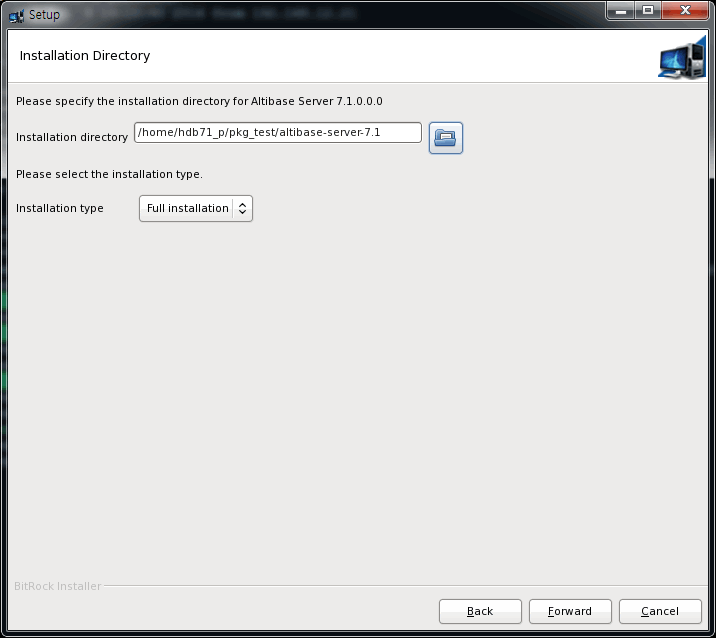
Select "Full Installation" for a new installation, or "Patch Installation" to apply a patch to an existing version.
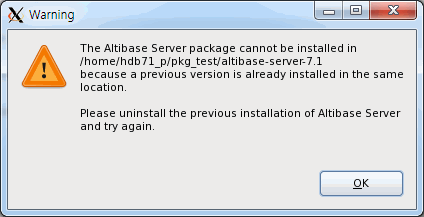
If an Altibase product is already installed in the directory you entered, a warning message appears. In that case, choose a different directory or uninstall the product in that directory first.
5. Set Altibase Properties#
Altibase properties are set in three steps:
- Step 1: Basic Database Operation Properties
- Step 2: Database Creation Properties
- Step 3: Set Database Directories
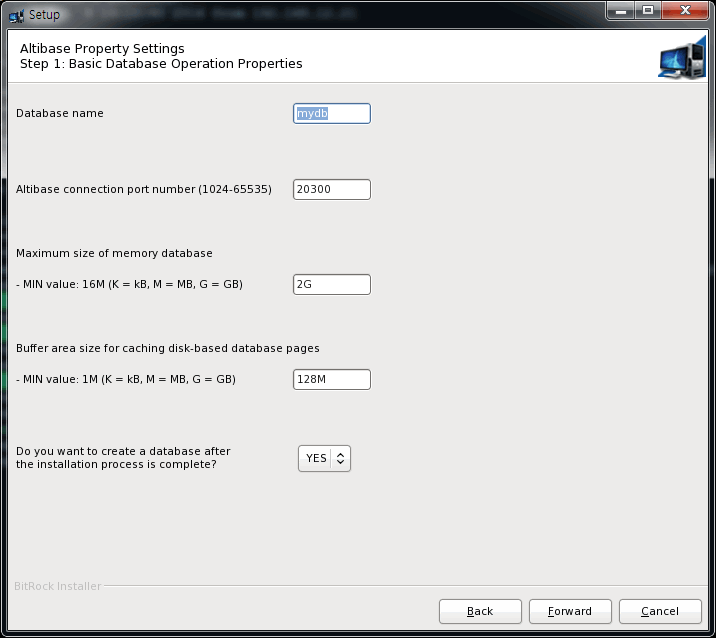
Step 1: Basic Database Operation Properties
Set the following items:
- Database name
- Connection port number
- Maximum size of the memory database
- Buffer size
- Whether to generate an SQL script for creating a database: if you select YES, Step 2 is performed; otherwise Step 2 is skipped.
Regardless of whether the script is generated, you can create a database after installation with the server create <database character set> <national character set> command.
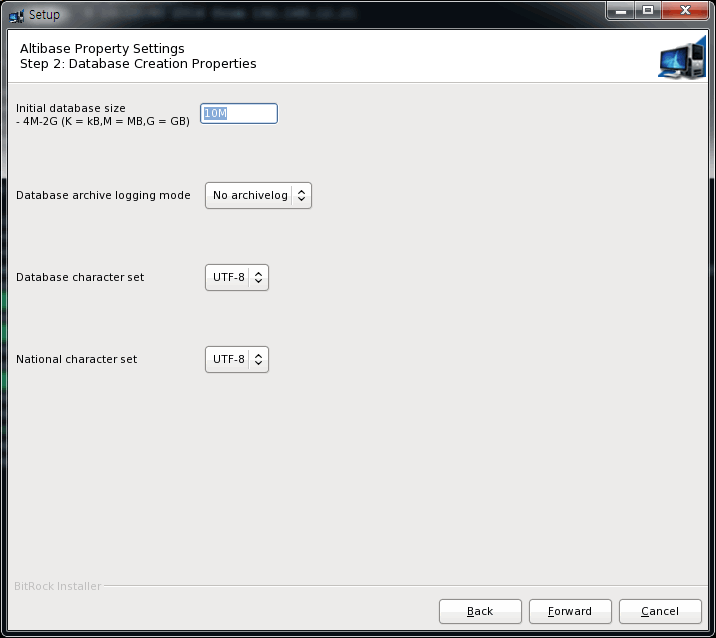
Step 2: Database Creation Properties
Set the following items. The SQL script generated here is saved in the $ALTIBASE_HOME/install/post_install.sh file.
| Item | Values |
|---|---|
| Initial database size | - |
| Database archive log mode | Noarchivelog, Archivelog |
| Database character set | MS949, US7ASCII, KO16KSC5601, BIG5, GB231280, MS936, UTF-8, SHIFT-JIS, MS932, EUC-JP |
| National character set | UTF-16, UTF-8 |
Step 3: Set Database Directories
Set the following directories:
- Disk database directory
- Memory database directory
- Archive log directory
- Transaction log directory
- Log anchor file directory
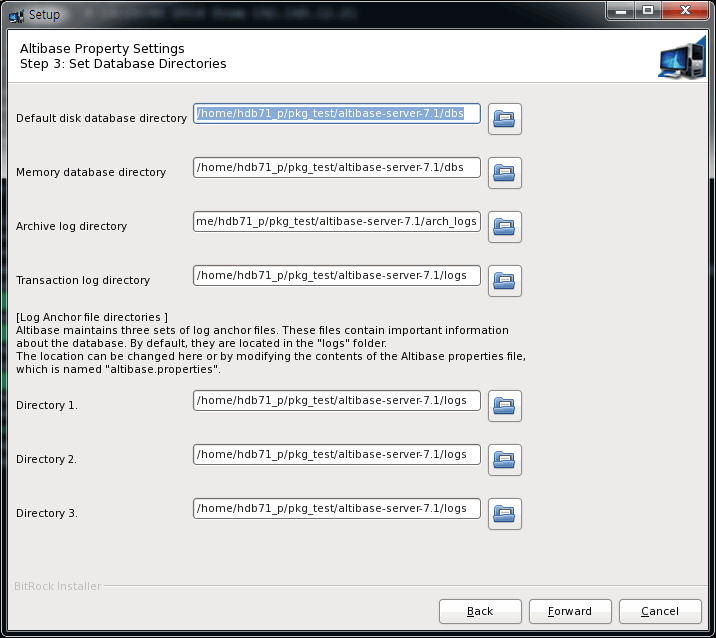
To set properties not covered in these steps, or to change the values set here later, edit the $ALTIBASE_HOME/conf/altibase.properties file directly.
6. Check Altibase Properties#
The property values set in the previous steps are displayed.
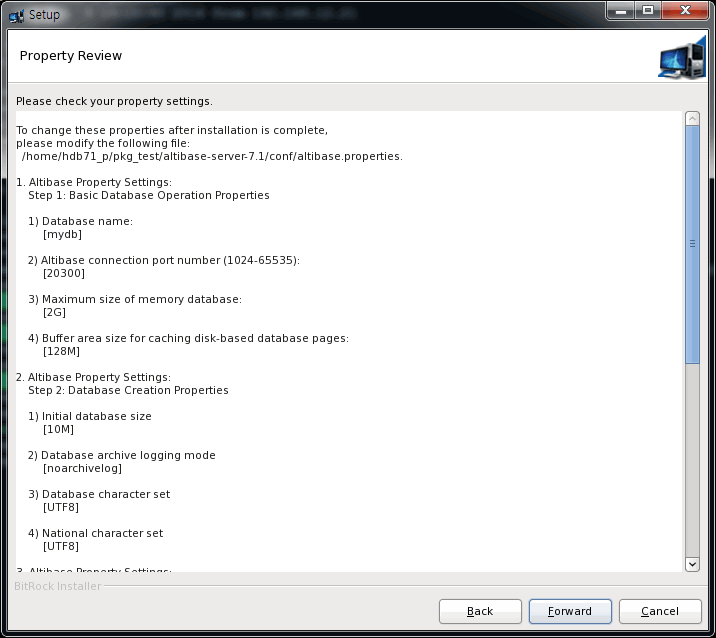
The following is an example of what is displayed.
To change these properties after installation is complete,
please modify the following file:
 /home/hdb71_p/pkg_test/altibase-server-7.1/conf/altibase.properties.
1. Altibase Property Settings:
   Step 1: Basic Database Operation Properties
   1) Database name:
      [mydb]
   2) Altibase connection port number (1024-65535):
      [20300]
   3) Maximum size of memory database:
      [2G]
   4) Buffer area size for caching disk-based database pages:
      [128M]
2. Altibase Property Settings:
   Step 2: Database Creation Properties
   1) Initial database size
      [10M]
   2) Database archive logging mode
      [noarchivelog]
   3) Database character set
      [UTF8]
   4) National character set
      [UTF8]
3. Altibase Property Settings:
   Step 3: Set Database Directories The database will not operate properly if any of these directories are removed.
   1) Disk database directory:
      [/home/hdb71_p/pkg_test/altibase-server-7.1/dbs]
   2) Memory database directory:
      [/home/hdb71_p/pkg_test/altibase-server-7.1/dbs]
   3) Archive log directory:
      [/home/hdb71_p/pkg_test/altibase-server-7.1/arch_logs]
   4) Transaction log directory:
      [/home/hdb71_p/pkg_test/altibase-server-7.1/logs]
   5) Log Anchor file directories:
      Directory 1: [/home/hdb71_p/pkg_test/altibase-server-7.1/logs]
      Directory 2: [/home/hdb71_p/pkg_test/altibase-server-7.1/logs]
      Directory 3: [/home/hdb71_p/pkg_test/altibase-server-7.1/logs]
After checking the values, click "Forward" and the "Ready to Install" screen appears as shown below.
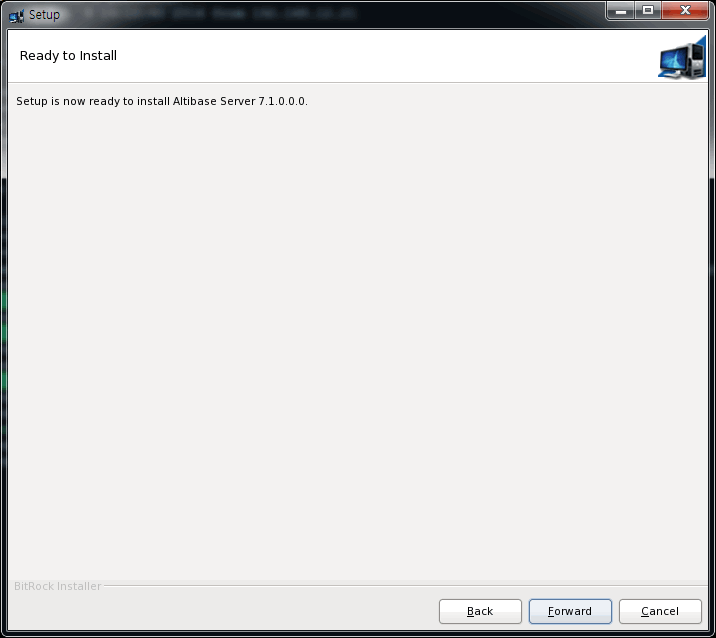
Click "Forward" to continue the installation.
7. Install Altibase Products#
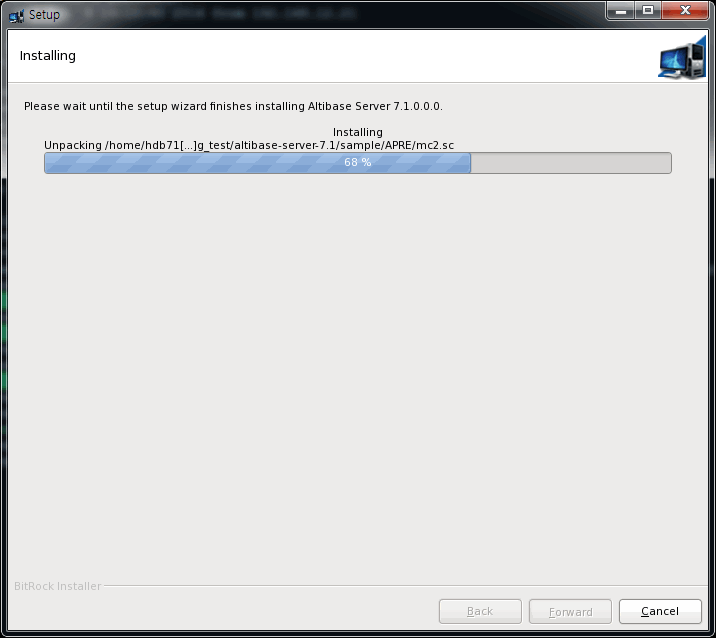
When the product installation finishes, the installer performs the following tasks without displaying a screen:
- Applies the configured properties to the altibase.properties file.
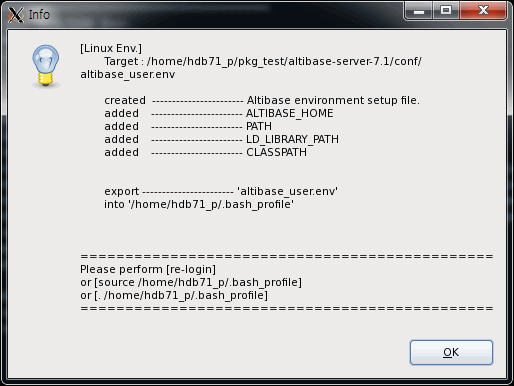
- Creates the altibase_user.env file, which contains the basic environment variables required to run the Altibase server, in the $ALTIBASE_HOME/conf directory, and adds a command that runs this file to the user account's shell profile (.bashrc, .bash_profile, .profile, etc.).
8. Enter the Altibase License#
This screen is for entering the Altibase license key. The license key can be registered in one of three ways:
- Enter the license key directly
- Select a file containing the license key
- Register the license later
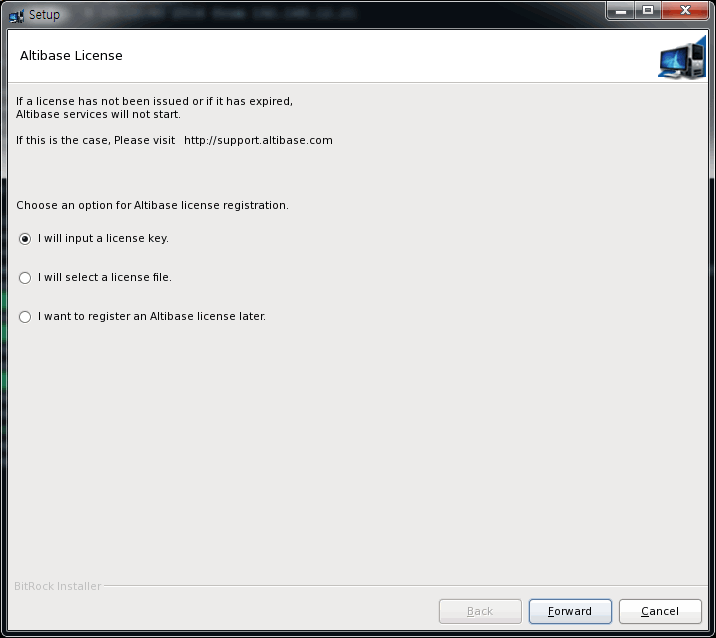
If you do not have a license key yet, choose to register it later, and copy the license file to the $ALTIBASE_HOME/conf directory afterward.
$ cp license $ALTIBASE_HOME/conf/
Note
If you do not register a license key in this step, the installer will not ask whether to create a database in the next step.
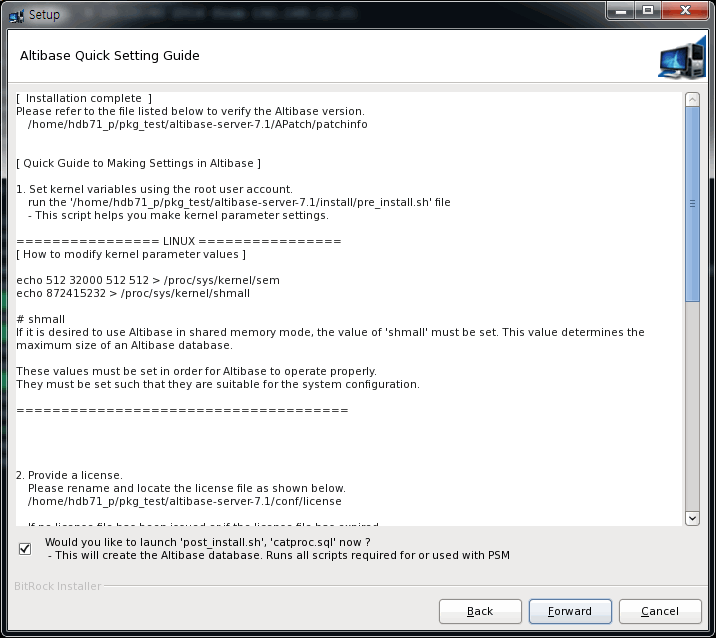
9. Preview the Altibase Quick Setup Guide#
The Quick Setup Guide screen explains how to start Altibase after installation. The package installer provides the following scripts to help with kernel parameters, environment variables, and database creation.
| Script | Description |
|---|---|
| $ALTIBASE_HOME/install/pre_install.sh | Lists the required kernel parameters with their recommended values and how to set them. |
| $ALTIBASE_HOME/install/post_install.sh | Contains the SQL script for creating a database, if Step 2 of the property settings was performed. |
| $ALTIBASE_HOME/packages/catproc.sql | SQL script required to use PSM. |
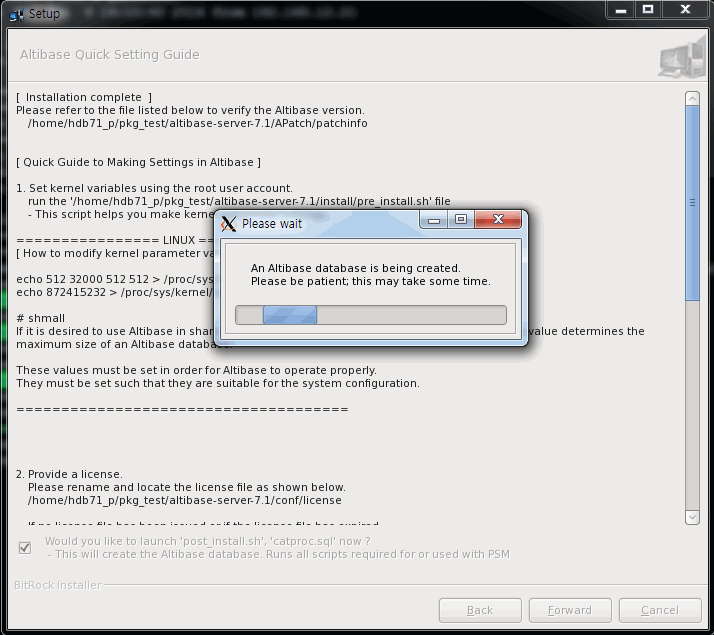
If you select the checkbox on the next screen, the package installer creates the database and runs the PSM script. This makes the installation take a little longer. If you do not select it, you must create the database and run the PSM script yourself after installation.
The following screen appears while the database is being created.
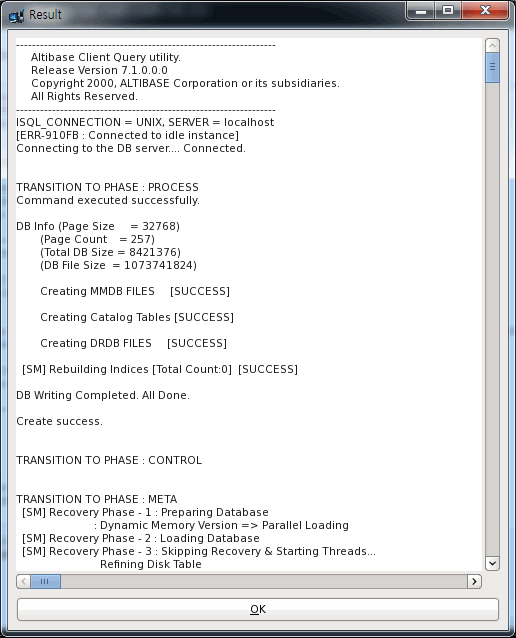
10. Complete the Installation#
When the installation succeeds, the following screen appears.
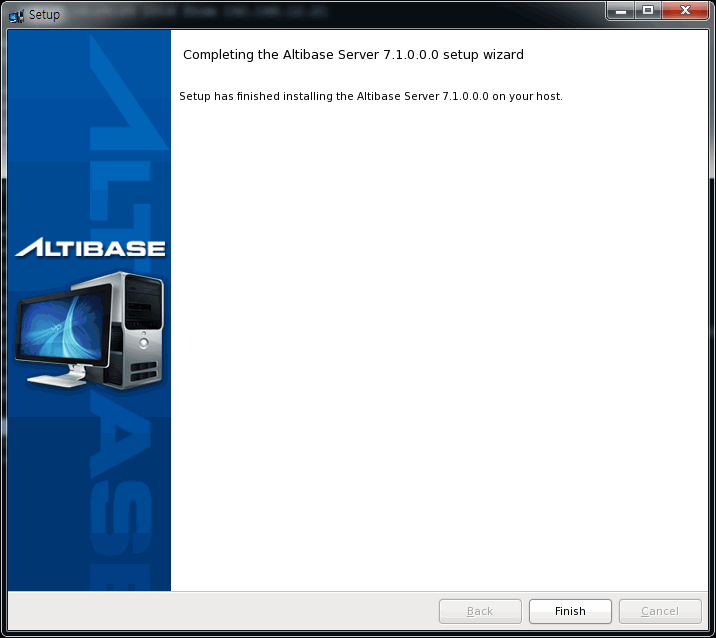
Click the "Finish" button to display the environment setup guide shown below.
11. Post-installation Tasks#
After installation, perform the following tasks.
1) Set kernel parameters
If you did not set kernel parameters during installation, set them yourself by referring to the $ALTIBASE_HOME/install/pre_install.sh file.
2) Apply environment variables
To apply the environment settings added during installation, do one of the following:
- Log out and log back in
- Run
. ~/.bash_profile - Run
source ~/.bash_profile
3) Create the database and run the PSM script
If you did not create a database during installation, create it as follows.
If you entered the database creation properties (Step 2) during installation, run the post_install.sh script.
$ sh $ALTIBASE_HOME/install/post_install.sh dbcreate
If you did not enter the database creation properties, create the database with the server script.
$ server create UTF8 UTF8
If you did not run the PSM script, run catproc.sql.
$ isql -s 127.0.0.1 -u sys -p manager -silent -f $ALTIBASE_HOME/packages/catproc.sql
Reference#
Requesting a License#
Altibase is commercial software, so you must purchase a license to provide services with Altibase. To purchase a license, contact a sales representative (sales@altibase.com).
When you purchase a license, you receive a license certificate that includes a warranty. The license certificate contains a license key that matches the machine on which Altibase will be installed.
How to Find the MAC Address by OS#
To be issued an Altibase license, you need the MAC address of the machine on which Altibase will be installed. The MAC address can be found on each OS as follows.
Linux#
Run ifconfig -a or /sbin/ifconfig -a.
$ ifconfig -a
eth0      Link encap:Ethernet  HWaddr 14:DA:E9:68:A9:55
          inet6 addr: fe80::16da:e9ff:fe68:a955/64 Scope:Link
          UP BROADCAST RUNNING MULTICAST  MTU:1500  Metric:1
          RX packets:6 errors:0 dropped:0 overruns:0 frame:0
          TX packets:6 errors:0 dropped:0 overruns:0 carrier:0
          collisions:0 txqueuelen:1000
          RX bytes:360 (360.0 b)  TX bytes:468 (468.0 b)
          Interrupt:36 Base address:0x2000
Enter the 12 digits of the HWaddr value without the colons (:).
Example: 14:DA:E9:68:A9:55 → 14DAE968A955
AIX#
Run lscfg -vp or lscfg -vpl.
$ lscfg -vp | grep -i 'network address'
        Network Address.............10000000C98FA544
        Network Address.............00215E891312
        Network Address.............00215E891313
        Network Address.............E41F131EB561
Enter the 12-digit Network Address value as is.
Example: 00215E891312 → 00215E891312
Solaris#
Run ifconfig -a as root.
# ifconfig -a
lo0: flags=1000849 mtu 8232 index 1
        inet 127.0.0.1 netmask ff000000
eri0: flags=1000843 mtu 1500 index 2
        inet 192.168.1.69 netmask ffffff00 broadcast 192.168.1.255
        ether 0:3:ba:b0:64:9d
lo0: flags=2000849 mtu 8252 index 1
        inet6 ::1/128
eri0: flags=2000841 mtu 1500 index 2
        ether 0:3:ba:b0:64:9d
        inet6 fe80::203:baff:feb0:649d/10
Remove the colons (:) from the ether value, pad any single-digit part with a leading 0, and enter the resulting 12 digits.
Example: 0:3:ba:b0:64:9d → 0003bab0649d
HP-UX#
Run lanscan or /usr/sbin/lanscan.
$ /usr/sbin/lanscan
Hardware Station        Crd Hdw   Net-Interface  NM  MAC   HP-DLPI DLPI
Path     Address        In# State NamePPA        ID  Type  Support Mjr#
0/4/2/0  0x0017A4517308 0   UP    lan0 snap0     1   ETHER Yes     119
0/4/2/1  0x0017A4517309 0   UP    lan1 snap1     2   ETHER Yes     119
Enter the 12 digits of the Station Address value without the 0x prefix.
Example: 0x0017A4517308 → 0017A4517308
Windows#
Run ipconfig /all at the command prompt.
C:\> ipconfig /all

Ethernet adapter Local Area Connection:

   Connection-specific DNS Suffix  . :
   Description . . . . . . . . . . . : Intel(R) 82579V Gigabit Network Connection
   Physical Address. . . . . . . . . : 2C-41-38-05-81-D9
   DHCP Enabled. . . . . . . . . . . : No
   Autoconfiguration Enabled . . . . : Yes
   Link-local IPv6 Address . . . . . : fe80::8d60:b22b:8547:5625%16(Preferred)
   IPv4 Address. . . . . . . . . . . : 192.168.6.5(Preferred)
   Subnet Mask . . . . . . . . . . . : 255.255.255.0
   Default Gateway . . . . . . . . . : fe80::951a:406c:58c6:16e0%16
                                       192.168.6.1
   DNS Servers . . . . . . . . . . . : 192.168.1.3
   NetBIOS over Tcpip. . . . . . . . : Enabled
Enter the 12 digits of the Physical Address value without the hyphens (-).
Example: 2C-41-38-05-81-D9 → 2C41380581D9