JEUS Integration Guide for Altibase#
Overview#
This document is a guide for operating Altibase 6.3.1 integrated with JEUS 6.0. It describes how to install JEUS 6.0 and set its environment variables, and then explains how to integrate it with Altibase.
Info
For errors and improvements related to this document, please contact the technical support portal or technical support center.
- Technical support portal: http://support.altibase.com/en
- Technical support center: +82-2-2082-1114
Info
This document is provided for informational purposes only and is subject to change without prior notice. It may contain errors, and Altibase makes no express or implied warranties of any kind, including but not limited to warranties of merchantability or fitness for a particular purpose.
The development, release, and timing of any features or functionality described for Altibase products in this document are at the sole discretion of Altibase.
Altibase may hold patents, trademarks, copyrights, or other intellectual property rights related to the contents of this document.
JEUS Installation#
There are two ways to install JEUS: in console mode and in GUI mode. This section describes how to install JEUS in Unix/Linux console mode and in Windows GUI mode. JEUS 6.0 requires JDK 5.0 Update 4 (1.5.0_04) or later and at least 300 MB of free disk space.
Basic Installation (Console Mode)#
The following steps describe how to install JEUS from a text-based shell.
-
Download the Unix/Linux version of the JEUS package from the TmaxSoft website.
-
Upload the package to the server where JEUS will be installed, and go to the directory containing the jeus60_unix_generic_ko.bin file.
-
Grant execute permission on the jeus60_unix_generic_ko.bin file so that the console installer can be run.
-
chmod +x jeus60_unix_generic_ko.bin
-
Run jeus60_unix_generic_ko.bin from the console.
[tmax@dev ~]$ ./jeus60_unix_generic_ko.bin Preparing to install... -
Review the license agreement that appears when the file runs, and accept it.
PRESS <ENTER> TO CONTINUE: DO YOU ACCEPT THE TERMS OF THIS LICENSE AGREEMENT? (Y/N): Y -
Select the operating system type.
Choose Platform --------------- Choose current system ( platform-architecture ) 1)HP-UX PA-RISC 2)HP-UX ITANIUM 3)Solaris Ultra-Sparc 4)Solaris x86 5)Solaris x64 6)AIX 5.x PowerPC 7)Linux ITANIUM 8)Linux x86 9)Linux x64 Quit) Quit Installer Choose Current System (DEFAULT: 9): -
Select the installation directory. Press
<Enter>to accept the default, or enter an installation path to use a different directory.Choose Install Folder --------------------- Where would you like to install? Default Install Folder: $HOME/jeus6 ENTER AN ABSOLUTE PATH, OR PRESS <ENTER> TO ACCEPT THE DEFAULT : /app/was/jeus6 -
Select the installation type.
Choose Install Set ------------------ Please choose the Install Set to be installed by this installer. ->1- Full Install 2- Typical ENTER THE NUMBER FOR THE INSTALL SET, OR PRESS <ENTER> TO ACCEPT THE DEFAULT : -
Enter the JDK location.
Choose JDK Folder ----------------- Please Choose a Folder: Input User JDK Folder (DEFAULT: /usr/jdk1.6.0_15): -
Enter the password.
Enter the Password for the administrator account. This password will be registered in JEUS as the first user. Input Password:: Confirm Password:: -
After the password is entered, a summary of the installation settings is displayed. Press
<Enter>to complete the installation.Pre-Installation Summary ------------------------ Please Review the Following Before Continuing: Product Name: JEUS6.0 Install Folder: /app/was/jeus6 Install Set Full Install Disk Space Information (for Installation Target): Required: 308,147,759 bytes Available: 45,215,862,784 bytes PRESS <ENTER> TO CONTINUE:
Setting Environment Variables#
JEUS requires the following system environment variables. They are applied during installation: PATH is recorded in a shell profile such as .profile or .cshrc, and the remaining variables are set in the $JEUS_HOME/bin/jeus.properties file.
By default, they are added to the user's default shell automatically during installation.
| Environment Variable | Description | Value |
|---|---|---|
| PATH | System path | Must include the following: $JEUS_HOME/bin $JEUS_HOME/webserver/bin $JEUS_HOME/lib/system |
| JEUS_HOME | JEUS installation directory | $HOME/jeus6/ |
| JEUS_BASEPORT | The base port among the network ports used by JEUS (default: 9763) | 9763 |
| JEUS_LIBPATH | JEUS library files | $JEUS_HOME/lib/system |
| JAVA_HOME | JAVA2 installation directory | $JAVA_HOME |
JEUS Directories#
The following are subdirectories of the installed JEUS home directory.
$ ~ /jeus6] ls
bin     docs     logs    ThirdPartyLicenses.txt  webserver
config    lib      readme.txt    UninstallerData   workspace
derby    license    samples      webhome
▪ Bin: Contains the JEUS executables.
▪ Config: Contains XML descriptor files, node configuration files, and security configuration files.
▪ Derby: Database used for running examples and testing.
▪ Docs: Contains the JEUS manuals and API documentation.
▪ Lib: Contains the library files used by JEUS. The JEUS class library archive is included in jeus.jar.
▪ License: Contains the JEUS license file.
▪ Logs: Contains log files.
▪ Samples: Contains examples.
▪ Sessiondb: Created when the session server is used in JEUS. It is created after JEUS has been booted at least once, rather than during installation.
▪ UninstallerData: Used for uninstallation.
▪ Webhome: Deployment directory for EJB, Servlet, and JSP applications.
▪ Webserver: Contains the JEUS web server, which is the Servlet Engine listener.
▪ Workspace: Temporary directory used by JEUS. Like Sessiondb, it is created after JEUS has been booted at least once.
Verifying JEUS Startup#
Perform the following steps to verify that JEUS has been installed successfully.
Enter "jeus" at the console prompt.
[tmax@dev ~]$ jeus
***************************************************************
- JEUS Home         : /app/was/jeus6
- JEUS Base Port    : 9736
- Java Vendor       : Sun
- Added Java Option :
***************************************************************
.
.
.
[2014.10.22 11:01:21][0][b396] [dev-1] [MGR-0248] JEUS Manager is READY
-
The message "JEUS Manager is READY" indicates that JEUS Manager has loaded successfully and JEUS is on standby.
-
In another console window, run jeusadmin
<node name>, where<node name>is the host machine name. Log in with the password specified during JEUS installation.[tmax@dev jeus6]$ jeusadmin dev Login name>administrator Password> JEUS 6.0 (Fix#9) administration tool dev> -
After logging in to jeusadmin, you can control the JEUS server with commands such as boot and down.
If the message "connect successful" is displayed, JEUS has booted successfully.dev>boot dev boot done dev_container1 dev> [2014.10.27 14:36:15][2][b396] [dev-18] [MGR-0205] command : boot() [2014.10.27 14:36:15][2][b396] [dev-18] [MGR-0567] trying to start engine container[dev_container1] [2014.10.27 14:36:15][2][b396] [dev-18] [MGR-0128] start engine container[dev_container1] with command … [2014.10.27 14:36:36][2][b396] [container1-83] [WEB-3384] WebtoB connection[unix(hth-0:9900:139)] established [2014.10.27 14:36:36][2][b396] [container1-84] [WEB-3384] WebtoB connection[unix(hth-0:9900:138)] established [2014.10.27 14:36:36][2][b396] [container1-85] [WEB-3384] WebtoB connection[unix(hth-0:9900:140)] established [2014.10.27 14:36:36][2][b396] [container1-87] [WEB-3384] WebtoB connection[unix(hth-0:9900:135)] established [2014.10.27 14:36:36][2][b396] [container1-86] [WEB-3384] WebtoB connection[unix(hth-0:9900:141)] established [2014.10.27 14:36:36][0][b396] [dev-67] [MGR-0303] engine container[dev_container1] initialization successfully done [pid : 1891]If the message "all containers successfully shutdowned" is displayed, JEUS has shut down successfully.dev>down Do you really want to shutdown the node [dev]? (y : n):>y The JEUS node [dev] is down. dev> [2014.10.27 14:38:17][0][b396] [dev-18] [MGR-0207] command : down() [2014.10.27 14:38:17][2][b396] [dev-18] [MGR-0261] shutting down the jeus server ... [2014.10.27 14:38:17][2][b396] [dev-18] [MGR-0566] attempt to shutdown all running container [2014.10.27 14:38:17][2][b396] [dev-18] [MGR-0568] trying to shutdown container dev_container1 [2014.10.27 14:38:17][2][b396] [container1-18] [MGR-0103] engine container[dev_container1] is STOPPING … [2014.10.27 14:38:17][2][b396] [container1-18] [JMXR-0102] JMXConnector is shutting down [2014.10.27 14:38:17][1][b396] [container1-18] [Network-1023] OnePortServer virtual listener /JEUSMP_dev_container1 unregistered [2014.10.27 14:38:17][1][b396] [container1-11] [Network-1009] OnePortServer unknown virtual listener(/JEUSMP_dev_container1). socket discarded. [2014.10.27 14:38:17][2][b396] [container1-18] [MGR-0097] Container security manager uninstalled [2014.10.27 14:38:17][2][b396] [container1-18] [JNDI.Local-0012] Successfully stopped. (ID 127.0.0.1:9736(JNSServer)) [2014.10.27 14:38:17][2][b396] [container1-18] [MGR-0103] engine container[dev_container1] is SHUTDOWN [2014.10.27 14:38:17][0][b396] [container1-1] [MGR-0099] container dev_container1 shutdown [2014.10.27 14:38:17][0][b396] [container1-9] [MGR-0565] JVM process is shutting down [2014.10.27 14:38:17][0][b396] [container1-9] [MGR-0566] JVM process will be terminated [2014.10.27 14:38:18][0][b396] [dev-18] [MGR-0141] engine container[dev_container1] successfully stopped [2014.10.27 14:38:18][0][b396] [dev-18] [MGR-0558] all containers in the node shutdown successfully [2014.10.27 14:38:18][0][b396] [dev-18] [MGR-0262] all containers successfully shutdowned -
Check the processes after JEUS starts.
[tmax@dev ~]$ ps -ef | grep jeus
tmax      1729  1705  0 14:35 pts/0    00:00:00 /bin/sh /app/was/jeus6/bin/jeus
tmax      1735  1729  8 14:35 pts/0    00:00:23 /app/java/jdk1.6/bin/java -server -Xmx512m -Xbootclasspath/p:/app/was/jeus6/lib/system/extension.jar -classpath /app/was/jeus6/lib/system/bootstrap.jar -Dsun.rmi.dgc.client.gcInterval=3600000 -Dsun.rmi.dgc.server.gcInterval=3600000 -Djava.library.path=/app/was/jeus6/lib/system -Djava.endorsed.dirs=/app/was/jeus6/lib/endorsed -Djava.naming.factory.initial=jeus.jndi.JNSContextFactory -Djava.naming.factory.url.pkgs=jeus.jndi.jns.url -Djava.net.preferIPv4Stack=true -Djava.util.logging.config.file=/app/was/jeus6/bin/logging.properties -Djava.util.logging.manager=jeus.util.logging.JeusLogManager -Djeus.home=/app/was/jeus6 -Djeus.log.home=/app/was/jeus6/logs -Djeus.baseport=9736 -Djeus.jvm.version=hotspot -Djeus.tm.checkReg=true -Djeus.tool.webadmin.locale.language=ko -Djeus.net.reuseAddress=true -Djeus.properties.replicate=jeus,sun.rmi,java.util,java.net jeus.server.JeusBootstrapper
tmax      2016  1799  0 14:40 pts/1    00:00:00 grep jeus
[tmax@dev ~]$
Installation Notes#
This section describes points to note when installing JEUS.
-
An error occurs if the wrong operating system is selected
If you select an operating system that does not match the server at the platform selection step, JEUS will not be installed correctly.
Example) Selecting Linux x86 on a Linux x64 machine
java.lang.UnsatisfiedLinkError: $HOME /jeus6/lib/system/libRunner.so: $HOME /jeus6/lib/system/libRunner.so: cannot open shared object file: No such file or directory (Possible cause: architecture word width mismatch) at java.lang.ClassLoader$NativeLibrary.load(Native Method) at java.lang.ClassLoader.loadLibrary0(ClassLoader.java:1751) at java.lang.ClassLoader.loadLibrary(ClassLoader.java:1676) at java.lang.Runtime.loadLibrary0(Runtime.java:822) at java.lang.System.loadLibrary(System.java:993) at jeus.util.Runner.(Runner.java:31) at jeus.server.JeusServer.main(JeusServer.java:916) at sun.reflect.NativeMethodAccessorImpl.invoke0(Native Method) at sun.reflect.NativeMethodAccessorImpl.invoke(NativeMethodAccessorImpl.java:39) at sun.reflect.DelegatingMethodAccessorImpl.invoke(DelegatingMethodAccessorImpl.java:25) at java.lang.reflect.Method.invoke(Method.java:585) at jeus.server.Bootstrapper.callMainMethod(Bootstrapper.java:299) at jeus.server.Bootstrapper.callMain(Bootstrapper.java:371) at jeus.server.Bootstrapper.main(Bootstrapper.java:365) at jeus.server.JeusBootstrapper.main(JeusBootstrapper.java:8) -
When the GLIBC version is too low
If the server's GLIBC version is lower than 2.4, an error occurs during installation. You can check the GLIBC version with the following command.
This applies only to Linux. It does not apply to Windows or Unix.
$~ ] rpm -qa |grep glibc
compat-glibc-2.3.4-2.26
compat-glibc-2.3.4-2.26
glibc-2.5-34
glibc-devel-2.5-34
compat-glibc-headers-2.3.4-2.26
glibc-common-2.5-34
glibc-headers-2.5-34
glibc-2.5-34
glibc-devel-2.5-34
Example) When the GLIBC version is 2.3
java.lang.UnsatisfiedLinkError: $HOME/jeus6/lib/system/libRunner.so: /lib64/tls/libc.so.6: version `GLIBC_2.4' not found (required by $HOME/jeus6/lib/system/libRunner.so)
at java.lang.ClassLoader$NativeLibrary.load(Native Method)
at java.lang.ClassLoader.loadLibrary0(ClassLoader.java:1751)
at java.lang.ClassLoader.loadLibrary(ClassLoader.java:1676)
at java.lang.Runtime.loadLibrary0(Runtime.java:822)
at java.lang.System.loadLibrary(System.java:993)
at jeus.util.Runner.(Runner.java:31)
at jeus.server.JeusServer.main(JeusServer.java:916)
at sun.reflect.NativeMethodAccessorImpl.invoke0(Native Method)
at sun.reflect.NativeMethodAccessorImpl.invoke(NativeMethodAccessorImpl.java:39)
at sun.reflect.DelegatingMethodAccessorImpl.invoke(DelegatingMethodAccessorImpl.java:25)
at java.lang.reflect.Method.invoke(Method.java:585)
at jeus.server.Bootstrapper.callMainMethod(Bootstrapper.java:299)
at jeus.server.Bootstrapper.callMain(Bootstrapper.java:371)
at jeus.server.Bootstrapper.main(Bootstrapper.java:365)
at jeus.server.JeusBootstrapper.main(JeusBootstrapper.java:8)
Integrating Altibase and JEUS#
This section describes how to configure Altibase and JEUS to work together.
JDBC Driver#
JDBC is a standard interface that allows Java applications to connect to a database and execute SQL statements.
JDBC drivers are provided by each database vendor; Altibase provides its driver as the Altibase.jar file, located in the $ALTIBASE_HOME/lib directory.
Starting with Altibase 5, the $ALTIBASE_HOME/lib directory contains both Altibase.jar and Altibase5.jar. Altibase.jar is the standard Altibase JDBC driver, while Altibase5.jar is used when you also need to work with Altibase 5 or earlier. Therefore, to connect to more than one Altibase version, Altibase5.jar is generally used.
Setting Up the JDBC Driver#
To integrate Altibase and JEUS, place the Altibase JDBC driver (Altibase.jar) in the $JEUS_HOME/lib/datasource directory.
Connection Pooling#
Connection pooling is a framework for caching DB connections. When a connection pool starts, it creates a specified number of physical connections, which reduces the overhead of creating connections while the application is running.
The benefits of connection pooling are as follows.
-
Better performance
Creating a DB connection is slow. All physical connections in the connection pool are created in advance and are ready to handle application requests. When a connection is no longer needed, it is returned to the pool, reducing the overhead of closing connections.
-
Connection management
The number of concurrent connections can be controlled. By configuring the maximum number of concurrent connections, you can effectively limit the number of concurrent connections to the DB.
Data Source#
A javax.sql.DataSource is the interface between an application and a connection pool. A javax.sql.DataSource object can be regarded as a factory for DB connections and offers many advantages over java.sql.DriverManager.
The four types of data sources are summarized below.
-
Basic data source
Returns connections to users. Because no connection pooling is performed, there may be additional overhead compared to the connection pool type.
-
Connection pool data source
Obtains a connection stored in the connection pool and returns it to the application. Because it uses the connection pooling provided by JEUS, it has less overhead than connecting to the DB every time a connection is needed. If Autocommit is set to False, the application can control local transactions directly.
-
XA data source
Manages connections used for distributed/global transactions. Use this type only when 2PC (Two-Phase Commit) is required. When a transaction is started in an EJB or Servlet and work is performed using two or more connections obtained from an XA data source, the 2PC protocol starts automatically. These connections cannot be reused after the transaction ends.
When an XADataSource is used, transaction recovery is supported for each data source.
For DB integration using an XA data source, refer to the Altibase 5.3.3 API manual. -
Local XA data source
Uses a connection obtained from a connection pool data source with Autocommit turned off so that a local transaction is always active, and the transaction manager handles commit and rollback. This allows a local transaction to emulate participation in XA. A local XA data source can be used when a connection needs to participate in XA even though the JDBC driver does not support XA data sources.
Due to functional limitations, a local XA data source may not always recover correctly, and at most one local XA data source can participate in a single global transaction.
Data Source Configuration#
To integrate Altibase and JEUS, configure a data source in JEUSMain.xml. Because the properties of javax.sql.DataSource differ for each driver, you must understand the characteristics of the driver you want to use and configure it accordingly.
The following XML tags can be used as child tags of the <resource><data-source>…<database> XML tag.
| Tag | Description |
|---|---|
| Vendor | DB vendor name (oracle, mssql, db2, sybase, tibero, others). For Altibase, set it to others. |
| Export-name | The name bound to JNDI. The data source object is bound under this name. It can be any name the user chooses. |
| Data-source-class-name | Data source class name for each JDBC driver. Determines which configuration method is used, such as ABConnectionPoolDataSource (Altibase 6.1.1 or earlier), AltibaseConnectionPoolDataSource (Altibase 6.3.1 or later), or BlackboxConnectionPoolDataSource. |
| Data-source-type | One of "DataSource", "ConnectionPoolDataSource", "XADataSource", or "LocalXADataSource". Select the type that matches the data source you want to use. |
| Data-source-name | Name of the data source. Depends on the driver vendor; usually the same as the DataSourceClass-Name value. |
| Database-name | DB name (e.g. mydb) |
| Service-name | Used only with the Oracle inet driver; the SID of the Oracle Database. Not used with ALTIBASE. |
| description | Text describing the data source. |
| Network-protocol | Protocol used to connect to the DB |
| Password | User password |
| User | User name |
| Port-number | Port number of the DB listener |
| Server-name | DNS name or IP address of the server running the DB |
| Driver-type | For Oracle, the driver type (e.g. thin, oci) |
| Property | Specifies custom JDBC properties. When BlackboxConnectionPoolDataSource is used, specify DriverClassName, URL, USER, and PASSWORD here. |
| Connection-pool | Specifies settings specific to connection pooling. |
| Auto-commit | Specifies the auto commit value for the connection: true or false. For local XA data sources and XA data sources, it applies only when the connection is not associated with a transaction. |
| Action-on-connection-leak | Sets the logging or return action for JDBC connections used by components (mainly stateless components: Servlet/JSP, stateless session beans, MDBs). If not set, the default behavior follows the invocation-manager-action set for the engine container. |
For the connection pool data source name, use Altibase.jdbc.driver.ABConnectionPoolDataSource for version 6.1.1 or earlier. From Altibase 6.3.1 or later, Altibase.jdbc.driver.AltibaseConnectionPoolDataSource is used, so take care when setting the class.
If the class name is incorrect, a java.lang.ClassNotFoundException: Altibase.jdbc.driver.ABConnectionPoolDataSource or java.lang.ClassNotFoundException: Altibase.jdbc.driver.AltibaseConnectionPoolDataSource exception occurs in the JEUS log.
Configuring the Data Source#
There are two ways to configure a data source for Altibase and JEUS: editing the XML file directly in console mode, or using WebAdmin in GUI mode.
There are also two ways to configure and manage the connection pool: the AltibaseConnectionPoolDataSource method and the BlackboxConnectionPoolDataSource method. With AltibaseConnectionPoolDataSource, the connection pool is managed by the Altibase JDBC driver rather than by JEUS; with BlackboxConnectionPoolDataSource, the connection pool is managed by JEUS.
The following shows how to configure a connection pool using each of the two methods, with each of the two configuration approaches.
-
Configuring with the BlackboxConnectionPoolDataSource method
- Configuring by editing JEUSMain.xml directly
Open JEUSMain.xml in a text editor and add the
<resource>~</resource>section.<jeus-system> … <resource> <data-source> <database> <vendor>others</vendor> <export-name>datasource1</export-name> <data-source-class-name>jeus.jdbc.driver.blackbox.BlackboxConnectionPoolDataSource</data-source-class-name> <data-source-type>ConnectionPoolDataSource</data-source-type> <property> <name>DriverClassName</name> <type>java.lang.String</type> <value>Altibase.jdbc.driver.AltibaseDriver</value> </property> <property> <name>URL</name> <type>java.lang.String</type> <value>jdbc:Altibase://127.0.0.1:20300/mydb</value> </property> <property> <name>User</name> <type>java.lang.String</type> <value>sys</value> </property> <property> <name>Password</name> <type>java.lang.String</type> <value>manager</value> </property> <connection-pool> <pooling> <min>2</min> <max>30</max> <step>1</step> <period>3600000</period> </pooling> </connection-pool> </database> </data-source> </resource> … </jeus-system>- Configuring with WebAdmin
This section shows how to configure a connection pool with the BlackboxConnectionPoolDataSource method using WebAdmin.
WebAdmin can be accessed at http://localhost:9744/WebAdmin. By default, the USER is Administrator and the password is the one set during installation. The port 9744 is JEUS_BASEPORT + 8.The JEUS Manager menu in WebAdmin lets you select a node and boot, shut down, or terminate it.

After booting the node with WebAdmin, click the JEUS Manager > Resources > JDBC menu to create a new data source for integration with ALTIBASE.

Select "Others" as the DBMS vendor and "BlackboxConnectionPoolDataSource" as the data source, then proceed to the next step.

When creating a new JDBC data source, set each property value. Once the DBMS vendor and data source are selected, "Vendor", "Data Source Class Name", "Data Source Type", and "Export Name" are set automatically as shown below. Change these values only if necessary; otherwise, leave them as they are.
Do not set the "Database Name", "Port Name", and "Server Name" properties; instead, set the values in the "Property" item below and proceed to the next step. (When configuring with AltibaseConnectionPoolDataSource or XADataSource, set the values in "Database Name", "Port Name", and "Server Name" instead of "Property".)

Set the "Property" values as follows.
DriverClassName=Altibase.jdbc.driver.AltibaseDriver
URL= jdbc:Altibase://server_ip:server_port/dbname
USER=sys
PASSWORD=manager
If these values are not set in the "Property" item, or if any of "Database Name", "Port Name", or "Server Name" is set, an error occurs.

Set the Min/Max values of the connection pool to complete the basic configuration.

After the data source is created, you can test and bind it. The configuration takes effect only after it is bound.

-
Configuring with the AltibaseConnectionPoolDataSource method
- Configuring by editing JEUSMain.xml directly
Open JEUSMain.xml in a text editor and add the
<resource>~</resource>section.<jeus-system> … <resource> <data-source> <database> <vendor>others</vendor> <export-name>Datasource1</export-name> <data-source-class-name>Altibase.jdbc.driver.AltibaseConnectionPoolDataSource</data-source-class-name> <data-source-type>ConnectionPoolDataSource</data-source-type> <database-name>mydb</database-name> <port-number>20300</port-number> <server-name>127.0.0.1</server-name> <user>sys</user> <password>manager</password> <auto-commit>true</auto-commit> <property> <name>Encoding</name> <type>java.lang.String</type> <value>KSC5601</value> </property> <property> <name>maxPoolSize</name> <type>java.lang.Integer</type> <value>30</value> </property> <connection-pool> <pooling> <min>2</min> <max>30</max> <step>1</step> <period>3600000</period> </pooling> </connection-pool> </database> </data-source> </resource> … </jeus-system>- Configuring with WebAdmin
With WebAdmin, provided by JEUS, you can start and stop JEUS and configure data sources. Property values set through WebAdmin are saved in JEUSMain.xml. If you compare JEUSMain.xml before and after setting the values, you can see that the ALTIBASE property values have been updated between
<resource>and</resource>.
Click "Create New JDBC Data Source" to create a new JDBC data source.

Select "Other" as the DBMS, and then select "Other DataSource".

Set the items from "Data Source Class Name" to "Password". For "Data Source Class Name", do not enter just AltibaseConnectionPoolDataSource; enter the fully qualified name of the JDBC driver's data source class, including the package name (Altibase.jdbc.driver.AltibaseConnectionPoolDataSource).
For connection pool settings, binding, and testing, refer to the BlackboxConnectionPoolDataSource configuration above.
Notes on Configuring the Data Source#
-
Notes on using AltibaseConnectionPoolDataSource
- When AltibaseConnectionPoolDataSource is set as the Data-Source-Class-Name, properties such as "Encoding" and "maxPoolSize" can be specified. These properties cannot be used with BlackboxConnectionPoolDataSource.
- The URL-related method name differs depending on the Altibase version, so you must use the property name that matches your version.
Info
In some versions the URL setter method is named setUrl, and in others it is named setURL, so the URL property name must be set with the correct case for your version.
For version 6.3.1 or later, set it as URL (uppercase) as shown below.
If the wrong property name is used, an error such as java.lang.NoSuchMethodException: Altibase.jdbc.driver.ABConnectionPoolDataSource.setURL(java.lang.String) occurs. In that case, check the error and correct JEUSMain.xml to match the method name implemented in the class.<property> <name>URL</name> <type>java.lang.String</type> <value>jdbc:Altibase://192.168.1.35:20300/mydb</value> </property> Some versions require lowercase, as shown below. <property> <name>url</name> <type>java.lang.String</type> <value>jdbc:Altibase://192.168.1.35:20300/mydb</value> </property> -
Deadlock
- When initialPoolSize is used with AltibaseConnectionPoolDataSource, a lock may occur. This happens because pool values intended for JEUS are used by the ALTIBASE JDBC driver. To resolve it, do not set initialPoolSize; set only maxPoolSize.
<property>
<name>encoding</name>
<type>java.lang.String</type>
<value>KSC5601</value>
</property>
<property>
        <name>maxPoolSize</name>
        <type>java.lang.Integer</type>
        <value>10</value>
</property>
Check Query#
When an application requests a JDBC connection, this feature sends a specific SELECT query to check the connection's status. It is useful for detecting connections dropped due to internal JDBC errors, sockets closed by a firewall, and so on. If the check fails, a new physical connection is created and its handle is returned to the application.
The check query can be configured in two ways: by simply putting a query in the <check-query> tag, or by extending the feature with the <check-query-class> tag.
You can add these directly between <database> and </database> in JEUSMain.xml. When using WebAdmin, set the values after clicking Connection Pool and Advanced Options when creating or modifying a data source.
- Check-query setting
The check query must be a read-only query, not a command that updates the DB. <check-query>select 1 from dual</check-query> - Check-query-timeout setting (msec)
If the DB server does not respond to the check-query, the request may wait indefinitely. To avoid this, set check-query-timeout. The value is in msec; values less than 1000 msec are set to 0. <check-query-timeout>20000</check-query-timeout> - Non-validation-interval setting (msec)
If frequent check-queries cause overhead, set Non-validation-interval. If the time elapsed between the last use of the connection and the time the check-query would run is within the Non-validation-interval, the check-query is skipped. <non-validation-interval>10000</non-validation-interval> -
Destroy policy on check-query failure
You can choose the destroy policy for the remaining connections in the pool when a check-query fails:
- FailedConnectionOnly: Discards only the connection whose check-query failed. This is the default.
- AllConnections: Discards all remaining connections as well.
<destroy-policy-on-check-query>AllConnections</destroy-policy-on-check-query>
Monitoring the Connection Pool#
Connection pools can be monitored with jeusadmin or with WebAdmin. This section describes how to monitor them with jeusadmin.
In jeusadmin, the 'dsinfo' command monitors the JDBC connection pools configured in an engine container. To monitor all connection pools in a container, specify the container name; to monitor a single pool, also specify the data source name (Export Name) created in the container.
Jeusadmin> Dsinfo –con <container name> <data source name (export name)>

| Item | Description |
|---|---|
| Name | Export name of the DB pool |
| Min | Minimum number of connections kept in the pool |
| Max | Maximum number of connections kept in the pool |
| Act | Number of connections in use by applications |
| Idle | Number of connections currently in the pool |
| Disp | Total number of disposable (use-once) connections |
| Tot | Total number of DB connections (active + idle + disposable) |
| Wait | Determines whether a thread waits when the pool has no available connections. If "true", the thread waits; if "false", a connection outside the pool is created. |
| work | "true" if the DB pool is active; "false" if it is inactive or has not yet been created. |
You can also use the 'dsconinfo' command to check the current state of each connection in a data source and view related statistics.
Jeusadmin> dsconinfo –con <container name> <data source name (export name)>
2edcf6a9ba4d44b>dsconinfo -con 2edcf6a9ba4d44b_container1 datasource1

===============================================================
Connection information list for the engine container[2edcf6a9ba4d44b_container1]
---------------------------------------------------------------
| id | state | state-time(ms) | use-count | type |
---------------------------------------------------------------
| datasource1-1 | idle | 10000 | 0 | pooled |
---------------------------------------------------------------
===============================================================
| Item | Description |
|---|---|
| Id | Unique value assigned to each connection within a data source in the container |
| State | Connection state: active or idle. Active means the connection is currently in use. |
| Usecount | Number of open/close pairs that have occurred |
| State time | Time elapsed since the connection changed to its current state |
| type | Indicates whether the connection is pooled or disposable |
If you know the data source's Export Name, you can use jeusadmin to test whether the pool configuration is usable.
Jeusadmin> testdsconfig <data source name (export name)>
2edcf6a9ba4d44b>testdsconfig datasource1
Configuration is valid. You can use it.
Examples#
Having covered how to integrate Altibase and JEUS, this section verifies the integration by connecting to Altibase and running queries using the node configuration above.
Sample Using a Pool#
<%@ page import="javax.naming.*" %>
<%@ page import="java.sql.*" %>
<%@ page import="javax.sql.*" %>
<%
Connection con=null;
Statement  st=null;
ResultSet  rs=null;
try
{
InitialContext ctx = new InitialContext();
DataSource ds = (DataSource)ctx.lookup("DataSource1");
con=ds.getConnection();
st=con.createStatement();
rs=st.executeQuery("select *  from dual");
while(rs.next())
{
out.println("TABLE_NAME :" + rs.getString(1)+"");
}
}
catch(Exception e)
{
out.println("Error:" + e.getMessage());
e.printStackTrace();
}
finally
{
if(rs!=null)rs.close();
if(st!=null)st.close();
if(con!=null)con.close();
}
%>
Sample Using getConnection#
<%@ page import="java.util.*"%>
<%@ page import="java.sql.*"%>
<%
Connection conn = null;
PreparedStatement pstmt = null;
ResultSet rs = null;

String db_url = "jdbc:Altibase://127.0.0.1:20300/mydb";
String db_user = "sys";
String db_passwd = "manager";
String enc = "KO16KSC5601";
Properties props = new Properties();
props.put("user", db_user);
props.put("password", db_passwd);
props.put("encoding", enc);

try {
try {
Class.forName("Altibase.jdbc.driver.AltibaseDriver");
conn = DriverManager.getConnection(db_url, props);
out.print(" Connection ok" + "" );
} catch (Exception e) {
out.println("### CONN ERROR=>" + e.toString() + "###" + "");
}
String Query = "select * from dual";
pstmt = conn.prepareStatement(Query);
String get_1 = null;

try {
rs = pstmt.executeQuery();
while(rs.next()) {
get_1 = rs.getString(1);
out.println(" get_1 = " + get_1 + "");
}
} catch (Exception e) {
out.println("### SELECT ERROR=>" + e.toString() + "###" + "");
}
} catch (Exception e) {
out.println("### ERROR=>" + e.toString() + "###" + "");
try {
conn.rollback();
} catch(Exception ex) {
out.println("### rollback ERROR=>" +  ex.toString()  + "###" + "");
}   // end of try
} finally {
try {
conn.close();
} catch(Exception ex) {
out.println("### close ERROR=>" +  ex.toString()  + "###" + "");
}   // end of try
}   // end of try
%>
How to Run#
This section describes how to deploy the JSP file with WebAdmin and test it.
Deployment refers to the operations of uploading module files to JEUS and controlling them to start an application's services.
JEUS can deploy uploaded EJB modules (.jar files), web application modules (.war files), resource adapter modules (.rar files), and so on. A standalone module consisting of a single module can also be deployed as a type of Java EE application.
This sample test describes how to build a WAR file from the sample above, deploy it to a JEUS server, and run it. For how to upload and deploy other modules, refer to the "Deployment" section of the JEUS manual.
The WAR file used in this sample test was created with Eclipse.
-
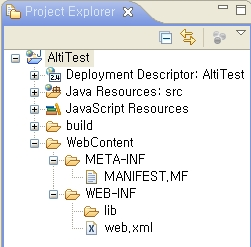
Run Eclipse, select File > New > Project, then in the wizard select Web > "Dynamic Web Project" and set the project name.

-
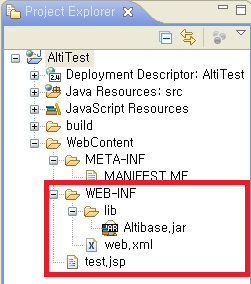
Once the project is created as shown below, create a JSP file from the sample above and add it under the "WebContent" directory.
Add Altibase.jar to the Lib folder.
 |
-
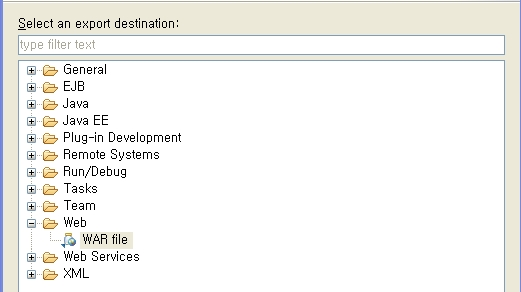
After adding the JSP file and Altibase.jar, select File > Export, select Web > "War file", and specify the output path to create the WAR file.
-
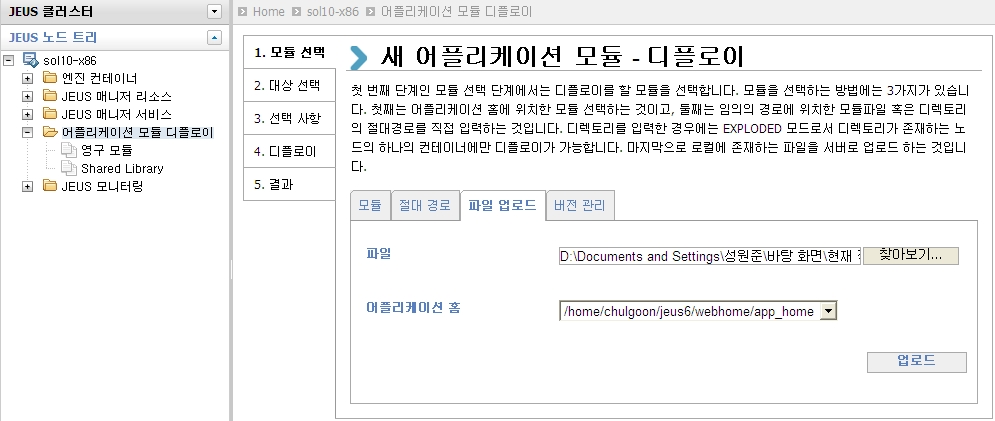
Once the WAR file is created, select "Deploy Application Module" > File Upload tab in the WebAdmin node tree and upload the WAR file.
-
After the file is uploaded, deploy the uploaded module. The name of the deployed module (the WAR file name) becomes the path used to run the sample.

-
When deployment is complete, open a web browser and enter the following URL to run it.
http://server_ip:8088/module_name/JSP_file_name

e.g.) http://192.168.1.76:8088/AltiTest/test.jsp
ALTIBASE JEUS Integration Guide (PDF)
Previous version: ALTIBASE JEUS Integration Guide 6.0 (PDF) (Altibase 5.3, JEUS 6.0)