WebSphere Integration Guide for Altibase#
Overview#
This document explains how to integrate and operate Altibase with WebSphere. It covers how to install WebSphere, how to set environment variables, and how to integrate Altibase with WebSphere.
This document is based on Altibase 7.1 and WebSphere 9.0.
Info
For errors and improvements related to this document, please contact the technical support portal or technical support center.
- Technical support portal: http://support.altibase.com/en
- Technical support center: +82-2-2082-1114
Info
This document is provided for informational purposes only and is subject to change without prior notice. It may contain errors, and Altibase makes no express or implied warranties of any kind, including but not limited to warranties of merchantability or fitness for a particular purpose.
The development, release, and timing of any features or functionality described for Altibase products in this document are at the sole discretion of Altibase.
Altibase may hold patents, trademarks, copyrights, or other intellectual property rights related to the contents of this document.
WebSphere Installation#
This chapter describes how to download and install WebSphere, the WebSphere directory structure, and how to start and shut down WebSphere.
Basic Installation#
Downloading the WebSphere Package
To download WebSphere, you must first install IBM Installation Manager. This document is based on IBM Installation Manager 1.8.5.
You can download IBM Installation Manager from the following link.
Installation Manager and Packaging Utility download documents
To download IBM Installation Manager, you need an IBM account and Java. You can download it only with Internet Explorer.

Set the download path, port, and other options, and then select OK.

Unzip the downloaded file and run the installation file (install.exe).


After you install IBM Installation Manager, go to File > Preferences on the start screen menu and click the Add Repository button.

The repository URLs are as follows.
- WAS V9: http://www.ibm.com/software/repositorymanager/V9WASBase
- WAS ND V9: http://www.ibm.com/software/repositorymanager/V9WASND

Click the Install button on the initial screen again to open the package selection menu. Select IBM WebSphere Application Server.

Select the installation path.


When the installation finishes, WebSphere Customization Toolbox 9.0 starts automatically. Click the Create button.

Select an application server.

Select Create Profile.

Administrative security is optional. If you do not select it, you can log in without entering a user ID.

When you finish creating the profile, you can check the profile information.


The installation details are as follows.


WebSphere Directory Structure#
After you install WebSphere, you can see the following directories.

If you installed WebSphere without changing the installation path (C:\IBM), the C:\IBM\WebSphere\AppServer path becomes the value of the WAS_INSTALL_ROOT environment variable, as shown in the figure above. You can also use ${WAS_INSTALL_ROOT} in the class path when you set up the JDBC provider.
You can find various directories under the ${WAS_INSTALL_ROOT} directory.
This document describes only the directories you need to know when using WebSphere.
WebSphere uses the concept of a profile. The product files that all users share are called binary files, and a profile is a set of environment and configuration files that each user configures for their own environment.
As shown in the figure below, WebSphere manages the profiles that users create in the Profiles directory.

A profile in the Profiles directory contains the following directories. All profiles have the same directory structure.

| Directory | Description |
|---|---|
| bin | Execution scripts, including scripts for starting and stopping the server |
| config | Profile settings such as resource.xml, in XML format |
| configuration | Eclipse-based OSGi and runtime configuration files |
| etc | Security key values and the key database |
| installableApps | Applications that you can install and use |
| logs | Logs for each server, such as SystemOut.log and SystemErr.log |
| properties | Property files used by WAS |
| tranlog | Transaction logs for recovering transactions after a failure |
When you change settings in the web administrative console, WebSphere writes the changes to the resource.xml file in the config directory.
Each cell, node, and server directory has its own resource.xml file. For a description of cell, node, and server, see JDBC Provider Settings.
Starting WebSphere#
After you install WebSphere, you can start it with a script file.
Open a command prompt, go to the bin directory of the installed profile (for example, D:\IBM\WebSphere\AppServer1\profiles\AppSrv01\bin), and run the server startup script startServer.bat.
The default WAS server name is server1. Enter startServer server1 in the bin directory to start the WAS server.
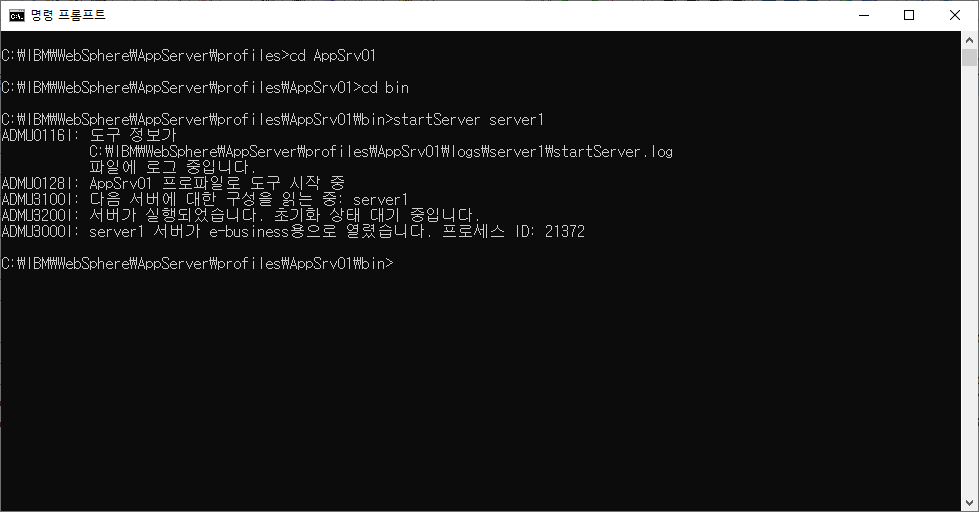
If a message that the server is open for e-business and the process ID appear, as shown in the figure above, WebSphere has started successfully. You can now connect to the web administrative console to manage WebSphere.
In a web browser, go to http://SERVER_IP:9060/ibm/console. SERVER_IP is the IP address of the server where you installed WebSphere, and 9060 is the service port of the administrative console.

When the login screen appears, enter any user ID to enter the administrative console. If you selected administrative security and set an ID and password during installation, log in with that ID.

In the left menu of the administrative console, select Servers > Server Types > WebSphere Application Servers to check the nodes that are currently running. Select a node to see its details.

Click the Ports menu at the bottom right to check and modify the ports that the WAS server uses. Check the administrative console service port (9060), the application service port (9080), and other ports, and change them if necessary.
Shutting Down WebSphere#
To shut down WebSphere, go to the directory where you started the server in a command prompt, and run the shutdown script stopServer.bat.
As with startup, run stopServer server1 to shut down the server.
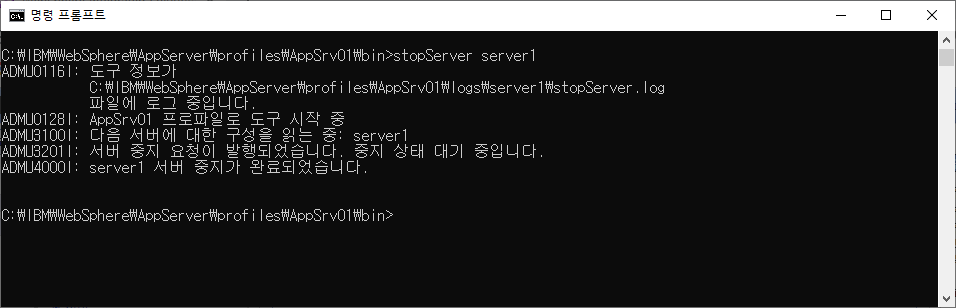
JDBC Driver Settings#
This chapter describes how to set up the JDBC driver to integrate Altibase with WebSphere.
Getting the Altibase JDBC Driver#
The Altibase JDBC driver file is Altibase.jar. It is in the $ALTIBASE_HOME/lib directory on the server where you installed Altibase.
Checking the Altibase JDBC Driver Version#
You can check the version of the Altibase JDBC driver with the following command.
$ java -jar Altibase.jar
Altibase 7.1.0.2.5 with CMP 7.1.7 for JDBC 3.0 compiled with JDK 5(sharding included)
To check whether the Altibase server and the JDBC driver are compatible, you also need to check the version of the Altibase server. If the cm protocol version of the Altibase server matches the CMP version of the JDBC driver, you can use them together.
$ altibase -v
version 7.1.0.2.5 X86_64_LINUX_redhat_Enterprise_release6.0-64bit-7.1.0.2.5-release-GCC4.6.3 (x86_64-unknown-linux-gnu) May 21 2019 13:44:56, binary db version 6.5.1, meta version 8.7.1, cm protocol version 7.1.7, replication protocol version 7.4.5, shard version 2.2.1
Applying the JDBC Driver#
To integrate WebSphere with Altibase, you must place the Altibase JDBC driver in the right location. Copy the Altibase.jar file to the ${WAS_INSTALL_ROOT}\universalDriver\lib directory.
Altibase and WebSphere Integration (AltibaseConnectionPool)#
This chapter describes how to integrate Altibase with WebSphere.
WebSphere does not provide a connection source for Altibase, so you must use AltibaseConnectionPool, which Altibase provides, for the integration.
JDBC Provider Settings#
To integrate Altibase with WebSphere, you must first set up a JDBC provider. When you register the Altibase JDBC driver in WebSphere, you can use WebSphere with Altibase.
In the WebSphere web administrative console, select Resources > JDBC > JDBC Providers.

Before you set up the JDBC provider, specify the scope in which the resource can be referenced. This document sets the scope to "Cell". With the "Cell" scope, the lower-level "Node" and "Server" units can also reference the resource. With the "Server" scope, only that server can reference the resource, and other servers cannot.
After you specify the scope, click [New] to set up the Altibase JDBC driver.

On the JDBC provider settings screen, set "Database type" to User-defined, "Implementation class name" to Altibase.jdbc.driver.AltibaseConnectionPoolDataSource, and "Name" to Altibase JDBC Provider, and then go to the next step.
Note
In Altibase 6.1.1 or earlier, you must use Altibase.jdbc.driver.ABConnectionPoolDataSource.
After you create the JDBC provider, specify the database class path. Enter the location of the Altibase.jar file as the class path.

As described earlier, you placed the Altibase.jar file in the ${WAS_INSTALL_ROOT}\universalDriver\lib directory, so specify this path as the class path.
Specifying the class path completes the JDBC provider setup. Review the summary of the JDBC provider, and click Finish if there is nothing to change.

Data Source Settings#
A data source is an object that manages the information for accessing Altibase. Applications connect to Altibase through the data source.
In the left menu of the WebSphere web administrative console, select Resources > JDBC > Data sources.
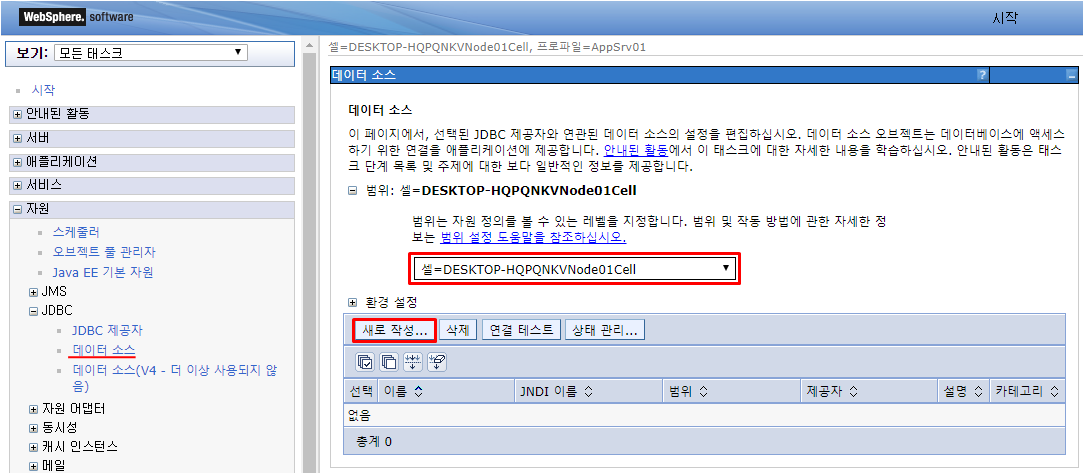
As with the JDBC provider, set the scope to "Cell" and create a new data source.
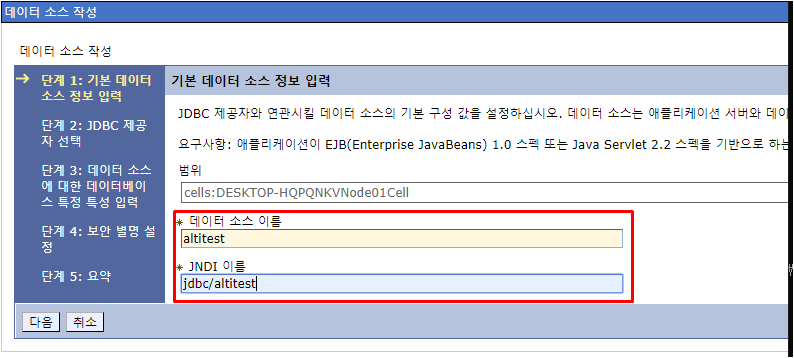
Enter the "Data source name" and "JNDI name". This document sets the data source name to altitest and the JNDI name to jdbc/altitest. The integration test example uses the JNDI name to look up the data source.
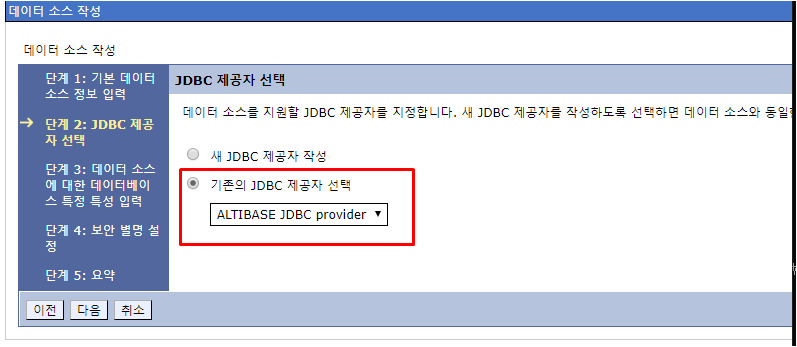
In the next step, select the JDBC provider that you created earlier. If you have not created a JDBC provider yet, you can create one in this step.
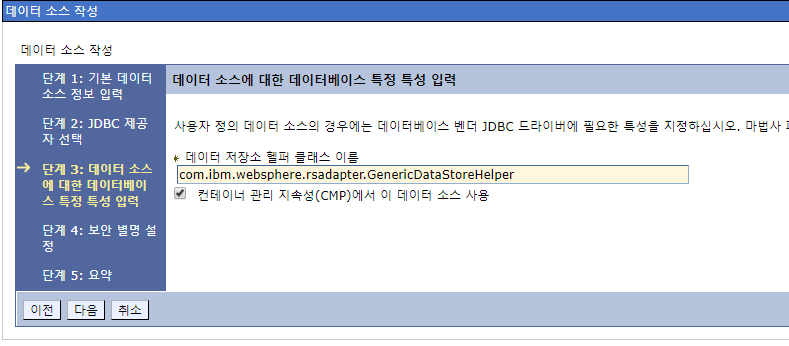
Use the default data store helper class.
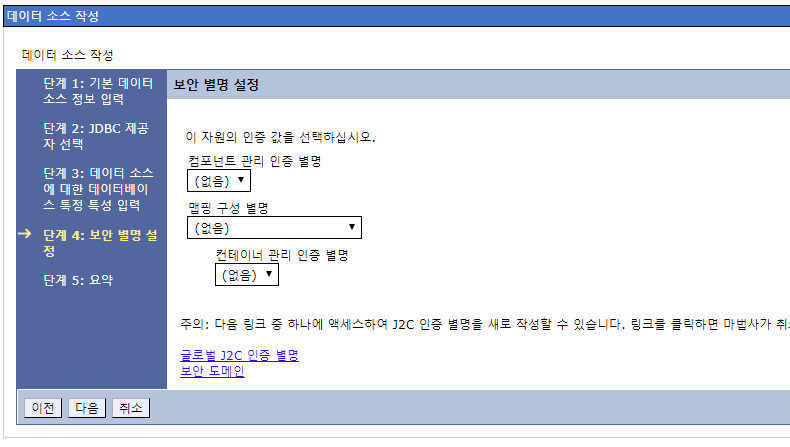
The next step sets the security alias. You have not set up J2C yet, so go to the next step. This completes the basic tasks for creating the data source.
In the final summary step, check that the data source settings are correct and click Finish.
When you finish setting up the data source, you can see the new data source as shown below. Click the data source to configure its details.
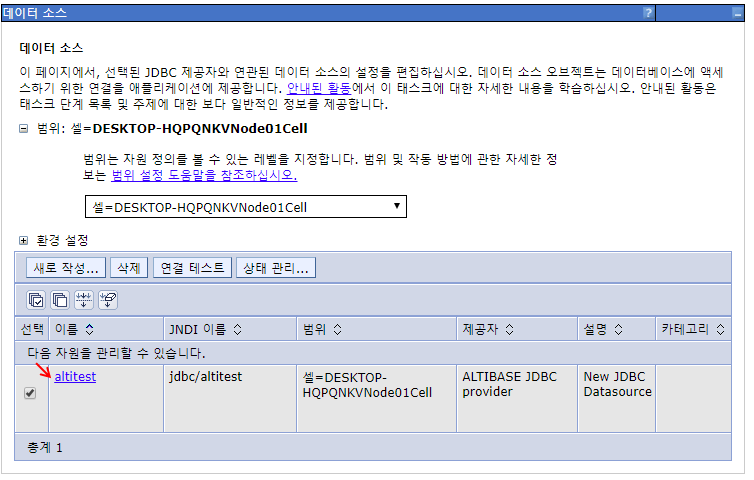
Click the altitest data source, and then click [Custom properties] in the menu to set the detailed items.
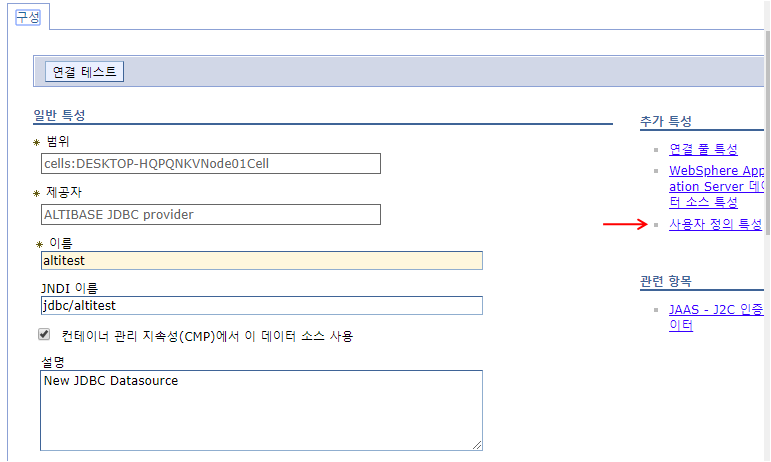
[Custom properties] shows the detailed settings of the data source. Set the items that your system configuration requires to the values you want.
This document sets only the minimum items required to integrate Altibase with WebSphere.
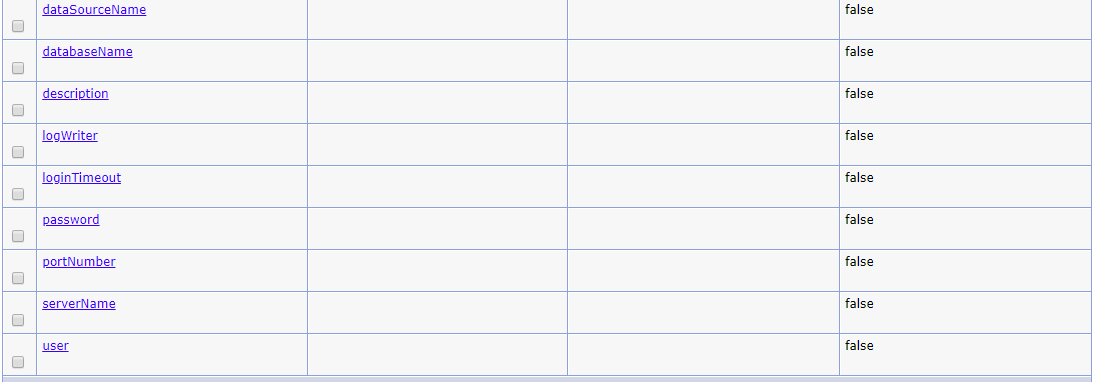
The items are empty at first, so set the values by referring to the table below. The Example column shows the values used in this document.
| Item | Description | Example |
|---|---|---|
| databaseName | Name of the Altibase database | mydb |
| serverName | IP address of the server where Altibase is installed | 192.168.1.35 |
| user | User name for connecting to Altibase | sys |
| password | Password for connecting to Altibase | manager |
| portNumber | Port number for connecting to Altibase | 20911 |
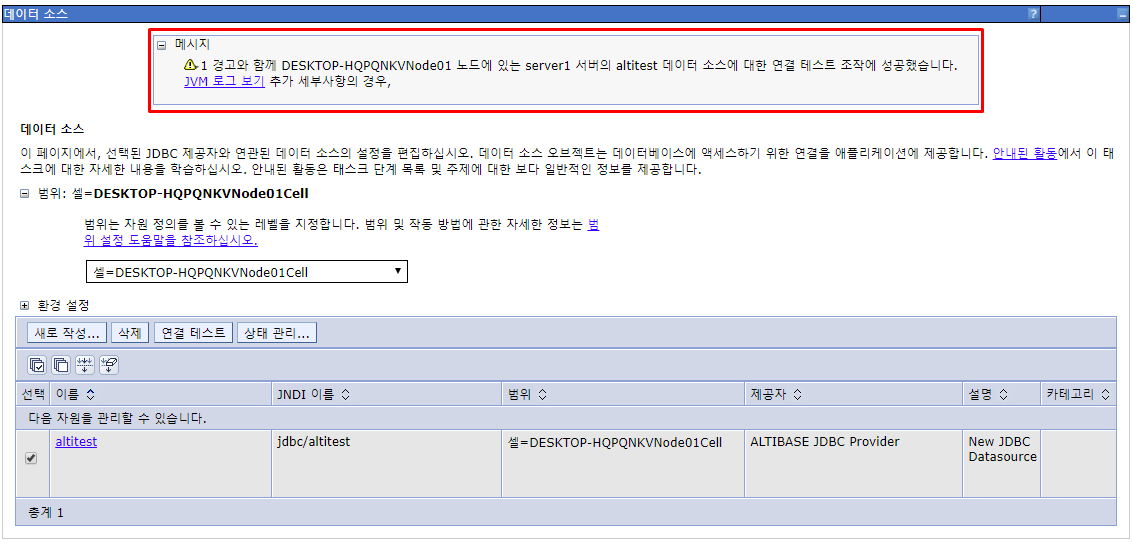
After you set the items, run a connection test. A success message appears as shown below. When this message appears, the basic connection between Altibase and WebSphere is set up.
Application Registration and Settings#
In WebSphere, you can register and use applications written as EAR or WAR modules. This section describes how to register a WAR module in WebSphere and set it up to work with Altibase.

In the left menu of the web administrative console, select [Applications] > [New Application], and then click [New Enterprise Application] to register the WAR module.

Specify the path of the WAR module to register it in WebSphere.
After you specify the path, select "Fast Path" in the [Preparing for the application installation] step and go to the next step.
In the [Select installation options] menu, you can change the application name and other items, but this document uses the default values.


In the [Map modules to servers] step, there is only one module, so go to the next step. If there are multiple modules and you want to map only a specific module to the server, select that module and click the "Apply" button.

For virtual host mapping, select "default_host" and go to the next step. The context root mapping step specifies the root of the WAR module. When you specify the context root you want, you can run the application with "context root/JSP file name", regardless of the WAR module name.

When you finish the context root mapping, WebSphere automatically configures and installs the application. When the installation finishes, click [Save] to save the configuration to the master configuration.
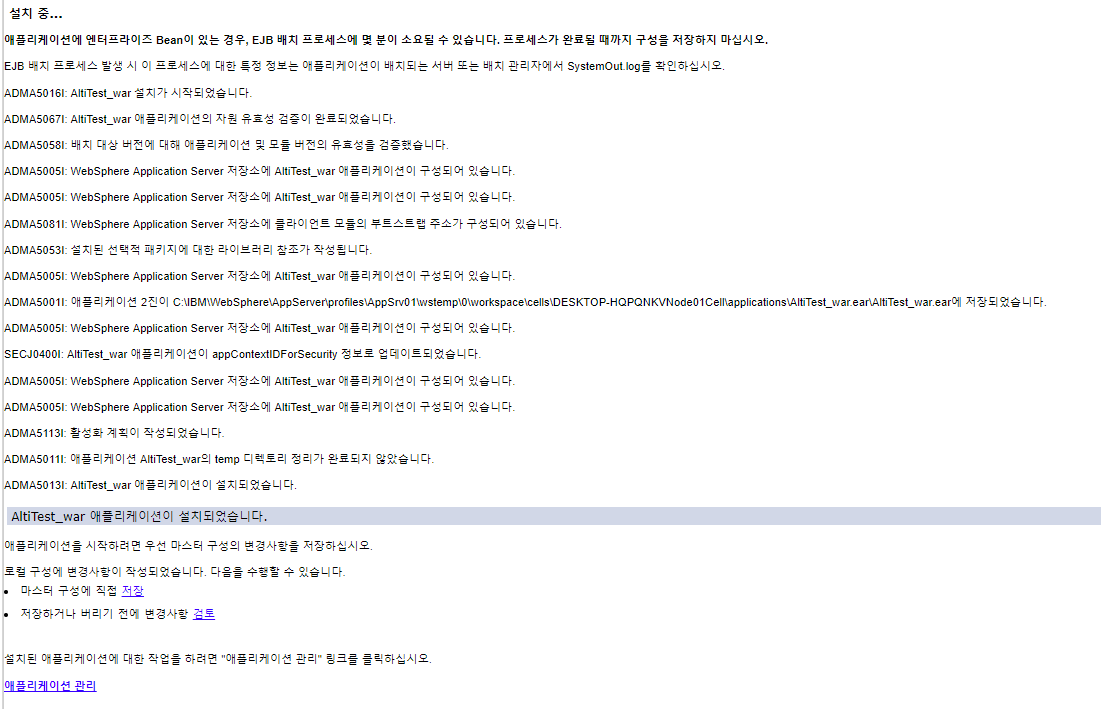
Saving to the master configuration completes the configuration and installation of the application. However, the application has not started yet, so you must change its status to "Start" yourself.
In the left menu of the web administrative console, select [Applications] > [Application Types] > [WebSphere enterprise applications] to see the installed applications.

Click the "Start" button to start the application. The following message appears. After the application starts, run the test in a web browser.

Integration Test#
The integration test uses the altitest.war module from the previous section. Create a WAR module in Eclipse with the test example below, and install it in WebSphere to run the test.
Creating Test.jsp#
Create a JSP file with the following test example.
<%@ page import="javax.naming.*" %>
<%@ page import="java.sql.*" %>
<%@ page import="javax.sql.*" %>
<%
    Connection con=null;
    Statement st=null;
    ResultSet rs=null;
    try
    {
        InitialContext ctx = new InitialContext();
        DataSource ds = (DataSource)ctx.lookup("jdbc/altitest");
        con=ds.getConnection();
        st=con.createStatement();
        rs=st.executeQuery("select * from dual");
        while(rs.next())
        {
            //Thread.sleep(100000);
            out.println("TABLE_NAME :" + rs.getString(1)+"<br>");
        }
    }
    catch(Exception e)
    {
        out.println("Error:" + e.getMessage());
        e.printStackTrace();
    }
    finally
    {
        if(rs!=null)rs.close();
        if(st!=null)st.close();
        if(con!=null)con.close();
    }
%>
Creating a WAR Module#
This document uses Eclipse to create the test WAR module.
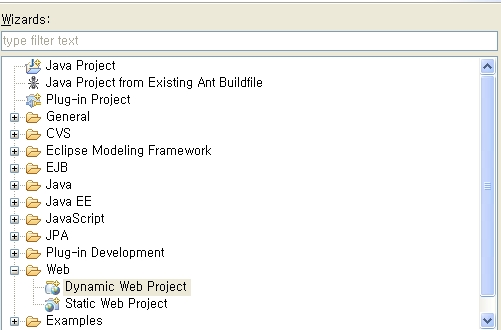
In Eclipse, select [File] > [New] > [Project], select [Web] > "Dynamic Web Project" in the wizard, and enter the project name.
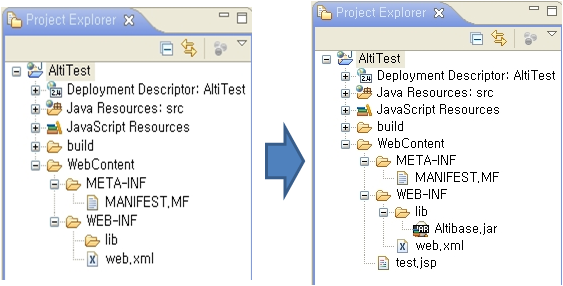
After you create the project, create a JSP file with the example above and add it under the "WebContent" directory.
Add the Altibase.jar file to the lib folder.
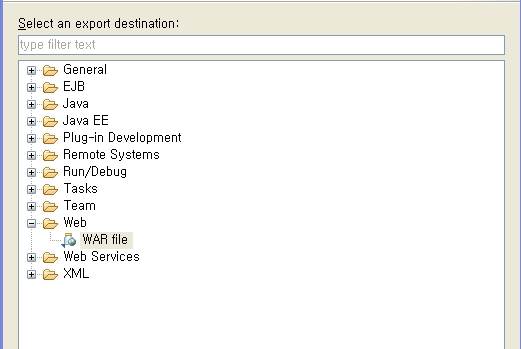
After you add the JSP file and the Altibase.jar file, select [File] > [Export], select [Web] > "WAR file", and specify the destination path to create the WAR module.
After you create the WAR module, install it in WebSphere in the same way as in the previous section.
Install the WAR module, change its status to "Start", and then go to an address in the following format in a web browser.
http://ServerIP:ApplicationServicePort/ContextRootName/JSPFileName
For the server IP, enter the IP address of the server where you installed WebSphere. For the application service port, enter the application service port you checked earlier (9080 by default). For the context root name, enter the context root you specified when registering the application. For the JSP file name, enter the name of the JSP file in the WAR module.
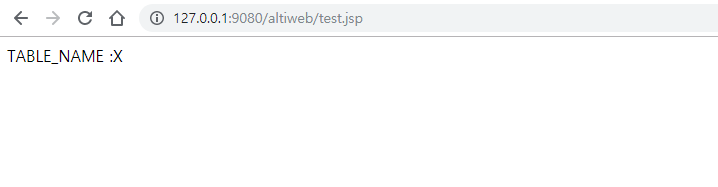
The address used in the test is as follows.
http://127.0.0.1:9080/altiweb/test.jsp
FailOver Configuration#
This chapter describes how to integrate with WebSphere by using the FailOver feature of Altibase.
FailOver#
WebSphere does not provide a FailOver feature. However, Altibase provides FailOver starting from version 5.3.3, so you can implement FailOver with it.
The syntax is as follows.
jdbc:Altibase://ServerIP:DBPortNumber/DBName?AlternateServers=(ServerIP:DBPortNumber)&ConnectionRetryCount=3&ConnectionRetryDelay=3&SessionFailOver=off
FailOver Related Properties#
The FailOver related properties are as follows.
| Item | Description |
|---|---|
| AlternateServer | Specifies the available servers to connect to when a failure occurs, in the format (IP Address1:Port1, IP Address2:Port2,...). |
| ConnectionRetryCount | Number of connection attempts when connecting to an available server fails |
| ConnectionRetryDelay | Time to wait (in seconds) before retrying when connecting to an available server fails |
| SessionFailOver | Specifies whether to perform STF (Service Time Fail-Over). - ON: STF, OFF: CTFCTF (Connection Time Fail-Over) detects a failure when connecting to the DBMS, and connects to the DBMS of another available node instead of the failed DBMS to continue the service. STF (Service Time Fail-Over) handles a failure that occurs during service after the connection to the DBMS succeeds. The client reconnects to the DBMS of another available node, restores the session properties, and then runs the business logic of the user application again. In other words, the work performed on the failed DBMS must be performed again. |
For how to implement CTF and STF, see the Altibase FailOver technical document.
Applying FailOver#
To use the FailOver feature, enter the FailOver syntax above in the "url" item of the data source settings, as shown below.
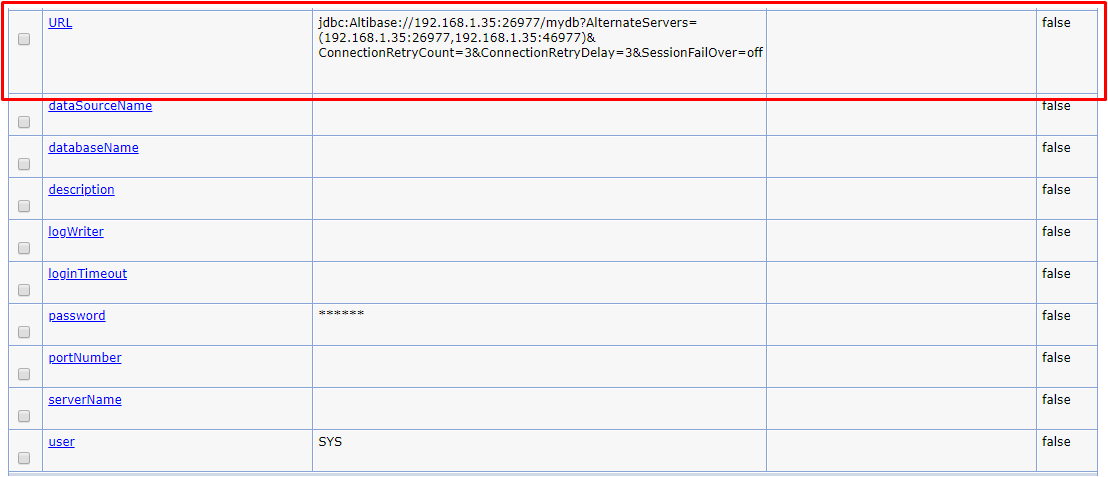
After you set up the data source, create a WAR module with the following test example and test it in WebSphere.
The test page displays the time of the local DB on the screen. If you shut down the local DB, the connection fails over to the alternate DB (AlternateServer), and the page displays the time of the alternate DB.
Test.jsp#
<%@ page import="java.sql.*"%>
<%
    javax.sql.DataSource ds = null;
    javax.naming.InitialContext ctx=null;

    ctx = new javax.naming.InitialContext();
    ds = (javax.sql.DataSource)ctx.lookup("jdbc/Altibase");
    Connection conn = ds.getConnection();

    DatabaseMetaData dmd = conn.getMetaData();

    String query = "select to_char(sysdate,'yyyy/mm/dd hh24:mi:ss') from dual";
    Statement stmt = null;
    ResultSet rs= null;

    for(int i =0;i<1000;i++){
        try{
            stmt = conn.createStatement();
            rs = stmt.executeQuery(query);
            if( rs.next() )
            {
                out.println( "VALUE : " + i+" "+rs.getString(1) + "<br>" );
                out.flush();
            }
            rs.close();
            stmt.close();
            Thread.sleep(1000);
        }catch(SQLException e){
            System.out.println(i+" "+e.getSQLState());
            Thread.sleep(1000);
            //conn = ds.getConnection();
        }
    }

%>