MyBatis Integration Guide for Altibase#
Overview#
This document describes the MyBatis, differences from iBatis, and how to integrate with Altibase in MyBatis.
MyBatis 3.2.8, Altibase 6.3.1, Eclipse and Maven were used as development IDE, and examples are provided separately from the chapter.
In addition to this document, the documents to be referenced during the development are as follows:
- Development Guide for Altibase
- JAVA Development Guide
- JBoss Integration Guide for Altibase
- TOMCAT Integration Guide for Altibase
- WebSphere Integration Guide for Altibase
- WebLogic Integration Guide for Altibase
- Spring Integration Guide for Altibase
- Hibernate Integration Guide for Altibase
Info
For errors and improvements related to this document, please contact the technical support portal or technical support center.
- Technical support portal: http://support.altibase.com/en
- Technical support center: +82-2-2082-1114
Info
This document is provided for informational purposes only and is subject to change without prior notice. It may contain errors, and Altibase makes no express or implied warranties of any kind, including but not limited to warranties of merchantability or fitness for a particular purpose.
The development, release, and timing of any features or functionality described for Altibase products in this document are at the sole discretion of Altibase.
Altibase may hold patents, trademarks, copyrights, or other intellectual property rights related to the contents of this document.
MyBatis Overview#
What is MyBatis?#
MyBatis is a persistence framework that supports developer-specified SQL, stored procedures, and some advanced mapping.
MyBatis removes JDBC code and manually set parameters and result mappings.
MyBatis can use XML and annotations to set and map primitive types and Map interfaces and Java POJOs to database records.
In the way of programming using JDBC, SQL statements are written in the program source, but with MyBatis, SQL statements are separated from the program and separately written in XML files.
This reduces the burden of programmers to program when using existing JDBC. In addition, if the user wants to change the SQL, the user can change the SQL with no hassle because the user only needs to change the SQL statement in the XML file rather than modifying the program as before.
The following is an illustration of the structure of MyBatis.

Configuration file (SqlMapConfig.xml): Defines the rules that MyBatis works such as DB settings and transactions
Mapper: Refers to the mapper XML file that defines SQL in XML, and the mapper interface that defines SQL as an annotation for each method of the interface
Mapping Statements: Refers to the result mapping indicating the rules for setting search result to the Java object and the mapping statement defining SQL in XML.
There are two ways to define mapping statements: annotation and XML method.
When the user writes each SQL statement for CRUD in the SqlMap XML file and writes these files in the SqlMapConfig XML file, it creates statement mapped objects automatically through MyBatis API and executes SQL statement in DB through it. MyBatis is currently acquired by Google and the website is https://mybatis.org/mybatis-3/.
Downloading MyBatis#
To use MyBatis, MyBatis related jar files are required. This jar file can be downloaded from http://repo1.maven.org/maven2/org/mybatis/mybatis/3.2.8/.
Download mybatis-3.2.8.jar and add it in Eclipse. If using Maven, add the following statement to pom.xml.
<dependency>
            <groupId>org.mybatis</groupId>
            <artifactId>mybatis</artifactId>
            <version>3.2.8</version>
</dependency>
How to add a library via Maven is explained in detail in Appendix 2.
Differences Between MyBatis and iBatis#
Java Required Version#
iBatis can be used with JDK 1.4 or later,
MyBatis requires JDK 1.5 or later (MyBatis 3.2 or later requires JDK 1.6 or later)
Change of Package Internal Structure#
iBatis: com.ibatis.
MyBatis: org.apache.ibatis. (Name changed, but iBatis is still used internally)
Change of SqlMap.xml Internal Structure#
The biggest change is that the parameterMap is deprecated.
The user cannot use parameterMap, and the part that used parameterMap defined in the parameterType as below.
ex)

<insert id="insertBlobData" parameterType="LobVo">
insert into test_blob(user_no, user_name, blob_data, clob_data, reg_date)
values(#{userNo}, #{userName}, #{blobData,jdbcType=BLOB}, #{clobData,jdbcType=CLOB}, #{regDate})
</insert>
Change of Terms#
SqlMapConfig -> Configuration
sqlMap -> mapper
Change of Namespace#
The user cannot use the abbreviated name for each sqlMap, and the user must specify the path. In addition, namespace was optional in iBatis, but it is required in MyBatis.
Ex)

iBatis : <sqlMap namespace="Lob">
MyBatis : <mapper namespace="com.altibase.sample.mapper.LobMapper">
Sample Preparation using MyBatis#
To process SQL statements using MyBatis, the user needs to create a Configuration XML file and mapper XML file. These files allow programmers to easily map JavaBeans to PreparedStatement parameters and ResultSets.
This chapter describes how to create Configuration XML file, Mapper XML file, and how to process SQL by using these files in the application.
Creating Mapper File#
The Mapper XML file is a file that specifies the SQL statements to be transferred to the DB, mapping of parameters to be bound to PreparedStatement and mapping of ResultSet results.
The following is an example of creating a Mapper XML file that processes CRUD in the person table. (UserMapper.xml)
<?xml version="1.0" encoding="UTF-8"?>
<!DOCTYPE mapper PUBLIC "-//mybatis.org//DTD Mapper 3.0//EN"
"http://mybatis.org/dtd/mybatis-3-mapper.dtd">

<mapper namespace="com.altibase.sidu.mapper.UserMapper">
    <select id="selectUserData" parameterType="Integer" resultType="User">
        SELECT user_no as userNo,
        user_name as userName,
        user_content as userContent,
        reg_date as regDate
        FROM users
        WHERE user_no = #{userNo}
    </select>

    <select id="selectAllUserData" resultType="User">
        SELECT user_no as userNo,
        user_name as userName,
        user_content as userContent,
        reg_date as regDate
        FROM users
    </select>

    <insert id="insertUserData" parameterType="User">
        insert into
        users(user_no, user_name, user_content, reg_date)
        values(#{userNo}, #{userName}, #{userContent}, #{regDate})
    </insert>

    <update id="updateUserData" parameterType="User">
        update users
        set user_name = #{userName},
        user_content = #{userContent},
        reg_date = #{regDate}
        where user_no = #{userNo}
    </update>

    <delete id="deleteUserData" parameterType="User">
        delete from users
        where user_no = #{userNo}
    </delete>
</mapper>
In the <insert>, <update>, <delete>, and <select> tags, each SQL statement for the CRUD operation is defined.
For more information about each tag, refer to https://mybatis.org/mybatis-3/.
Creating Configuration File#
The Configuration file is the SQL Maps configuration file that writes properties to control SqlMapClient in addition to setting dataSource, Mapper file path, and typeAliases for DB connection.
The following is an example of a configuration file (mybatis-config.xml).
<?xml version="1.0" encoding="UTF-8"?>
<!DOCTYPE configuration PUBLIC "-//mybatis.org//DTD Config 3.0//EN"
  "http://mybatis.org/dtd/mybatis-3-config.dtd">
<configuration>

<properties resource="db.properties" />

<typeAliases>
    <typeAlias type="com.altibase.sidu.model.UserVo" alias="User" />
</typeAliases>

<!--  DB Connection Option : UNPOOLED/POOLED/JNDI -->
<!--  transactionManager Option : JDBC/MANAGED -->
<environments default="development">
    <environment id="development">
    <transactionManager type="JDBC" />
    <dataSource type="POOLED">
        <property name="driver" value="${jdbc.driver}" />
        <property name="url" value="${jdbc.url}" />
        <property name="username" value="${jdbc.username}" />
        <property name="password" value="${jdbc.password}" />
        <property name="poolPingQuery" value="select 1 from dual"/>
            <property name="poolMaximumActiveConnections" value="100"/>
            <property name="poolMaximumIdleConnections" value="50"/>
            <property name="poolMaximumCheckoutTime" value="20000"/>
    </dataSource>
    </environment>
</environments>

<mappers>
    <mapper resource="com/altibase/sidu/mapper/UserMapper.xml" />
</mappers>

</configuration>
In the <properties> tag, specify the path and name of the properties file where the properties defined in the form of name = value are written. In the <settings> tag, write the properties to control the configuration. In the <transactionManager> and <dataSource>, write the DB information to connect.
In addition, the <mappers> tag writes the path and name of the previously created Mapper files. Unlike the previous iBatis, MyBatis can set several DBs in the configuration file and set a specific DB at the time of creating SqlSessionFactory object, compared to the fact that only one DB setting can be done in iBatis.
For more information about each tag, refer to https://mybatis.org/mybatis-3/
Creating Application#
CRUD operations can be processed by integrating with objects mapped to DB tables by using the instance of the SqlSession object provided by MyBatis in the application. In order to integrate with DB using MyBatis, first, read the configuration file with the configuration for the DB connection, create a SqlSession Factory object, obtain the SqlSession object from the object, and process the query mapped to the Mapper.
The following is an application that inserts, changes, and selects data in the user table of the DB. The part that gets the connection from the application was classified as a separate class.
Ex) SiduMain.java of altibase_mybatis_sidu
// Configuration DB Connection
MybatisUtil.java
…
inputStream = Resources.getResourceAsStream("mybatis-config.xml");
sqlSessionFactory = new SqlSessionFactoryBuilder().build(inputStream);
sqlSession = sqlSessionFactory.openSession(false);
…
UserVo userVo = new UserVo();
…

//select User
String statement = "com.altibase.sidu.mapper.UserMapper.selectUserData";
userVo = MybatisUtil.getSqlSessionFactory().selectOne(statement, user_no);
…

// select all User
List<UserVo> userVos = MybatisUtil.getSqlSessionFactory().selectList(statement);
…

// update User
String statement = "com.altibase.sidu.mapper.UserMapper.updateUserData";
            res_count = MybatisUtil.getSqlSessionFactory().update(statement, userVo);
…

// insert User
String statement = "com.altibase.sidu.mapper.UserMapper.insertUserData";
res_count = MybatisUtil.getSqlSessionFactory().insert(statement, userVo);
…

// delete User
String statement = "com.altibase.sidu.mapper.UserMapper.deleteUserData";
res_count = MybatisUtil.getSqlSessionFactory().insert(statement, user_no);
First, read Mapper file to create SqlSessionFactory object and create SqlSession object from the created SqlSessionFactory object. The method to get SqlSession from Sample is as follows.
sqlSessionFactory.openSession(boolean arg0);
The Boolean argument of the method is a value that determines the autocommit mode.
(inputStream = Resources.getResourceAsStream("mybatis-config.xml");
sqlSessionFactory = new SqlSessionFactoryBuilder().build(inputStream);
sqlSession = sqlSessionFactory.openSession(false);)
Then, each method of CRUD class is called with id named in SqlSession object and Mapper. (String statement = "com.altibase.sidu.mapper.UserMapper.updateUserData";
sqlSession.update(statement, update))
For more information about each tag, refer to https://mybatis.org/mybatis-3/
Altibase Integration#
To integrate Altibase with MyBatis, set the Altibase JDBC Driver and specify a dataSource for Altibase in the configuration file.
This section explains how to obtain the Altibase JDBC Driver, how to configure the JDBC Driver, and how to set the dataSource in the configuration.
It also covers how to use the Fail-Over feature, how to connect to multiple versions of Altibase, and how to call stored procedures or functions.
How to obtain the Altibase JDBC Driver#
The JDBC driver provided by Altibase is the Altibase.jar file. This file is located in the $ALTIBASE_HOME/lib directory on the server where Altibase is installed.
Starting from Altibase 5, both Altibase.jar and Altibase5.jar files are found in the $ALTIBASE_HOME/lib directory. Altibase.jar is the standard JDBC driver file, while Altibase5.jar is used when connecting to Altibase 5 and earlier versions together.
Therefore, if you are connecting to a single Altibase database or to multiple Altibase instances of the same version, use the $ALTIBASE_HOME/lib/Altibase.jar file.
To ensure compatibility between the Altibase DB server and the Altibase JDBC Driver, it is necessary to check the JDBC Driver version.
You can check the Altibase JDBC Driver version by running the following command.
$ java –jar Altibase.jar
JDBC Driver Info : Altibase Ver = 6.3.1.2.6 for JavaVM v1.4, CMP:7.1.1, Oct  6 2014 13:54:56
At this time, compatibility is ensured if the cm protocol version of Altibase and the CMP of the Altibase JDBC Driver are the same.
$ altibase -v
version 6.3.1.2.7 X86_64_LINUX_redhat_Enterprise_ES4-64bit-6.3.1.2.7-release-GCC3.4.6
(x86_64-unknown-linux-gnu) Oct  8 2014 09:16:24, binary db version 6.2.1, meta version 6.3.1,
cm protocol version 7.1.1, replication protocol version 7.4.1
As the version is updated, there is a possibility that JDBC-related bugs have been fixed, so it is generally recommended to use an ALTIBASE JDBC Driver file that is either the same version as Altibase or newer.
How to set up the JDBC Driver#
The downloaded JDBC Driver, Altibase.jar, should be added to the classpath or placed in an appropriate directory of the web server.
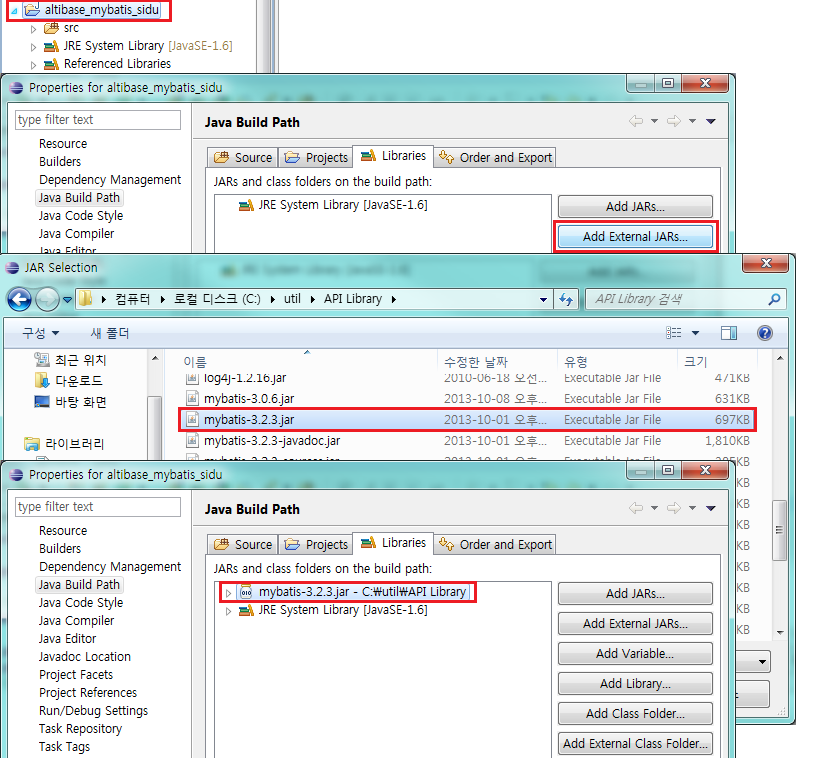
If you are developing with Eclipse, you can add the Altibase JDBC Driver to the project as follows:
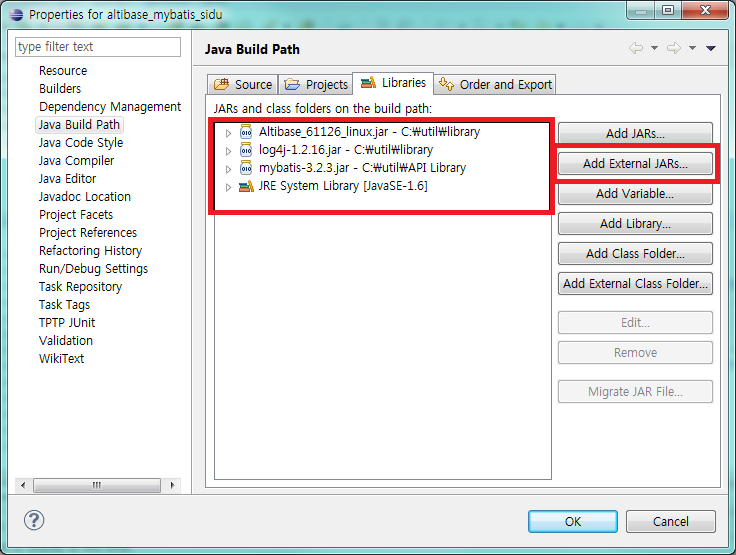
Go to Project → Properties → Java Build Path, then use the Add External JARs option to register the library.
Connecting to Altibase by setting the DataSource in the configuration file#
To connect to Altibase, specify the properties for Altibase inside the <configuration> tag of the configuration file. At this point, you can either enter the property values directly in the configuration file, or create a separate properties file and load the values from that file.
The following is an example of defining Altibase-related properties in a file named db.properties and then using those properties in the configuration file.
Example) db.properties file for altibase_mybatis_sidu
jdbc.driver=Altibase.jdbc.driver.AltibaseDriver
jdbc.url=jdbc:Altibase://192.168.1.35:36492/mydb
jdbc.username=sys
jdbc.password=manager
The meaning of each value set in this file is as follows.
| Property | Description |
|---|---|
| driver | Altibase JDBC driver class Name |
| URL | Connection string information for connecting to Altibase should be written in the form of "jdbc:Altibase://IP:port_no/db_name" |
| username | Database account |
| password | Database password |
example) mybatis-config.xml file of altibase_mybatis_sidu
<configuration>
    <properties resource="db.properties" />
    <typeAliases>
    <typeAlias type="com.altibase.sidu.model.UserVo" alias="User" />
    </typeAliases>

    <!--  DB 연결 옵션 : UNPOOLED/POOLED/JNDI -->
    <!--  transactionManager 옵션 : JDBC/MANAGED -->
    <environments default="development">
        <environment id="development">
    <transactionManager type="JDBC" />
    <dataSource type="POOLED">
        <property name="driver" value="${jdbc.driver}" />
        <property name="url" value="${jdbc.url}" />
        <property name="username" value="${jdbc.username}" />
        <property name="password" value="${jdbc.password}" />
        <property name="poolPingQuery" value="select 1 from dual"/>
        <property name="poolMaximumActiveConnections" value="100"/>
        <property name="poolMaximumIdleConnections" value="50"/>
        <property name="poolMaximumCheckoutTime" value="20000"/>
    </dataSource>
    </environment>
    </environments>
    <mappers>
        <mapper resource="com/altibase/sidu/mapper/UserMapper.xml" />
    </mappers>
</configuration>
The driver, url, username, and password properties specified in db.properties are read and set to the dataSource properties: JDBC.Driver, JDBC.ConnectionURL, JDBC.Username, and JDBC.Password.
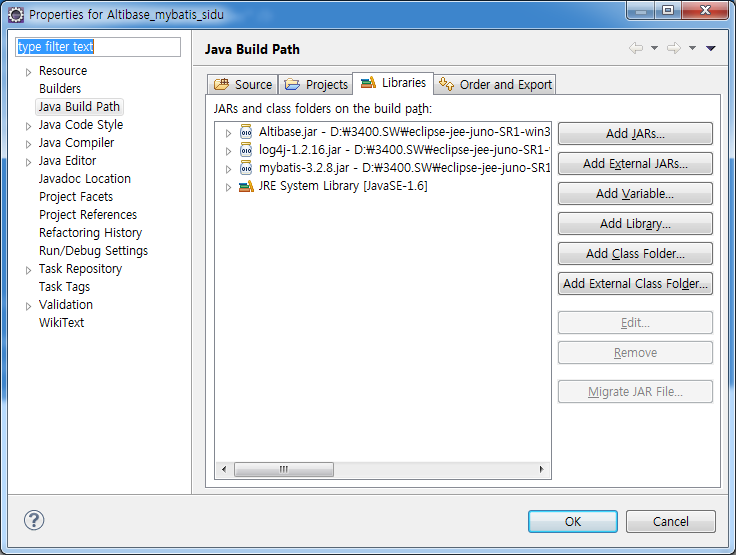
To run the SimpleConnection project shown in the example above, the Altibase.jar and mybatis-3.2.8.jar files are required.
Connection using Fail-Over#
Fail-Over has been supported since Altibase 5.3.3. To use the Fail-Over feature, include the Fail-Over related properties in the Connection URL of the dataSource.
The following is an example of connecting to Altibase using Fail-Over. The Connection URL part is defined in the db.properties file.
Ex) FailOverSample db.properties file
driver=Altibase.jdbc.driver.AltibaseDriver
url=jdbc:Altibase://192.168.6.224:21129/mydb?
AlternateServers=(192.168.1.35:21129)&
ConnectionRetryCount=1&ConnectionRetryDelay=1&
SessionFailOver=off&LoadBalance=off&Healthcheckduration=10&Failover_source=MESSAGE&
username=sys
password=manager
The Fail-Over related properties that can be defined in the Connection URL part specified in the above file are as follows.
| Property | Description |
|---|---|
| AlternateServer | Specifies the available servers to connect to in case of failure, written in the format IP Address1:Port1, IP Address2:Port2, ... |
| ConnectionRetryCount | The number of retry attempts when connecting to an available server fails. |
| ConnectionRetryDelay | The wait time in seconds before retrying connection after a failure to connect to an available server. |
| LoadBalance | If set to on, the initial connection attempt randomly selects from the primary server and available servers. If set to off, the initial attempt connects to the primary server, and if that fails, it tries the servers specified in AlternateServer. |
| SessionFailOver | Indicates whether to perform STF (Service Time Fail-Over). on means STF, off means CTF. CTF (Connection Time Fail-Over) detects failure at the time of DBMS connection and retries connecting to another available server. STF (Service Time Fail-Over) detects failure during service, reconnects to another available DBMS node, restores session properties, and allows the user application to continue its logic. STF only handles Fail-Over for DB connections; failed transactions must be retried by the user. |
| Healthcheckduration | Specifies the wait time before a server that experienced failover is added back to the AlternativeServer list. When connection failover occurs, the server is removed from the AlternativeServer list. After a set time, the server is re-added to the list. HealthCheckDuration determines this time in seconds. |
| Failover_source | Specifies a description sent to the server as Failover_source during failover. This information is stored in the FAILOVER_SOURCE column of the V$SESSION performance view. |
To run the above example FailOverSample project, just like setting the dataSource in the Configuration file to connect with Altibase, the Altibase.jar and ibatis-2.3.4.x.jar files are required.
Connecting Altibase 5 and previous versions simultaneously#
From Altibase 5 onwards, a dedicated JDBC Driver (Altibase5.jar) is provided so that one application can connect to Altibase 6 and Altibase 5, or Altibase 4 simultaneously.
Using this driver, it is possible to connect between two versions of Altibase such as Altibase 6 – Altibase 5, Altibase 6 – Altibase 4, and Altibase 5.1.5 – Altibase 5.3.3.
To distinguish from the existing Altibase.jar, a separate Altibase5.jar specific for Altibase 5 is required. Also, when specifying in the dataSource, the JDBC Driver class name must be set to Altibase5.jdbc.driver.AltibaseDriver instead of the existing Altibase.jdbc.driver.AltibaseDriver.
To integrate MyBatis with different versions of Altibase, you need to write an <environment> tag for each version and let the application read the settings through the <environment> id when connecting to the DB.
One important point is that in the program, Altibase5.jdbc.driver.AltibaseDriver must be loaded first, followed by Altibase.jdbc.driver.AltibaseDriver.
Below is an example of loading drivers for two versions of Altibase using Altibase.jar and Altibase5.jar files.
Example) db.properties file of altibase_mybatis_MultiVersionConnection
Settings for Altibase 6 version
### Altibase
jdbc.driver=Altibase.jdbc.driver.AltibaseDriver
jdbc.url=jdbc:Altibase://192.168.1.62:21020/mydb
jdbc.username=test
jdbc.password=test
Example) db.properties file of altibase_mybatis_MultiVersionConnection
Settings for versions prior to Altibase 6
<environment id="release">
  <transactionManager type="JDBC" />
  <dataSource type="POOLED">
    <property name="driver" value="${jdbc5.driver}" />
    <property name="url" value="${jdbc5.url}" />
    <property name="username" value="${jdbc5.username}" />
    <property name="password" value="${jdbc5.password}" />
    <property name="poolPingQuery" value="select 1 from dual"/>
      <property name="poolMaximumActiveConnections" value="100"/>
      <property name="poolMaximumIdleConnections" value="50"/>
      <property name="poolMaximumCheckoutTime" value="20000"/>
  </dataSource>
</environment>
Settings for versions to Altibase 6
<environment id="development">
  <transactionManager type="JDBC" />
  <dataSource type="POOLED">
    <property name="driver" value="${jdbc.driver}" />
    <property name="url" value="${jdbc.url}" />
    <property name="username" value="${jdbc.username}" />
    <property name="password" value="${jdbc.password}" />
    <property name="poolPingQuery" value="select 1 from dual"/>
      <property name="poolMaximumActiveConnections" value="100"/>
      <property name="poolMaximumIdleConnections" value="50"/>
      <property name="poolMaximumCheckoutTime" value="20000"/>
  </dataSource>
</environment>
Ex) MultiVersionConnectionMain.java file of altibase_mybatis_MultiVersionConnection
…
MultiVersionConnectionSelect multi_connection_select =
new MultiVersionConnectionSelect();

System.out.println("DB Version = " +  multi_connection_select.MultiVersionConnectionDBVersionSelect("release"));

System.out.println("DB Version = " +  multi_connection_select.MultiVersionConnectionDBVersionSelect("development"));
…
In the above MultiVersionConnectionMain.java example, to load Altibase5.jdbc.driver.AltibaseDriver before Altibase.jdbc.driver.AltibaseDriver, the id of the Altibase 5 driver’s tag, which is "release," is set as an argument. As mentioned earlier, the Altibase5.jdbc.driver.AltibaseDriver driver must be loaded first.
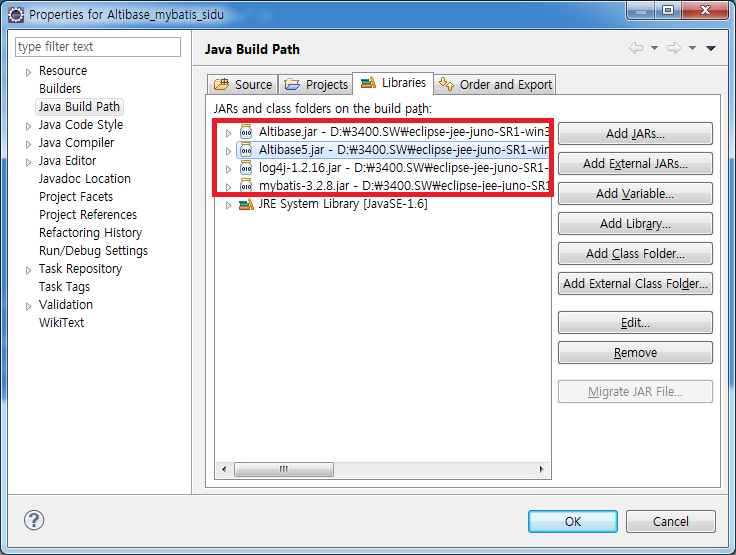
To run the MultiVersionConnection project included in the example, in addition to the previously used mybatis.3.2.8.jar file, the Altibase.jar and Altibase5.jar files are also required. These files are located in the lib directory inside the Altibase installation directory ($ALTIBASE_HOME). You should use the Altibase5.jar file for Altibase 5 and the Altibase.jar file for the earlier version.
- Altibase 6.3.1 jar : Altibase.jar
- Altibase 5.x.x.jar : Altibase5.jar
Calling Procedures#
When calling a stored procedure created in the DB from MyBatis, it should be configured in the Configuration file just like basic DML operations. However, the following points should be noted when using it:
- The <procedure> tag used in the previous iBatis has been removed, and procedure/function calls are determined only by statementType, so when using procedures/functions, statementType must be set to CALLABLE.
- The <parameterMap> used in the previous iBatis cannot be used.
Below is an example of selecting using a stored procedure.
Ex) Procedure creation script in altibase_mybatis_procedure
CREATE OR REPLACE PROCEDURE PROC_SEL_TEST(usr_no IN INTEGER, res_user OUT TEST_TYPE.TEST_CUR)
as
    SQL_STMT VARCHAR(200);
BEGIN
    SQL_STMT :='SELECT user_no as userNo,
user_name as userName,
user_content as userContent,
reg_date as regDate
FROM users
WHERE user_no = ?';
    OPEN res_user FOR SQL_STMT USING usr_no;
END;
/

CREATE or replace TYPESET TEST_TYPE
AS
  TYPE TEST_CUR IS REF CURSOR;
END;
/
Ex) UserMapper.xml (Mapper) file of altibase_mybatis_procedure
<select id="testSelectProc" statementType="CALLABLE" parameterType="INTEGER" resultType="User">
  { call PROC_SEL_TEST(
    #{userNo,mode=IN,jdbcType=INTEGER,javaType=INTEGER}
) }
</select>
By specifying the attribute statementType as CALLABLE in the <select> tag, it explicitly indicates that the request is a Procedure/Function call. The IN parameters of the called Procedure/Function are configured, and by setting the resultType to a Bean class, the results of the procedure are returned as instances of that Bean class.
At this time, the column names in the Bean class must match the column names selected from the DB for the results to be properly returned to the Bean class.
To run the altibase_mybatis_procedure example, just like setting the dataSource in the Configuration file to connect with Altibase, the Altibase.jar and mybatis.3.2.8.jar files are required.
Calling Functions#
When calling a Function created in the DB from MyBatis, it should be configured in the Configuration file just like basic DML operations. However, the following points should be noted:
- The <procedure> tag used in the previous iBatis has been removed, and procedure/function calls are determined only by statementType, so statementType must be set to CALLABLE when using Procedures/Functions.
- The <parameterMap> used in the previous iBatis cannot be used.
Below is an example of handling a Stored Function that returns a simple addition result. Although the basics are the same as Stored Procedures, the way of calling differs slightly, so it is described separately.
Ex) Function creation script in altibase_mybatis_procedure
CREATE OR REPLACE FUNCTION sum_func
(
p_num1 IN NUMBER,
p_num2 IN NUMBER
)
RETURN NUMBER
AS
v_num NUMBER;
BEGIN
  v_num := p_num1 + p_num2;
  RETURN v_num;
  END;
/
Ex) UserMapper.xml (Mapper) file of altibase_mybatis_procedure
<select id="testSelectFunc" statementType="CALLABLE" parameterType="map" resultType="INTEGER">
  { call #{resNum,mode=OUT,jdbcType=INTEGER,javaType=INTEGER} :=  SUM_FUNC(
    #{Num1,mode=IN,jdbcType=INTEGER,javaType=INTEGER},
    #{Num2,mode=IN,jdbcType=INTEGER,javaType=INTEGER}
     ) }
</select>
The basic configuration method is the same as for Stored Procedures, but the way Functions are called in the Mapper is different.
The differences compared to calling Stored Procedures are as follows.
Procedure : call PROC_SEL_TEST(#{IN});
Function  : call #{OUT} := SUM_FUNC(#{IN})
When calling a Function from the Mapper, you must follow the format described above for the Function call to work correctly.
To run the altibase_mybatis_procedure example, just like setting the dataSource in the Configuration file to connect with Altibase, the Altibase.jar and mybatis.3.2.8.jar files are required.
MyBatis, Spring, Altibase Integration#
To integrate MyBatis and Spring with Altibase, you need to define the dataSource in Spring using the MyBatis module and connect it to Altibase.
This chapter explains how to connect Altibase using the MyBatis module in Spring.
Setting dataSource by integrating MyBatis into Spring#
To use Altibase together with Spring and MyBatis, configure the following in Spring’s configuration file (applicationContext.xml):
- SqlSessionFactory bean using the MyBatis module
- Transaction settings via transactionManager
- DataSource for the database
-
Mapper Bean configuration: To perform the integration, you need the MyBatis - Spring integration modules, which are named as follows:
-
mybatis-spring-1.x.x.jar: Using the mybatis - spring integration module requires Java version 1.5 or later. Note that MyBatis and Spring versions may vary slightly depending on their releases. Please refer to the table below for detailed version compatibility information
| MyBatis Spring Integration Modules | MyBatis | Spring |
|---|---|---|
| 1.0.0 and 1.0.1 | 3.0.1 to 3.0.5 | 3.0.0 or later |
| 1.0.2 | 3.0.6 | 3.0.0 or later |
| 1.1.0 or later | 3.1.0 or later | 3.0.0 or later |
To use MyBatis together with Spring, you need to specify the MyBatis SqlSessionFactory bean and Mapper bean in Spring’s ApplicationContext.xml file.
The Mapper bean defines the methods that actually handle the queries, and it is processed via interfaces in the Spring framework.
In an environment integrating MyBatis and Spring, to configure the dataSource in Spring, you select one of the methods described in the Altibase_Spring_Integration_Guide document and specify the DB’s datasource name in the dataSource property of the SqlSessionFactory bean and TransactionManager bean.
Below is an example of specifying the dataSource, SqlSessionFactory bean, and TransactionManager bean in the applicationContext.xml file.
Ex) ApplicationContext.xml file of altibase_mybatis_spring
…
<!-- DriverManagerDataSource Setting up a data source using classes -->
<bean id="dataSource" class="org.springframework.jdbc.datasource.DriverManagerDataSource">
   <property name="driverClassName" value="Altibase.jdbc.driver.AltibaseDriver" />
   <property name="url" value="jdbc:Altibase://192.168.1.35:36492/mydb" />
   <property name="username" value="sys" />
   <property name="password" value="manager" />
</bean>
…
<!--TransactionManager bean setting -->
<bean id= TransactionManager "
class="org.springframework.jdbc.datasource.DataSourceTransactionManager">
<property name="dataSource" ref="dataSource" />
</bean>
…
<!-- SqlSessionFactory bean setting -->
<bean id="SqlSessionFactory" class="org.mybatis.spring.SqlSessionFactoryBean">
<property name="dataSource" ref="dataSource" />
<property name="typeAliasesPackage" value="com.altibase.test.domain" />
</bean>
This example is based on a Spring Template Project and was created using Maven.
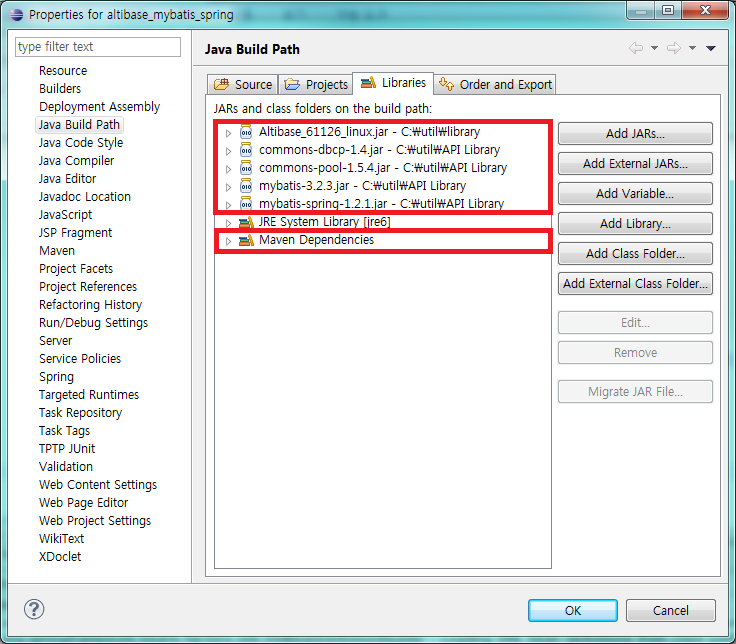
The libraries that users need to add are only the DB connection library (Altibase.jar), MyBatis-related library (mybatis-3.2.8.jar), and MyBatis-Spring integration library (mybatis-spring-1.2.1.jar). Spring-related libraries are handled automatically via Maven.
(The project was created using Spring MVC within the Spring Template Project, and when created this way, the generated pom.xml file automatically imports the necessary libraries using the dependency tags. Detailed information is provided in the appendix.)
How to Configure Connection Pool#
With Spring - MyBatis integration, the dataSource configuration can be set independently. Note that without Spring integration, MyBatis alone cannot use connection pools from other modules; you must integrate with Spring to use connection pools from other modules.
Below is an example of configuring a Connection Pool.
Ex) applicationContext.xml file of altibase_mybatis_spring
...
<!-- Altibase Connection Pool -->
<bean id="dataSource" class="Altibase.jdbc.driver.AltibaseConnectionPoolDataSource">
    <property name="URL" value="jdbc:Altibase://192.168.1.62:21020/mydb" />
    <property name="user" value="test" />
    <property name="password" value="test" />
</bean>
...

<!-- Apache Connection Pool -->
<bean id="dataSource"
class="org.apache.commons.dbcp.BasicDataSource" destroy-method="close">
<property name="driverClassName" value="Altibase.jdbc.driver.AltibaseDriver" />
<property name="url" value="jdbc:Altibase://192.168.1.35:36492/mydb" />
<property name="username" value="sys" />
<property name="password" value="manager" />
<property name="initialSize" value="10" />
<property name="minIdle" value="25" />
<property name="maxIdle" value="30" />
<property name="maxActive" value="100" />
<property name="validationQuery" value="select 1 from dual" />
</bean>
Transaction Management#
When integrating MyBatis with a database, the dataSource is specified in the <transactionManager> tag within each DB-specific <environment> under the <environments> section of the Configuration file. The database connection is then established through the SqlSessionFactory object using the <environment> id. At this time, auto-commit mode can also be configured, with the default being auto-commit enabled.
This chapter introduces various transaction management methods.
Transaction Management in MyBatis#
Unlike iBatis, where only one DB could be configured per configuration file, MyBatis allows multiple DBs to be configured and managed under the <environments> tag.
Each <environment> tag within <environments> configures one DB, specifying the dataSource under the <transactionManager> tag. The application programmer can manage transactions directly.
In MyBatis, there is no explicit transaction start or end. Instead, auto-commit mode can be set when configuring the SqlSessionFactory through the Configuration.
The following example shows how to configure multiple DBs in a single Configuration file.
Ex) mybatis-config.xml file of altibase_mybatis_MultiVersionConnection
…
<!--  DB Connection options : UNPOOLED/POOLED/JNDI -->
<!--  transactionManager options : JDBC/MANAGED -->
<environments default="development">
<!--  development alias의 connection configuration(5 version) -->
<environment id="development">
  <transactionManager type="JDBC" />
  <dataSource type="POOLED">
    <property name="driver" value="${jdbc5.driver}" />
    <property name="url" value="${jdbc5.url}" />
    <property name="username" value="${jdbc5.username}" />
    <property name="password" value="${jdbc5.password}" />
    <property name="poolPingQuery" value="select 1 from dual"/>
      <property name="poolMaximumActiveConnections" value="100"/>
      <property name="poolMaximumIdleConnections" value="50"/>
      <property name="poolMaximumCheckoutTime" value="20000"/>
  </dataSource>
</environment>
<!--  release alias의 connection configuration(6 or later version) -->
  <environment id="release">
    <transactionManager type="JDBC" />
    <dataSource type="POOLED">
      <property name="driver" value="${jdbc.driver}" />
      <property name="url" value="${jdbc.url}" />
      <property name="username" value="${jdbc.username}" />
      <property name="password" value="${jdbc.password}" />
      <property name="poolPingQuery" value="select 1 from dual"/>
        <property name="poolMaximumActiveConnections" value="100"/>
        <property name="poolMaximumIdleConnections" value="50"/>
        <property name="poolMaximumCheckoutTime" value="20000"/>
    </dataSource>
  </environment>
</environments>
…
Ex) MybatisUtil.java file of altibase_mybatis_MultiVersionConnection
…
// Read the configuration values from Mybatis-config.xml
inputStream = Resources.getResourceAsStream("mybatis-config.xml");
// Create an SqlSessionFactory from the read XML file. (At this time, assign the environment ID as an argument to set the database to be connected to.)
sqlSessionFactory = new SqlSessionFactoryBuilder()build(inputStream, “release”);
// Create the sqlSession object. The argument determines whether to use autoCommit.
// The default is true; if you provide a false value, autocommit=false
sqlSession = sqlSessionFactory.openSession(false);
…
To run the above altibase_mybatis_MultiVersionConnection project example, just like setting the dataSource in the Configuration file to connect with Altibase, the Altibase.jar and mybatis-3.2.8.jar files are required.
Considerations for MyBatis Integration#
Considerations When Integrating Altibase with Spring
LOB Data Handling#
In iBatis, to handle LOBs, it was necessary to explicitly specify the jdbcType as CLOB or BLOB in the Mapper file’s parameter and result settings, typically using parameterMap. However, since parameterMap is deprecated in MyBatis, you now directly specify the jdbcType on the columns being bound in the query. If jdbcType is not explicitly specified, the data will not be recognized as LOB and will cause an error.
Below is an example showing the parameterMap and resultMap settings for CLOB type data.
Ex) LobMapper.xml (Mapper) file of altibase_mybatis_lob
<mapper namespace="com.altibase.psy.mapper.LobMapper">
<!-- LOB select, insert, update, delete Test - 2013/11/05 -->
<select id="selectBlobData" parameterType="Integer" resultType="LobVo">
    SELECT user_no as userNo, user_name as userName, blob_data as blobData, clob_data as clobData, reg_date as regDate
    FROM test_blob
    WHERE user_no = #{userNo}
</select>

<select id="selectAllBlobData"  resultType="LobVo">
    SELECT user_no as userNo, user_name as userName, blob_data as blobData, clob_data as clobData, reg_date as regDate
    FROM test_blob
</select>

<insert id="insertBlobData" parameterType="LobVo">
    insert into test_blob(user_no, user_name, blob_data, clob_data, reg_date)
    values(#{userNo}, #{userName}, #{blobData,jdbcType=BLOB}, #{clobData,jdbcType=CLOB}, #{regDate})
</insert>

<update id="updateBlobData" parameterType="LobVo">
    update test_blob set
        user_name = #{userName},
        blob_data = #{blobData,jdbcType=BLOB},
        clob_data = #{clobData,jdbcType=CLOB},
        reg_date = #{regDate}
    where user_no = #{userNo}
</update>
...

</mapper>
When handling LOBs, an important point to note is that Altibase requires autocommit mode to be set to false and transactions to be managed accordingly. In iBATIS integration, when dataSource is set in the of the SqlMapConfig file, setAutoCommit(false) is internally called to disable autocommit, so no special consideration is needed for LOB handling. However, in MyBatis, the default is true, so it must be explicitly set when obtaining the session.
If autocommit mode is not set to false, the following error occurs:
java.sql.SQLException: 0:LobLocator can not span the transaction 101858625.
The following example is part of a sample that handles LOB data in MyBatis, with the full source attached in the appendix.
Ex) LobMapper.xml file of altibase_mybatis_lob
<?xml version="1.0" encoding="UTF-8"?>
<!DOCTYPE mapper PUBLIC "-//mybatis.org//DTD Mapper 3.0//EN"
"http://mybatis.org/dtd/mybatis-3-mapper.dtd">

<mapper namespace="com.altibase.psy.mapper.LobMapper">
    <!-- LOB select, insert, update, delete Test - 2013/11/05 -->
    <select id="selectBlobData" parameterType="Integer" resultType="LobVo">
        SELECT user_no as userNo, user_name as userName, blob_data as blobData, clob_data as clobData, reg_date as regDate
        FROM test_blob
        WHERE user_no = #{userNo}
    </select>

    <select id="selectAllBlobData"  resultType="LobVo">
        SELECT user_no as userNo, user_name as userName, blob_data as blobData, clob_data as clobData, reg_date as regDate
        FROM test_blob
    </select>

    <insert id="insertBlobData" parameterType="LobVo">
        insert into test_blob(user_no, user_name, blob_data, clob_data, reg_date)
        values(#{userNo}, #{userName}, #{blobData,jdbcType=BLOB}, #{clobData,jdbcType=CLOB}, #{regDate})
    </insert>

    <update id="updateBlobData" parameterType="LobVo">
        update test_blob set
            user_name = #{userName},
            blob_data = #{blobData,jdbcType=BLOB},
            clob_data = #{clobData,jdbcType=CLOB},
            reg_date = #{regDate}
        where user_no = #{userNo}
    </update>

    <delete id="deleteBlobData" parameterType="Integer">
        delete from test_blob
        where user_no = #{userNo}
    </delete>

</mapper>
To run the above altibase_mybatis_lob project, the Altibase.jar and mybatis-3.2.8.jar files are required.
The issue of duplicate Insert queries being sent during Insert operations#
15:15:55.076 [main] [main] [ERROR] - 2. Connection.prepareStatement(insert into TB_DB_CONFIGSET_LEVEL(DB_TYPE_CODE, LEVEL_CODE, LEVEL_NAME
      )
    values (?, ?, ?
      ), 1) insert into TB_DB_CONFIGSET_LEVEL(DB_TYPE_CODE, LEVEL_CODE, LEVEL_NAME
      )
    values (?, ?, ?
      )
Issue Description:
-
When setting 'useGeneratedKeys' to true in the MyBatis configuration XML, the problem described above occurs.
-
This setting is defined as follows ( https://mybatis.org/mybatis-3/sqlmap-xml.html ):
-
It enables the use of the JDBC getGeneratedKeys method to retrieve keys generated internally by the database.
-
Default value : 'false'
-
Changing this setting to false prevents the issue from occurring.
-
This problem does not occur with Oracle or Informix databases with the same setting.
Appendix1 (MyBatis - Altibase Integration)#
Based on the altibase_mybatis_sidu example, this explains in more detail how to integrate MyBatis with Altibase. Note that the IDE used is Eclipse.
Creating DB Table#
Create the following table and sequence in the database.
create table users(
  user_no integer,
  user_name varchar(30),
  user_content varchar(200),
  reg_date date
);
Create Project#
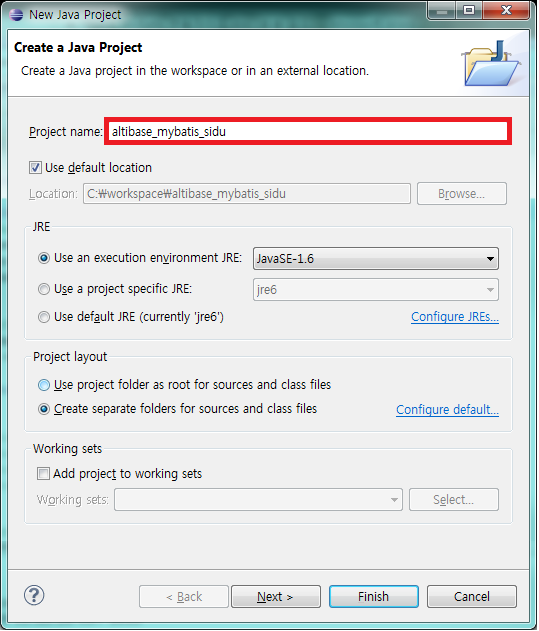
In Eclipse, create a project named altibase_mybatis_sidu.
- Menu – File – Click Java Project
- Enter Project name: Altibase_mybatis_sidu
- Click the Finish button
Package Naming Convention#
The package name explained in the appendix is basically named com.altibase.sidu, which follows common package classification rules. Each part has the following meaning:
-
com: The first part defines the leading group of the project, where com stands for company. For smaller organizations, org (organization) might be used instead.
-
altibase: The second part defines the company or group name. For companies, it’s usually the company name; for groups, the group name. Since this document is from Altibase, it is named altibase.
-
sidu: The third part represents the artifact structure of this project. Since this sample covers general DML commands (Select/Insert/Delete/Update), it is named sidu.
Creating Configuration File#
- Create a properties file (db.properties) that defines properties for connecting to Altibase.
(In the altibase_mybatis_sidu project – right-click the src directory, select New – File, and name the file db.properties.)
jdbc.driver=Altibase.jdbc.driver.AltibaseDriver
jdbc.url=jdbc:Altibase://192.168.1.62:21020/mydb
jdbc.username=sys
jdbc.password=manager
- In the configuration file (mybatis-config.xml), set the dataSource and SqlMap files for integration with Altibase.
(In the altibase_mybatis_sidu project – right-click the src directory, click New – File, and name the file mybatis-config.xml)
<?xml version="1.0" encoding="UTF-8"?>
<!DOCTYPE configuration PUBLIC "-//mybatis.org//DTD Config 3.0//EN"
"http://mybatis.org/dtd/mybatis-3-config.dtd">
<configuration>

<typeAliases>
    <typeAlias type="com.altibase.sidu.model.UserVo" alias="User" />
</typeAliases>

<environments default="development">
    <environment id="development">
        <transactionManager type="JDBC" />
        <dataSource type="SIMPLE">
            <property name="driver" value="${jdbc.driver}" />
            <property name="url" value="${jdbc.url}" />
            <property name="username" value="${jdbc.username}" />
            <property name="password" value="${jdbc.password}" />
            <property name="poolPingQuery" value="select 1 from dual" />
        </dataSource>
    </environment>
</environments>

<mappers>
    <mapper resource="com/altibase/sidu/mapper/UserMapper.xml" />
</mappers>

</configuration>
Create Mapper File#
Create a Mapper file (Person.xml) that defines methods mapped to CRUD SQL statements for the Users table.
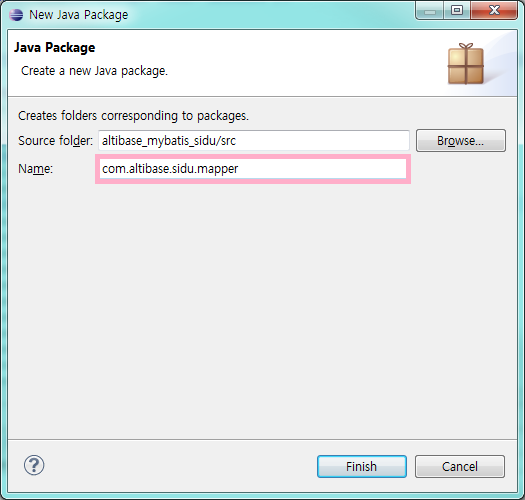
The Mapper is created in the com.altibase.sidu.mapper package.
-
In the altibase_mybatis_sidu project – right-click the src directory, click New – Package, and create a new package named com.altibase.sidu.mapper.
-
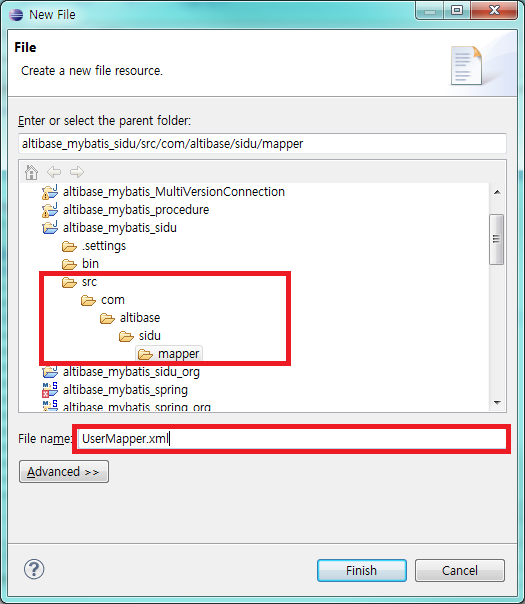
In the newly created package (com.altibase.sidu.mapper), right-click, select New – File, and name the file UserMapper.xml.
-
Write the following content into UserMapper.xml.
<?xml version="1.0" encoding="UTF-8"?>
<!DOCTYPE mapper PUBLIC "-//mybatis.org//DTD Mapper 3.0//EN"
"http://mybatis.org/dtd/mybatis-3-mapper.dtd">

<mapper namespace="com.altibase.sidu.mapper.UserMapper">
    <select id="selectUserData" parameterType="Integer" resultType="User">
        SELECT user_no as userNo,
        user_name as userName,
        user_content as userContent,
        reg_date as regDate
        FROM users
        WHERE user_no = #{userNo}
    </select>

    <select id="selectAllUserData" resultType="User">
        SELECT user_no as userNo,
        user_name as userName,
        user_content as userContent,
        reg_date as regDate
        FROM users
    </select>

    <insert id="insertUserData" parameterType="User">
        insert into
        users(user_no, user_name, user_content, reg_date)
        values(#{userNo}, #{userName}, #{userContent}, #{regDate})
    </insert>

    <update id="updateUserData" parameterType="User">
        update users
        set user_name = #{userName},
        user_content = #{userContent},
        reg_date = #{regDate}
        where user_no = #{userNo}
    </update>

    <delete id="deleteUserData" parameterType="User">
        delete from users
        where user_no = #{userNo}
    </delete>
</mapper>
When the application calls the insert, update, or delete methods in the configuration, the SQL statements defined in the <insert>, <update>, <delete>, and <select> tags with matching ids in the above file are automatically executed.
Creating the Application#
-
Create a VO (Value Object) class for the users table called UserVO (UserVo.java).
1-1. In the altibase_mybatis_sidu project, right-click the src directory and select New – Class.
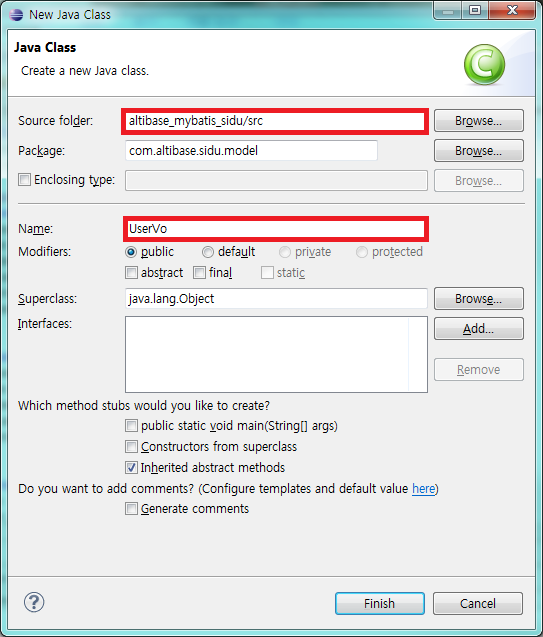
1-2. Enter com.altibase.sidu.model in the Package field and UserVo in the Name field.
1-3. Write the following content into the UserVo.java file.
package com.altibase.sidu.model; import java.io.Serializable; import java.util.Date; @SuppressWarnings("serial") public class UserVo implements Serializable { private Integer userNo; private String userName; private String userContent; private Date regDate; public Integer getUserNo() { return userNo; } public void setUserNo(Integer userNo) { this.userNo = userNo; } public String getUserName() { return userName; } public void setUserName(String userName) { this.userName = userName; } public String getUserContent() { return userContent; } public void setUserContent(String userContent) { this.userContent = userContent; } public Date getRegDate() { return regDate; } public void setRegDate(Date regDate) { this.regDate = regDate; } public String toString() { return "user_no = " + this.userNo + "\n" + "user_name = " + this.userName + "\n" + "user_content = " + this.userContent + "\n" + "reg_date = " + this.regDate; } } -
Create the MyBatisUtil.java class, which includes the DB connection and necessary methods.
2-1. In the altibase_mybatis_sidu project, right-click the src directory and select New – Class.
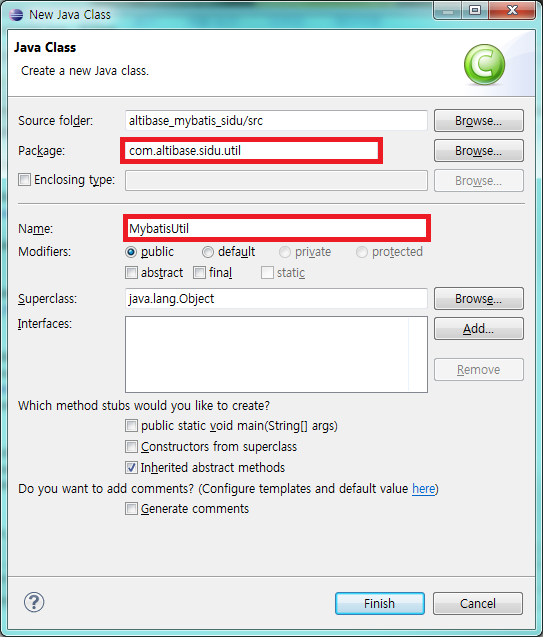
2-2. Enter com.altibase.sidu.util in the Package field and MybatisUtil in the Name field.
2-3. Write the following content into the MybatisUtil.java file.
package com.altibase.sidu.util; import java.io.IOException; import java.io.InputStream; import java.text.ParsePosition; import java.text.SimpleDateFormat; import java.util.Calendar; import org.apache.ibatis.io.Resources; import org.apache.ibatis.session.SqlSession; import org.apache.ibatis.session.SqlSessionFactory; import org.apache.ibatis.session.SqlSessionFactoryBuilder; public class MybatisUtil { private static SqlSessionFactory sqlSessionFactory; private static SqlSession sqlSession; public static SqlSession getSqlSessionFactory() { if (sqlSessionFactory == null) { InputStream inputStream; try { inputStream = Resources .getResourceAsStream("mybatis-config.xml"); sqlSessionFactory = new SqlSessionFactoryBuilder() .build(inputStream); sqlSession = sqlSessionFactory.openSession(false); } catch (IOException e) { throw new RuntimeException(e.getCause()); } } return sqlSession; } public String NulltoStr(String str) { if (str == null) { str = ""; } return str; } public String getFormatDate(String date, String originalformat, String wantformat) { java.util.Date d = null; SimpleDateFormat dd = new SimpleDateFormat(originalformat); ParsePosition parse = new ParsePosition(0); d = dd.parse(date, parse); Calendar cal = Calendar.getInstance(); cal.setTime(d); SimpleDateFormat sdf = new SimpleDateFormat(wantformat); String day = sdf.format(cal.getTime()); return day; } } -
Create a class that obtains a SqlSession object from the MybatisUtil class and executes queries.
In the example, separate classes were declared for each DML operation. This example explains only the Select case.
3-1. In the altibase_mybatis_sidu project, right-click the src directory and select New – Class.
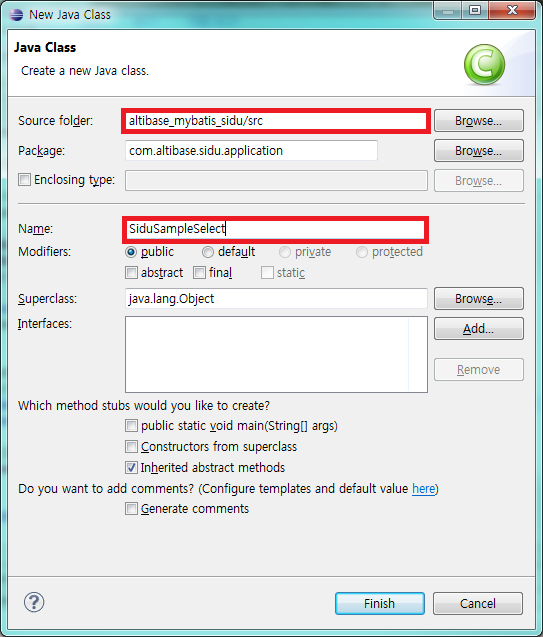
3-2. Enter com.altibase.sidu.application in the Package field and SiduSampleSelect in the Name field.
3-3. Write the following content in the SiduSampleSelect.java file.
package com.altibase.sidu.application; import java.sql.SQLException; import java.util.List; import com.altibase.sidu.model.UserVo; import com.altibase.sidu.util.MybatisUtil; public class SiduSampleSelect { public UserVo SiduSelect(int user_no) { UserVo userVo = new UserVo(); try { String statement = "com.altibase.sidu.mapper.UserMapper.selectUserData"; userVo = MybatisUtil.getSqlSessionFactory().selectOne(statement, user_no); return userVo; } catch (Exception e) { throw new IllegalArgumentException(e); } } public List<UserVo> SiduSelectList() throws SQLException { String statement = "com.altibase.sidu.mapper.UserMapper.selectAllUserData"; List<UserVo> userVos = MybatisUtil.getSqlSessionFactory().selectList(statement); return userVos; } } -
Write the Main class, where the actual program runs, in the SiduMain.java file.
package com.altibase.sidu.application;

import java.util.Calendar;
import java.util.List;

import com.altibase.sidu.model.UserVo;

public class SiduMain {

    /**
     * @param args
     */
    public static void main(String[] args) {

        UserVo userVo = new UserVo();
        int user_no = 1;
        int res_count = 0;

        try {
            // Insert example
            userVo.setUserNo(user_no);
            userVo.setUserName("sidu_1");
            userVo.setUserContent("sidu_content_1");
            userVo.setRegDate(Calendar.getInstance().getTime());
            SiduSampleInsert sidu_insert = new SiduSampleInsert(userVo);
            res_count = sidu_insert.SiduInsert();

            // Select example
            SiduSampleSelect sidu_select = new SiduSampleSelect();
            userVo = sidu_select.SiduSelect(user_no);

            System.out.println(userVo.toString());

            // Insert example
            userVo.setUserNo(5);
            sidu_insert = new SiduSampleInsert(userVo);
            res_count = sidu_insert.SiduInsert();
            System.out.println("insert count = " + res_count);

            // Update example
            userVo.setUserName("sidu_5");
            userVo.setUserContent("sidu_content_5");
            userVo.setRegDate(Calendar.getInstance().getTime());
            SiduSampleUpdate sidu_update = new SiduSampleUpdate(userVo);
            res_count = sidu_update.SiduUpdate();
            System.out.println("update count = " + res_count);

            // Delete example
            user_no = 5;
            SiduSampleDelete sidu_delete = new SiduSampleDelete(user_no);
            res_count = sidu_delete.SiduDelete();
            System.out.println("delete count = " + res_count);

            // Select All example
            List userVos = sidu_select.SiduSelectList();

            for(int i=0; i<userVos.size(); i++) {
                userVo = userVos.get(i);

                System.out.println((i+1) + " Number Object ");
                System.out.println(userVo.toString());
            }

            // When the same test is repeated twice, there are two records with user_no = 1, so only a SELECT is executed
            // Since the program can terminate (by using the SelectOne method), it also deletes data with user_no = 1.
            user_no = 1;
            sidu_delete = new SiduSampleDelete(user_no);
            res_count = sidu_delete.SiduDelete();

        }
        catch(Exception e) {
            e.getStackTrace();
        }

    }

}
Add related JAR files#
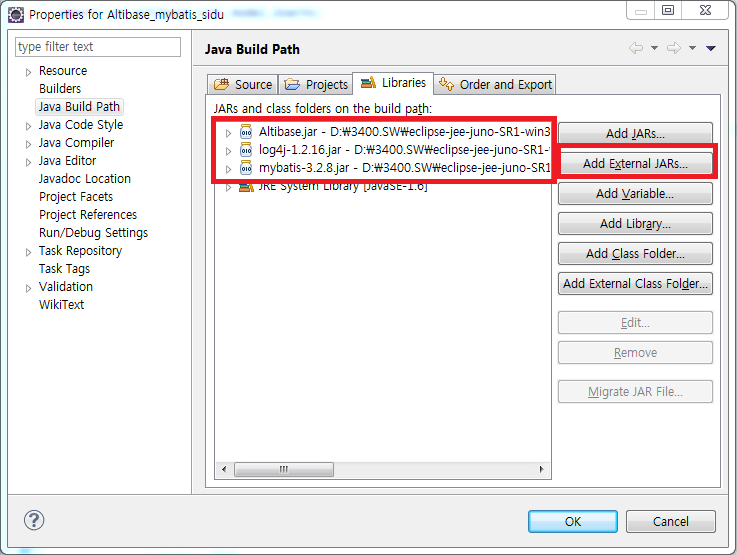
Add the Altibase.jar and mybatis-3.2.8.jar files.
In the altibase_mybatis_sidu project, right-click and select Properties – Java Build Path – Libraries, then click Add External JARs and add the Altibase.jar and mybatis-3.2.8.jar files.
Run the Application#
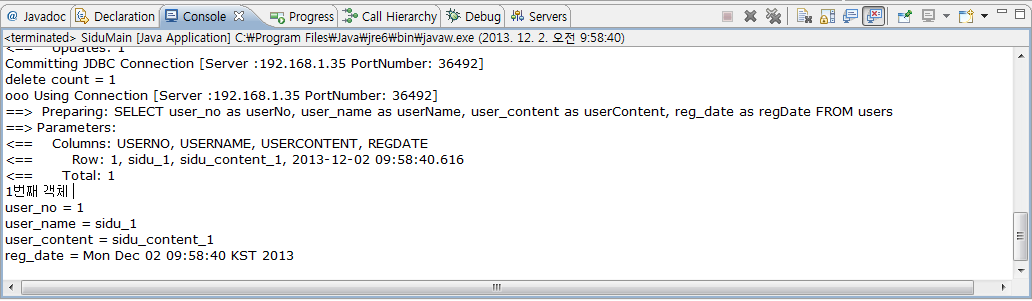
Run the altibase_mybatis_sidu project.
Click the altibase_mybatis_sidu project and select Run from the menu, or open the SiduMain.java class in the com.altibase.sidu.application package by double-clicking it, then run it.
Appendix2 (Spring - MyBatis - Altibase Integration)#
Based on the altibase_mybatis_spring example, provide a more detailed explanation of how to integrate Spring - MyBatis with Altibase. Note that the IDE used is Eclipse.
Create DB Tables#
Create the following tables and sequences in the database.
create table users(
  user_no integer,
  user_name varchar(30),
  user_content varchar(200),
  reg_date date
);
Spring Installation#
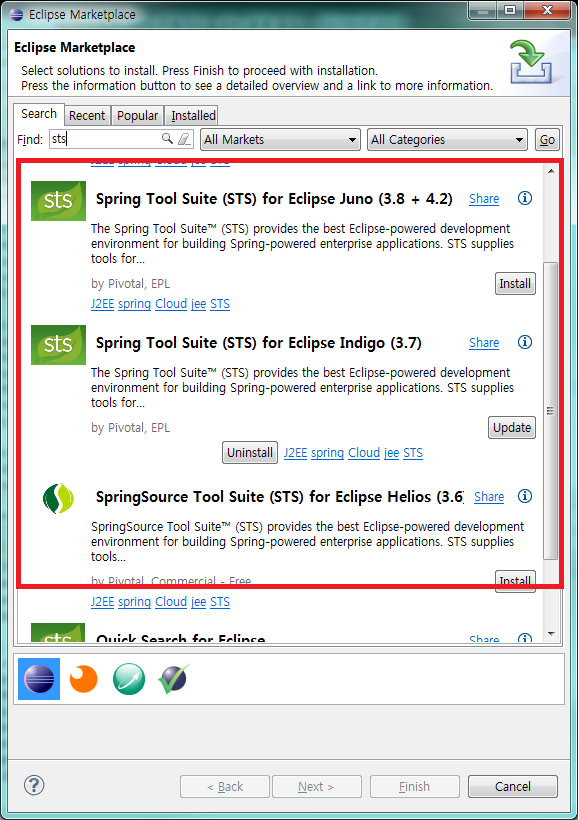
To use Spring, you need to install STS (SpringSource Tools Suite).
STS is a plugin for Eclipse that provides convenient tools for developing with Spring within Eclipse. Install the version that matches your Eclipse version from the list below.
Maven Installation#
-
Maven is a software project management tool developed by the Apache Software Foundation.
Based on the Project Object Model (POM), Maven manages the entire project lifecycle including build, test, and documentation. The Spring-MyBatis-Altibase integration test source is also managed using Maven.
This section explains the Maven installation process. -
Download Maven Files
Download the binary zip file from http://maven.apache.org/download.html
(As of October 2014, the latest version is apache-maven-3.2.8-bin.zip) -
Configure Maven Environment
After extracting the files, add MAVEN_HOME (e.g., c:\maven) to the user variables in Windows Environment Variables (Desktop -> My Computer -> Properties -> Advanced -> Environment Variables).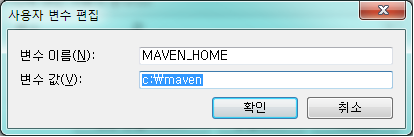
Include the Maven binary path in the PATH environment variable.
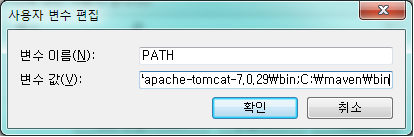
- In Windows, go to Start → Run → cmd to open the command prompt.
Then, enter "mvn –version". If the version information appears, the setup is successful.
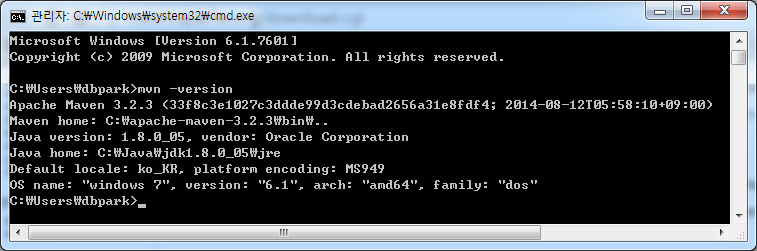
- In Windows, go to Start → Run → cmd to open the command prompt.
-
Download Maven in Eclipse
- In Eclipse, go to Help → Eclipse Marketplace, and download Maven just like you do when downloading STS.
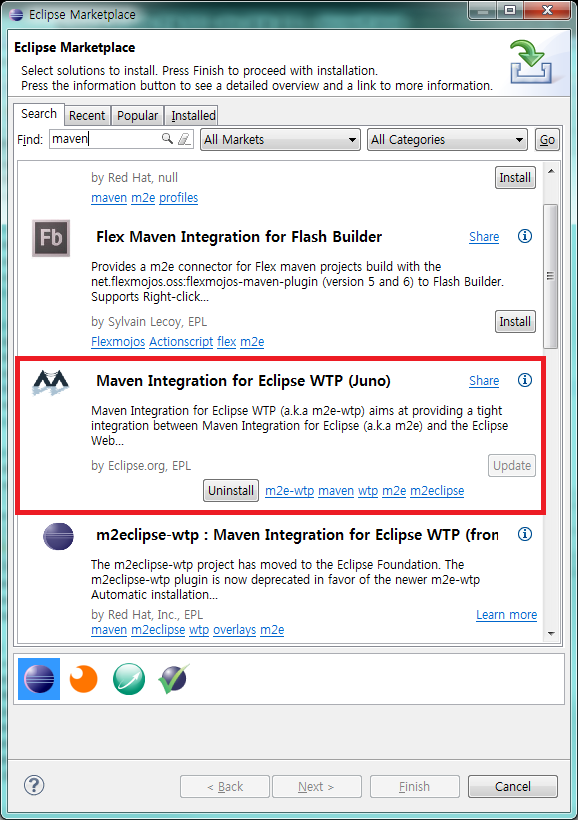
-
Set the extracted Maven in Eclipse.
- Go to Windows → Preferences → Maven → Installations, click Browse, and select the path to "C:\maven\conf\settings.xml", then click Apply.
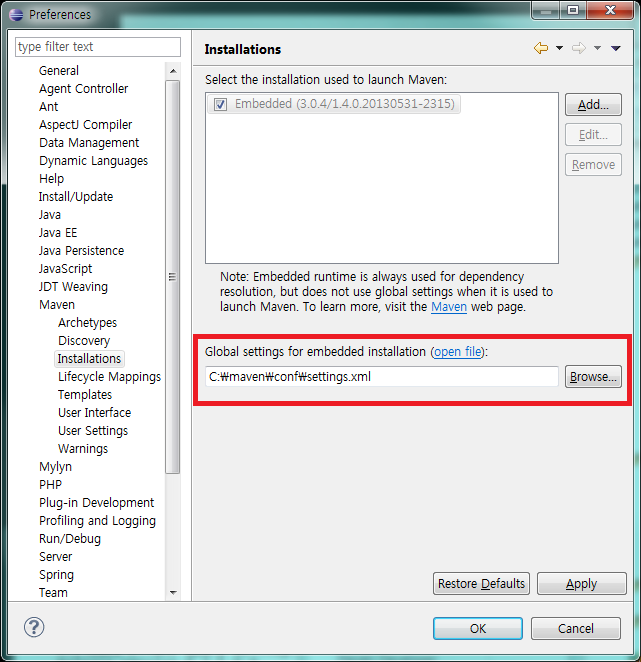
Project Creation#
After installing STS in Eclipse, you can create Spring-based projects using Spring Template Project. Follow the steps below to create a project:
-
From the menu, click File → New → Spring Template Project, and create a Spring MVC Project.
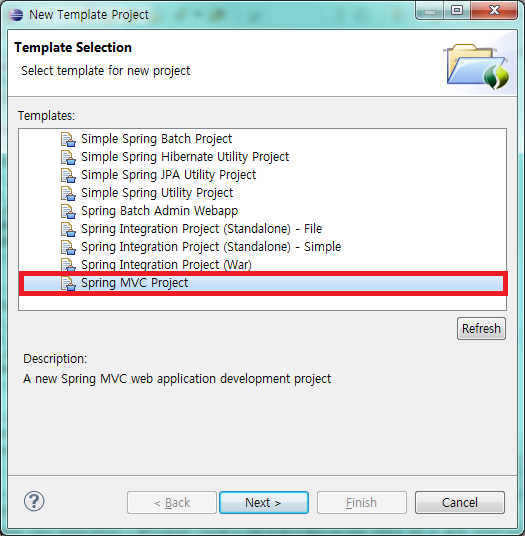
-
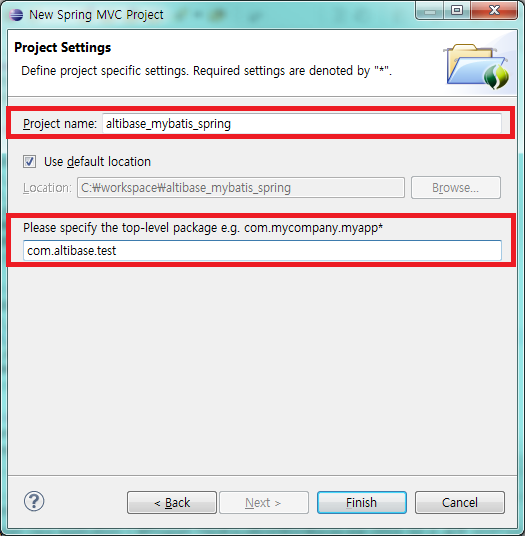
For Project name: enter: 'altibase_mybatis_spring', for Top-level package, enter: 'com.altibase.test'
(Spring requires a default package name when creating a project.)
-
Click the Finish button.
Package Naming Convention#
The package name used in this example is based on a common naming convention and follows the structure 'com.altibase.test', as explained in the appendix. Each part of the package name has a specific meaning:
- com : The first part indicates the nature of the organization leading the project. "com" stands for "company". For smaller groups or non-commercial organizations, "org" (organization) is often used.
- altibase : The second part represents the name of the company or organization. Since this document is created by Altibase, it uses "altibase"
- test : The third part reflects the specific artifact or purpose of the project. In this case, the project demonstrates general DML operations (Select/Insert/Delete/Update), so "test" is used.
Creating the ApplicationContext File#
In Spring development, the first thing you should do is create the ApplicationContext file, which is the Spring bean configuration file.
The following section describes the contents of this configuration file.
<?xml version="1.0" encoding="UTF-8"?>
<beans xmlns="http://www.springframework.org/schema/beans"
    xmlns:xsi="http://www.w3.org/2001/XMLSchema-instance"
    xmlns:context="http://www.springframework.org/schema/context"
    xmlns:tx="http://www.springframework.org/schema/tx"
    xmlns:p="http://www.springframework.org/schema/p"
    xsi:schemaLocation="http://www.springframework.org/schema/beans http://www.springframework.org/schema/beans/spring-beans-3.0.xsd
        http://www.springframework.org/schema/tx http://www.springframework.org/schema/tx/spring-tx-3.1.xsd
        http://www.springframework.org/schema/context http://www.springframework.org/schema/context/spring-context-3.0.xsd">

    <description>Example configuration to get you started.</description>

    <!-- Explore empty items in the specified package -->
    <context:component-scan base-package="com.altibase.test.service" />

     <!-- How to connect to ALTIBASE DB using Apache DBCP - Apache DBCP has an initial property that specifies the Session Pool. Of course, it is also possible to create a session of initialSize on the first connection.
     -->
    <bean id="dataSource" class="org.apache.commons.dbcp.BasicDataSource" destroy-method="close">
        <property name="driverClassName" value="Altibase.jdbc.driver.AltibaseDriver" />
        <property name="url" value="jdbc:Altibase://192.168.1.62:21020/mydb" />
        <property name="username" value="test" />
        <property name="password" value="test" />
        <property name="initialSize" value="10" />
        <property name="minIdle" value="25" />
        <property name="maxIdle" value="30" />
        <property name="maxActive" value="100" />
        <property name="validationQuery" value="select 1 from dual" />
        <property name="testOnBorrow" value="false" />
    </bean>

    <!-- Using Transactions -->
    <bean id="txManager" class="org.springframework.jdbc.datasource.DataSourceTransactionManager">
        <property name="dataSource" ref="dataSource" />
    </bean>

    <!-- Transaction annotation definition -->
    <tx:annotation-driven transaction-manager="txManager"/>

    <!-- SqlSessionFactory definition -->
    <!-- The typeAliasesPackage attribute specifies the package containing the domain classes referenced by SQL statements in the mapper definition file (XML) -->
    <bean id="sqlSessionFactory" class="org.mybatis.spring.SqlSessionFactoryBean">
        <property name="dataSource" ref="dataSource" />
        <property name="typeAliasesPackage" value="com.altibase.test.domain" />
    </bean>

    <!-- Allows the mapper interface and the mapper class generated from the mapper definition file to be injected into an empty object -->
    <bean class="org.mybatis.spring.mapper.MapperScannerConfigurer">
        <property name="basePackage" value="com.altibase.test.persistence" />
    </bean>
</beans>
Create the Mapper File#
Create a Mapper file that defines the CRUD SQL statements for the Users table and the corresponding mapping methods.
Since it follows the Spring approach, Dependency Injection is used. (UserMapper.xml, UserMapper.java)
The Mapper will be created in the "com.altibase.test.persistence" package.
-
In the altibase_mybatis_spring project, right-click the src directory, then click New → Package to create a new package named com.altibase.test.persistence.
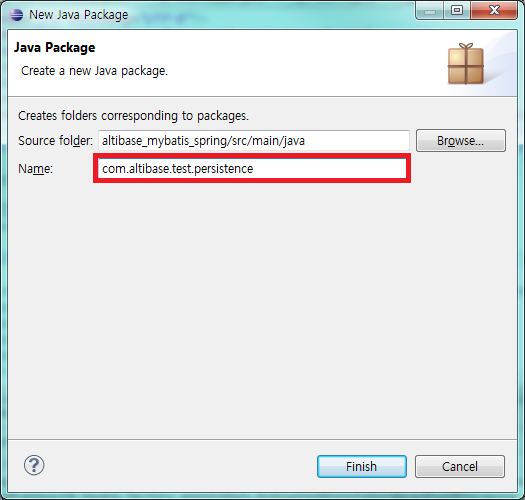
-
right click on the newly created package (com.altibase.test.persistence) and select new - interface to create the usermapper.java file
-
write the contents of the created interface file as follows
package com.altibase.test.persistence; import java.util.List; import com.altibase.test.domain.UserVo; public interface UserMapper { public List<UserVo> getAllUser(); public UserVo getUserByNo(int user_no); public Integer insertUserData(UserVo userVo); public Integer deleteUserByNo(int user_no); public Integer updateUserByNo(UserVo userVo); } -
right click on the newly created package (com.altibase.test.persistence), then select new – file and enter usermapper.xml in file name
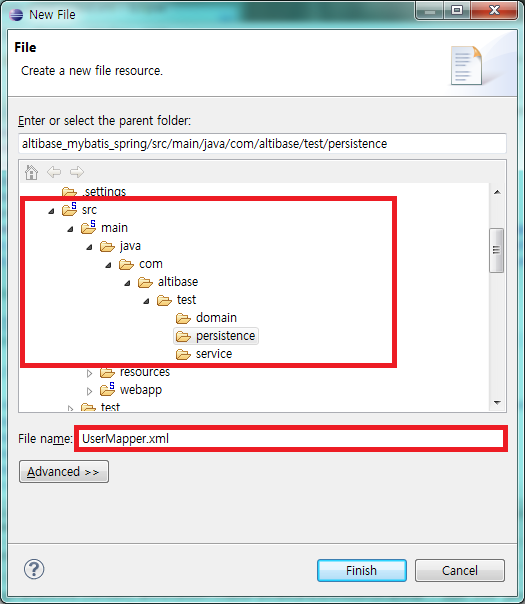
-
write the following content in usermapper.xml
<?xml version="1.0" encoding="UTF-8"?>
<!DOCTYPE mapper PUBLIC "-//mybatis.org//DTD Mapper 3.0//EN"
"http://mybatis.org/dtd/mybatis-3-mapper.dtd">

<mapper namespace="com.altibase.test.persistence.UserMapper">
    <select id="getAllUser" parameterType="Integer" resultType="UserVo">
        SELECT user_no as userNo,
        user_name as userName,
        user_content as userContent,
        reg_date as regDate
        FROM users
        WHERE user_no = #{userNo}
    </select>

    <select id="getUserByNo"  resultType="UserVo">
        SELECT user_no as userNo,
        user_name as userName,
        user_content as userContent,
        reg_date as regDate
        FROM users
    </select>

    <insert id="insertUserData" parameterType="UserVo">
        insert into
        users(user_no, user_name, user_content, reg_date)
        values(#{userNo}, #{userName}, #{userContent}, #{regDate})
    </insert>

    <update id="updateUserByNo" parameterType="UserVo">
        update users
        set user_name = #{userName},
        user_content = #{userContent},
        reg_date = #{regDate}
        where user_no = #{userNo}
    </update>

    <delete id="deleteUserByNo" parameterType="Integer">
        delete from users
        where user_no = #{userNo}
    </delete>
</mapper>
this method is specific to spring and uses Dependency Injection (DI) for processing
in the application, sql statements are handled through methods defined in the interface
Dependency Injection#
Dependency Injection (abbreviated as DI) literally means injecting dependencies
dependency injection is a technique from the GoF design patterns, where the methods to be used by the user are defined in an interface and separated from the actual logic implementation
by doing this, users can work with just the methods of the interface, and the actual implementation is injected later, enabling effective division of work and making it easy to switch implementation classes
application development#
-
create the uservo class (uservo.java), a value object (vo) for the users table
1-1. in the src/main/java directory of the altibase_mybatis_spring project, right click and select new – class
1-2. enter com.altibase.test.domain for package and uservo for name
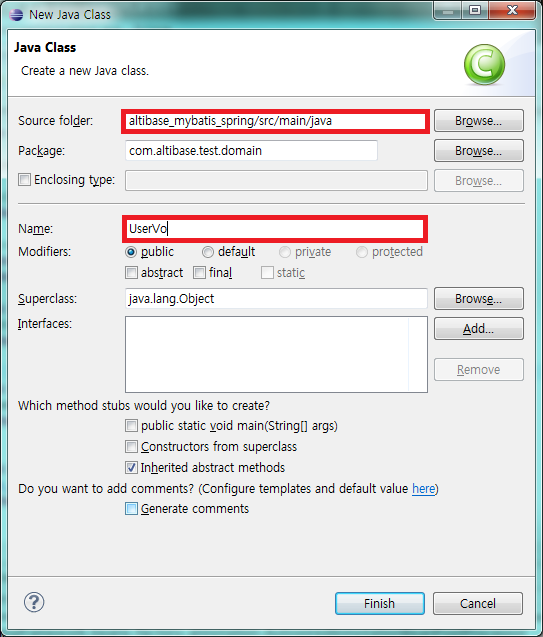
1-3. write the following content in the uservo.java file
package com.altibase.test.domain; import java.io.Serializable; import java.util.Date; @SuppressWarnings("serial") public class UserVo implements Serializable { private Integer userNo; private String userName; private String userContent; private Date regDate; public UserVo() { } public UserVo(Integer userNo, String userName, String userContent, Date regDate) { this.userNo = userNo; this.userName = userName; this.userContent = userContent; this.regDate = regDate; } public Integer getUserNo() { return userNo; } public void setUserNo(Integer userNo) { this.userNo = userNo; } public String getUserName() { return userName; } public void setUserName(String userName) { this.userName = userName; } public String getUserContent() { return userContent; } public void setUserContent(String userContent) { this.userContent = userContent; } public Date getRegDate() { return regDate; } public void setRegDate(Date regDate) { this.regDate = regDate; } @Override public String toString() { return "User [no=" + userNo + ", name=" + userName + ", content=" + userContent + ", date=" + regDate + "]"; } } -
create the interface and injection class files that execute the actual queries
2-1. in the src/main/java directory of the altibase_mybatis_spring project, right-click and select new – interface
2-2. enter com.altibase.test.service for the package and userservice for the name
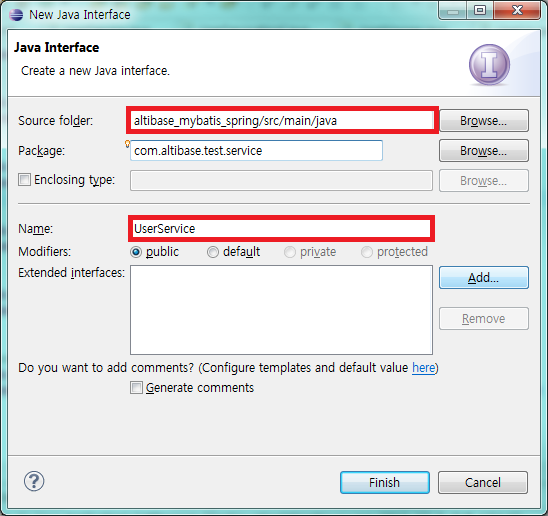
2-3. write the following content in the userservice.java file
package com.altibase.test.service;

import java.util.List;
import com.altibase.test.domain.UserVo;

public interface UserService {
public List getAllUser();
public UserVo getUserByNo(int user_no);
public Integer insertUserData(UserVo userVo);
public Integer deleteUserByNo(int user_no);
public Integer updateUserByNo(UserVo userVo);
}
2-4. right-click the newly created package (com.altibase.test.service), then click New – Class to create the UserServiceImpl.java class file that handles the actual logic
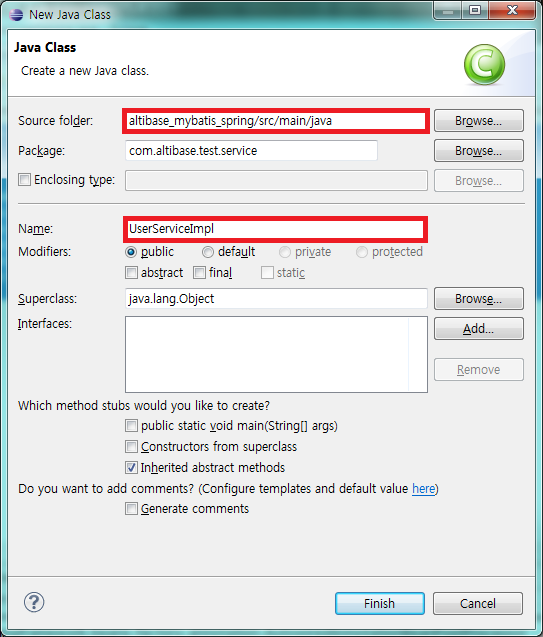
2-5. write the following content in the UserMapperImpl.java file
package com.altibase.test.service; import java.util.List; import org.springframework.beans.factory.annotation.Autowired; import org.springframework.stereotype.Service; import com.altibase.test.domain.UserVo; import com.altibase.test.persistence.UserMapper; @Service("userService") public class UserServiceImpl implements UserService { @Autowired private UserMapper userMapper; private Integer res_count; public List<UserVo> getAllUser() { List<UserVo> userVos = userMapper.getAllUser(); return userVos; } public UserVo getUserByNo(int user_no) { UserVo userVo = userMapper.getUserByNo(user_no); return userVo; } public Integer insertUserData(UserVo userVo) { res_count = userMapper.insertUserData(userVo); return res_count; } public Integer deleteUserByNo(int user_no) { res_count = userMapper.deleteUserByNo(user_no); return res_count; } public Integer updateUserByNo(UserVo userVo) { res_count = userMapper.updateUserByNo(userVo); return res_count; } } -
Write the Main class, where the actual program runs, in the Main.java file.
package com.altibase.test;

import java.util.Calendar;

import org.springframework.context.ApplicationContext;
import org.springframework.context.support.ClassPathXmlApplicationContext;

import com.altibase.test.domain.UserVo;
import com.altibase.test.service.UserService;

public class Main {

private static UserService userService;

public static void main(String[] args) {
    // TODO Auto-generated method stub
    int res_count = 0;

    ApplicationContext applicationContext = new ClassPathXmlApplicationContext("META-INF/spring/ApplicationContext.xml");
    userService = (UserService)applicationContext.getBean("userService");

    UserVo userVo = new UserVo();

    // Insert example
    userVo.setUserNo(1);
    userVo.setUserName("psy");
    userVo.setUserContent("psy_content");
    userVo.setRegDate(Calendar.getInstance().getTime());
    res_count = userService.insertUserData(userVo);
    System.out.println("insert count = " + res_count);

    // Select example
    userVo = userService.getUserByNo(1);
    System.out.println("no = " + userVo.getUserNo());
    System.out.println("name = " + userVo.getUserName());
    System.out.println("content = " + userVo.getUserContent());
    System.out.println("date = " + userVo.getRegDate());

    // Update example
    userVo.setUserName("updated_psy");
    userVo.setUserContent("updated_psy_content");
    res_count = userService.updateUserByNo(userVo);
    System.out.println("update count = " + res_count);

    // Delete example
    res_count = userService.deleteUserByNo(userVo.getUserNo());
    System.out.println("delete count = " + res_count);
    }
}
Creating related JAR files#
There are two ways to add JARs:
- Adding libraries via Maven
- Adding libraries the traditional way (Add External JARs in properties - Java Build Path)
The sample source is written choosing the Maven library management method. Since the second method, the traditional way, has already been explained above, this chapter will explain the Maven library management method.
When you install Maven and create a Spring Template Project, a file called pom.xml is generated. This file manages the libraries.
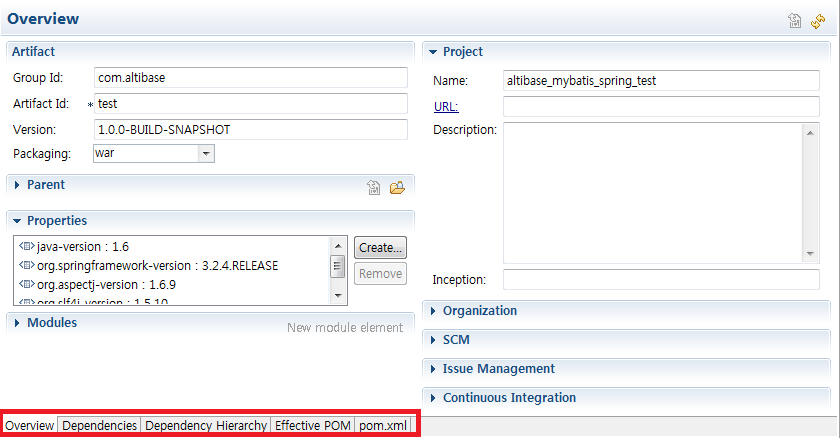
There are two ways to add libraries in the pom.xml file:
- Add libraries by directly entering tags in the pom.xml tab
- Add libraries using the Add button in the Dependencies tab
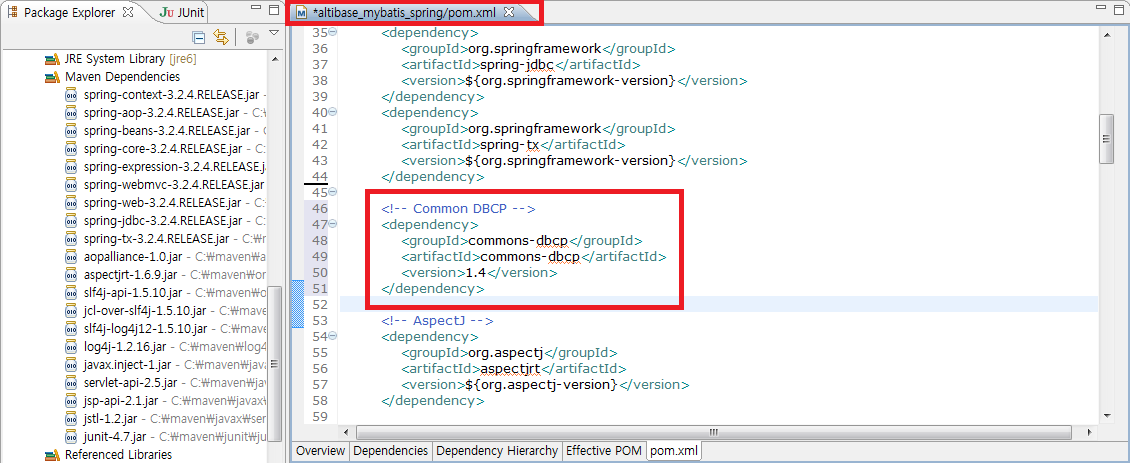
The method of directly entering tags involves clicking the pom.xml tab to open the XML file and adding the library by typing the tags manually, as shown in the image below. (The library used for testing is the Apache Commons DBCP library.)
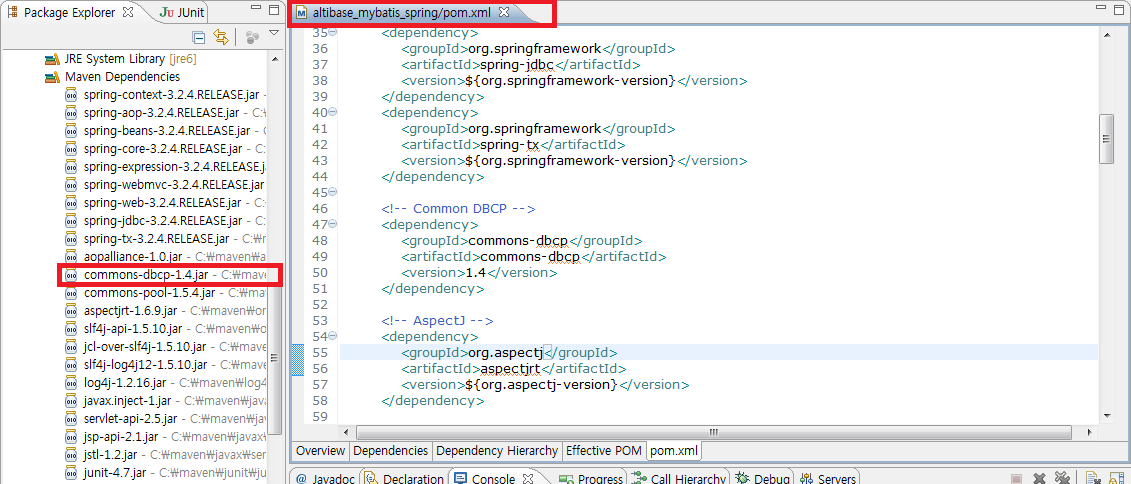
After saving the XML file, you can confirm that the library has been added to Maven Dependencies.
To add a library using the Add button in the Dependencies tab, follow these steps:
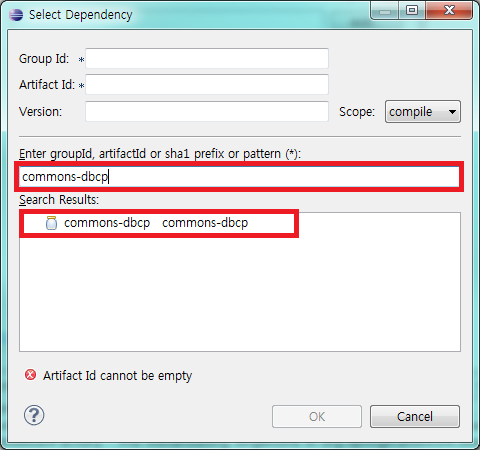
1) In the pom.xml file, click the dependencies-Add button, which opens the following window.
In the field labeled "Enter groupId, artifactId or sha1 prefix or pattern (*) :" type the name of the library you want to add, and it will display libraries matching the entered name as shown below.
2) When you click on a library shown in the Search Results, the available versions for that library will appear. Select the desired version and then click the OK button to add the library.
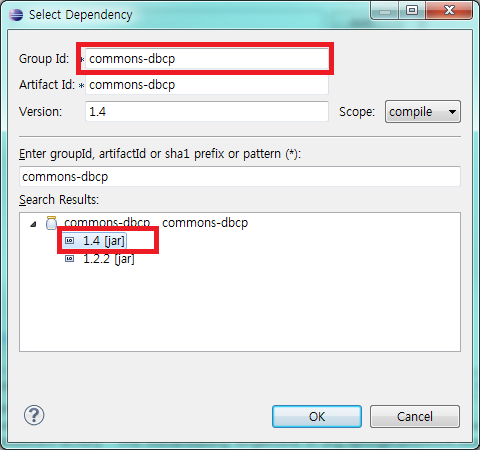
You can verify that the library has been successfully added.
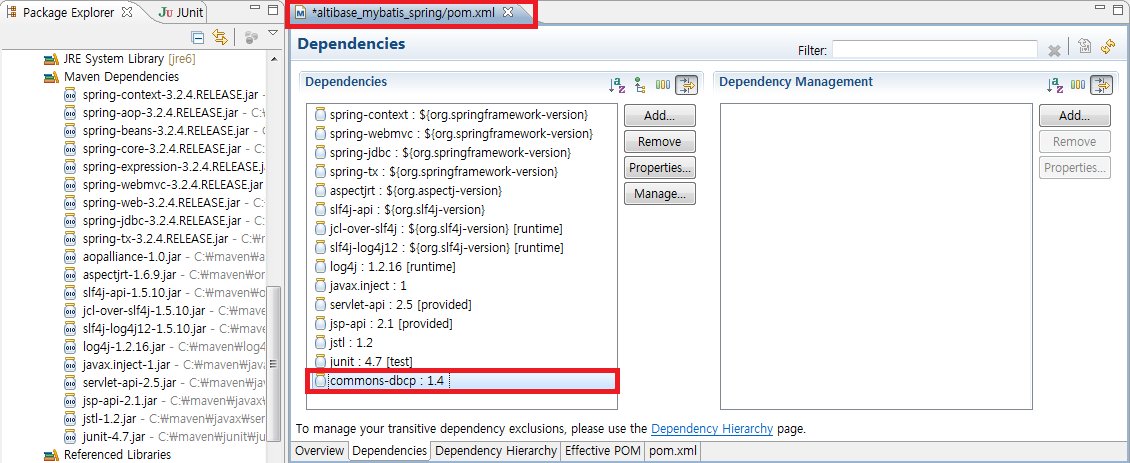
When you save the file, the changes are applied, and the library is added.
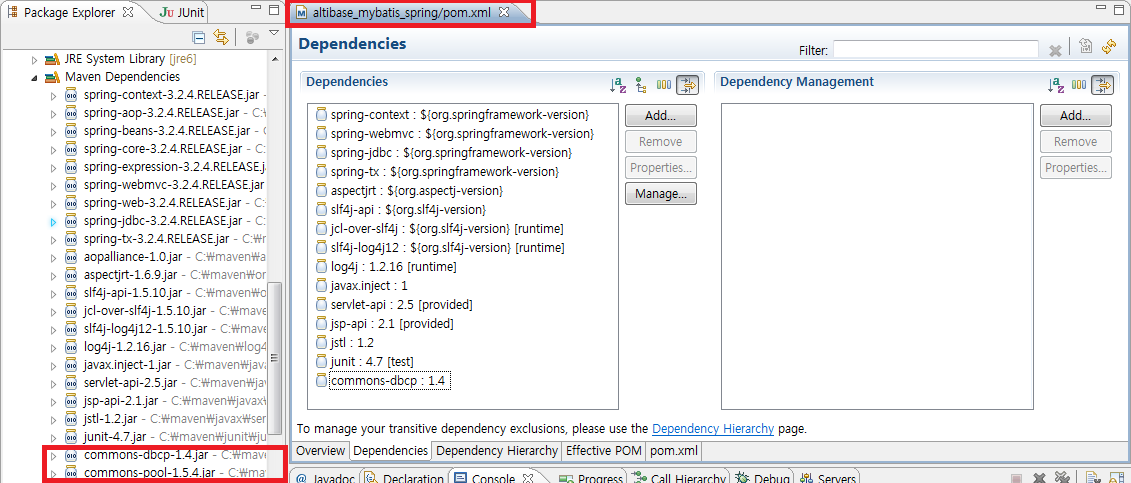
At the end, you can see that not only commons-dbcp but also commons-pool was added. When you add libraries through the dependencies tab, related libraries like these are also added automatically.
Running the Application#
Run the altibase_mybatis_spring project.
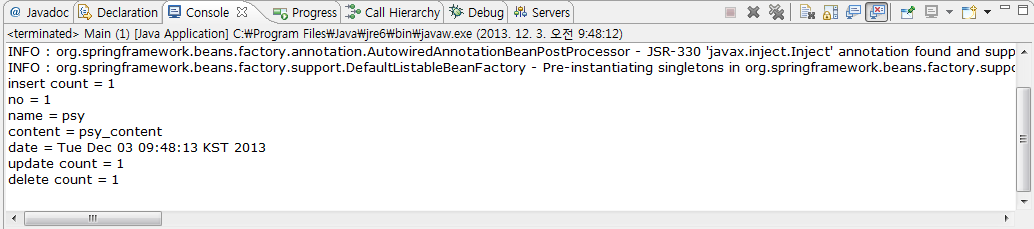
You can either right-click the altibase_mybatis_spring project and select Run from the menu, or open the Main.java class in the com.altibase.test package by double-clicking it and then run it.