Spring Integration Guide for Altibase#

Copyright ⓒ 2000~2026 Altibase Corp. All Rights Reserved.
This document is provided by Altibase for informational purposes only, and its contents are subject to change without prior notice. This document may contain errors, and Altibase makes no express or implied warranties of merchantability or fitness for a particular purpose.
Altibase develops and announces the features and functionality described in this document at its own discretion. Altibase may also hold patents, trademarks, copyrights, and other intellectual property rights related to this document.
Altibase Corp.
10F, Daerung Post Tower II, 306 Digital-ro, Guro-gu, Seoul 08378, Republic of Korea
Tel: +82-2-2082-1114
Fax: +82-2-2082-1099
Customer Support Portal: https://support.altibase.com/en/
Website                              : https://altibase.com/en/
Overview#
This document explains how to integrate Altibase with Spring.
This document is based on Spring Framework 3.2.x and Altibase 6.3.1, with Eclipse as the development IDE. The examples for each chapter are provided separately, so refer to them as you read.
You may also find the following documents useful during development.
- Altibase Development Guide
- JAVA Developer's Guide
- JBoss Integration Guide for Altibase
- TOMCAT Integration Guide for Altibase
- WebSphere Integration Guide for Altibase
- WebLogic Integration Guide for Altibase
- iBATIS Integration Guide for Altibase
- Hibernate Integration Guide for Altibase
Info
For errors and improvements related to this document, please contact the technical support portal or technical support center.
- Technical support portal: http://support.altibase.com/en
- Technical support center: +82-2-2082-1114
Info
This document is provided for informational purposes only and is subject to change without prior notice. It may contain errors, and Altibase makes no express or implied warranties of any kind, including but not limited to warranties of merchantability or fitness for a particular purpose.
The development, release, and timing of any features or functionality described for Altibase products in this document are at the sole discretion of Altibase.
Altibase may hold patents, trademarks, copyrights, or other intellectual property rights related to the contents of this document.
What Is Spring?#
Spring Framework is an open-source framework that provides the features enterprise applications need.
Spring is a lightweight container compared with EJB containers. It manages the lifecycle of POJOs (Plain Old Java Objects), such as their creation and destruction, and provides modules for transaction management, logging, security, and more.
Features of Spring#
Spring has the following features.
- It is a lightweight container compared with J2EE.
- It manages the lifecycle of Java objects, such as their creation and destruction. Instead of creating objects directly, a program can get the objects it needs from Spring.
- It supports IoC (Inversion of Control) and DI (Dependency Injection), so you can define dependencies between objects in a bean configuration file.
- It supports AOP (Aspect Oriented Programming). You can separate features that many modules share but that are not central to any of them, such as transactions, logging, and security, and apply them to each module.
- It supports POJOs, which are plain Java objects that do not implement a specific interface or extend a specific class as EJBs do. As a result, you can use existing source code in Spring without modification.
- It provides a consistent way to handle transactions.
- It provides a wide range of APIs.
Before You Begin#
To use Spring Framework, you need the Spring jar files. To integrate with Altibase, you also need the Altibase JDBC driver.
This chapter explains how to set up a Spring development environment and how to get the Altibase JDBC driver.
Setting Up the Spring Framework Environment#
You can easily set up a Spring development environment with STS (Spring Tool Suite), the Spring development tool for Eclipse, and Maven.
What Is Maven?#
Maven is a project management tool. It includes a project object model (POM), a set of standards, a project lifecycle, a dependency management system, and logic for running plugin goals at each phase of the lifecycle.
Maven Example#
<dependencies>
    <dependency>
        <groupId>org.springframework</groupId>
        <artifactId>spring-context</artifactId>
        <version>3.2.xx.RELEASE</version>
    </dependency>
</dependencies>
Note
- For details, see Appendix 2 of the MyBatis Integration Guide for Altibase.
- Change
3.2.xx.RELEASEin<version>to the Spring patch version you use.
Getting the Altibase JDBC Driver#
The JDBC driver provided by Altibase is Altibase.jar. You can find it in the $ALTIBASE_HOME/lib directory on the server where Altibase is installed.
Starting with Altibase 5, the $ALTIBASE_HOME/lib directory contains both Altibase.jar and Altibase5.jar. Altibase.jar is the standard JDBC driver, and Altibase5.jar is the JDBC driver for connecting to Altibase 5 and earlier versions at the same time. To connect to a single Altibase server, or to multiple Altibase servers of the same version, use $ALTIBASE_HOME/lib/Altibase.jar.
To make sure the Altibase JDBC driver is compatible with the Altibase server you want to connect to, check the version of the JDBC driver.
Run the following command to check the version of the Altibase JDBC driver.
$ java -jar Altibase.jar
JDBC Driver Info : Altibase Ver = 6.3.1.2.6 for JavaVM v1.4, CMP:7.1.1, Oct  6 2014 13:54:56
The driver is compatible if the CMP value of the Altibase JDBC driver matches the cm protocol version of the Altibase server. You can check the cm protocol version of the Altibase server with the following command.
$ altibase -v
version 6.3.1.2.7 X86_64_LINUX_redhat_Enterprise_ES4-64bit-6.3.1.2.7-release-GCC3.4.6 (x86_64-unknown-linux-gnu) Oct  8 2014 09:16:24, binary db version 6.2.1, meta version 6.3.1, cm protocol version 7.1.1, replication protocol version 7.4.1
Newer releases may include fixes for JDBC-related bugs, so we generally recommend using an Altibase JDBC driver that is the same version as your Altibase server or newer.
Configuring the JDBC Driver#
This chapter explains how to set up the Altibase JDBC driver.
Configuring an Eclipse Project#
To add the Altibase JDBC driver to an Eclipse project, do the following.
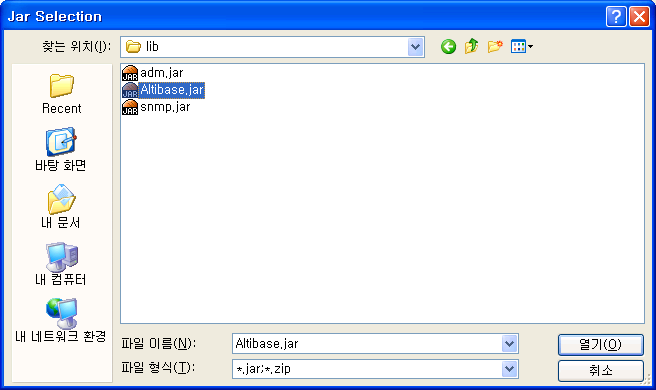
In the project, select JRE System Library > Properties > Installed JREs, select a JRE from the list, and then click Edit > Add External JARs to add Altibase.jar.

Configuring a Web Application#
There are two ways to set up the Altibase JDBC driver for web applications.
The first is to place Altibase.jar in an appropriate directory on the web server so that all web applications share the Altibase JDBC driver. For details, see the integration guide for your web server.
The second is to set up the Altibase JDBC driver for each web application so that only that application uses it. In this case, place Altibase.jar in the following location.
Web_application\WEB-INF\lib
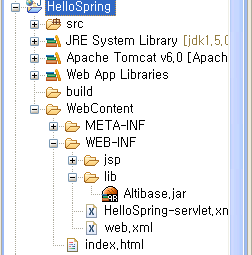
If you created the project as a Web Project in Eclipse, place Altibase.jar in the following directory.
Project\WebContent\WEB-INF\lib
Configuring DataSource#
To work with a database in Spring, you need to define a DataSource bean in the bean configuration file.
In this document, the bean configuration file is named applicationContext.xml.
There are several ways to configure a DataSource, including the DriverManagerDataSource provided by Spring Framework, the DBCP provided by Jakarta, and the ConnectionPool provided by the database vendor.
This chapter explains how to integrate with Altibase using each of these methods.
Using DriverManagerDataSource#
To connect to the database with the DriverManagerDataSource class provided by Spring Framework, set the class attribute of the dataSource bean to org.springframework.jdbc.datasource.DriverManagerDataSource in the bean configuration file.
You can define several properties for the database connection in the dataSource bean. To connect to Altibase, define the following properties.
| Property | Description |
|---|---|
| driverClassName | Class name of the Altibase JDBC driver |
| url | Connection string for Altibase. Use the format jdbc:Altibase://IP:port_no/db_name. |
| username | Database user account |
| password | Password for the database user account |
The following is part of the applicationContext.xml file in the DataManagerDataSourceConnection example.
Example: applicationContext.xml in DataManagerDataSourceConnection
<bean id="dataSource" class="org.springframework.jdbc.datasource.DriverManagerDataSource">
    <!-- JDBC driver class name -->
    <property name="driverClassName" value="Altibase.jdbc.driver.AltibaseDriver" />
    <!-- connection url -->
    <property name="url" value="jdbc:Altibase://192.168.1.35:21129/mydb" />
    <!-- DB user account -->
    <property name="username" value="sys" />
    <!-- DB user password -->
    <property name="password" value="manager" />
</bean>
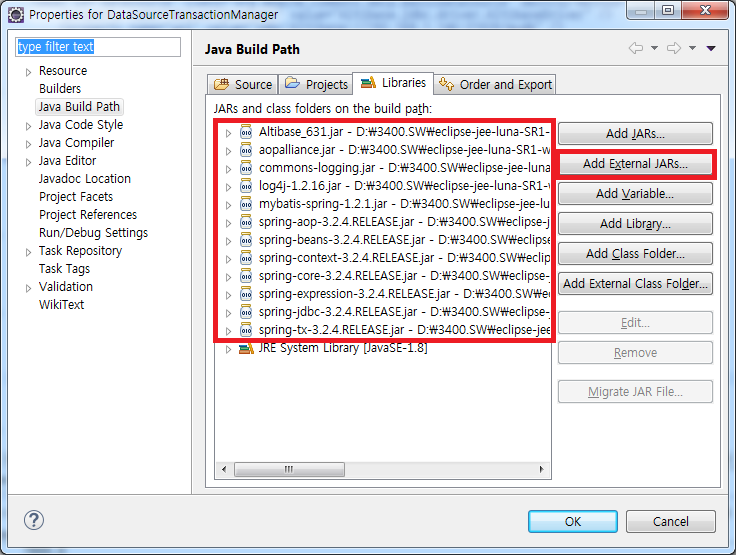
To run the DataManagerDataSourceConnection example project, add Altibase.jar, spring.jar, spring-jdbc.jar, and commons-logging.jar to the project.
Using DBCP#
In Spring, you can configure a ConnectionPool-based DataSource with the DBCP (Jakarta Commons Database Connection Pool) API provided by Jakarta.
The DataSource class to use is org.apache.commons.dbcp.BasicDataSource.
As with DriverManagerDataSource described above, define a dataSource bean with the BasicDataSource class in the applicationContext.xml file.
Example: applicationContext.xml in DBCPConnection
<bean id="dataSource" class="org.apache.commons.dbcp.BasicDataSource">
    <!-- JDBC driver class name -->
    <property name="driverClassName" value="Altibase.jdbc.driver.AltibaseDriver" />
    <!-- connection url -->
    <property name="url" value="jdbc:Altibase://192.168.1.35:21129/mydb" />
    <!-- DB user account -->
    <property name="username" value="sys" />
    <!-- DB user password -->
    <property name="password" value="manager" />
</bean>
The BasicDataSource class provides a variety of properties for managing the ConnectionPool.
| Property | Description |
|---|---|
| driverClassName | Class name of the Altibase JDBC driver |
| url | Connection string for Altibase. Use the format jdbc:Altibase://IP:port_no/db_name. |
| username | Database user account |
| password | Password for the database user account |
| maxActive | Maximum number of connections. 0 means unlimited. The default is 8. |
| initialSize | Initial number of connections. The default is 0. |
| maxIdle | Maximum number of idle connections kept in the pool. The default is 8. |
| maxWait | Maximum time in milliseconds to wait for a connection. -1 means wait indefinitely, which is the default. |
| validationQuery | SQL statement used to check whether a connection is valid. It must be a SELECT statement that returns at least one row. Example: SELECT 1 FROM DUAL |
| defaultAutoCommit | Autocommit mode. The default is true. |
| defaultTransactionIsolation | Transaction isolation level. Can be set to NONE, REPEATABLE_READ, or SERIALIZABLE.If not set, the Altibase server default applies. The default isolation level of Altibase is READ COMMITTED. |
To run the DBCPConnection example project, you need Altibase.jar, commons-logging.jar, commons-dbcp.jar, and commons-pool.jar in addition to the Spring library files.

Using Altibase ConnectionPool#
You can use the Altibase ConnectionPool through the AltibaseConnectionPoolDataSource class provided by Altibase.
As with the other DataSources described above, define a dataSource bean with the AltibaseConnectionPoolDataSource class in the applicationContext.xml file.
Example: applicationContext.xml in AltibaseConnectionPool
<bean id="dataSource" class="Altibase.jdbc.driver.AltibaseConnectionPoolDataSource">
    <!-- connection URL: note that the property name is uppercase -->
    <property name="URL" value="jdbc:Altibase://192.168.1.35:21129/mydb"/>
    <!-- DB user account -->
    <property name="user" value="sys"/>
    <!-- DB user password -->
    <property name="password" value="manager" />
</bean>
AltibaseConnectionPoolDataSource loads the Altibase JDBC driver class internally, so you do not need to specify the driverClassName property.
Also note that the property for the database user account is named user, not username.
The AltibaseConnectionPoolDataSource class provides a variety of properties for managing the ConnectionPool.
| Property | Description |
|---|---|
| URL | Connection string for Altibase. Use the format jdbc:Altibase://IP:port_no/db_name. |
| user | Database user account |
| password | Password for the database user account |
| maxPoolSize | Maximum number of connections. The default is 10. |
| minPoolSize | Minimum number of connections. The default is 0. |
| initialPoolSize | Initial number of connections. The default is 1. |
| maxIdleTime | Wait time for idle connections |
| propertyCycle | Wait time in milliseconds when the ConnectionPool is full |
To run the AltibaseConnectionPool example project, you need Altibase.jar, spring.jar, spring-jdbc.jar, and commons-logging.jar.

Additional Connection Features#
This chapter explains how to connect with the FailOver feature of Altibase and how to connect to different versions of Altibase at the same time.
Connecting with FailOver#
To use FailOver, add the FailOver attributes to the connection URL.
The following example connects to Altibase using FailOver, with DBCP as the DataSource.
Example: applicationContext.xml in FailOverConnection
<bean id="dataSource" class="org.apache.commons.dbcp.BasicDataSource">
<!-- JDBC driver class name -->
<property name="driverClassName" value="Altibase.jdbc.driver.AltibaseDriver" />
<property name="url"
value="jdbc:Altibase://192.168.1.62:21020/mydb?AlternateServers=(192.168.1.146:21020)&ConnectionRetryCount=1&ConnectionRetryDelay=1&SessionFailOver=off&LoadBalance=off" />
<property name="username" value="test" />
<property name="password" value="test" />
</bean>
The following FailOver properties can be specified in the connection URL.
| Property | Description |
|---|---|
| AlternateServers | Available servers to connect to when a failure occurs, in the format (IP Address1:Port1, IP Address2:Port2,...). |
| ConnectionRetryCount | Number of connection retries when the connection to an available server fails |
| ConnectionRetryDelay | Time in seconds to wait before retrying when the connection to an available server fails |
| LoadBalance | If set to ON, the driver randomly selects from the primary server and the available servers on the first connection attempt.If set to OFF, the driver connects to the primary server first and, if that fails, connects to a server listed in AlternateServers. |
| SessionFailOver | Whether to use STF (Service Time Fail-Over).ON: STF, OFF: CTFCTF (Connection Time Fail-Over) detects a failure when connecting to the DBMS and reconnects to another healthy server. STF detects a failure during service, reconnects to the DBMS on another available node, and restores the session properties so that the user application can run its business logic again. Use it when work performed on the failed DBMS needs to be performed again. |
For a FailOver configuration example, see the FailOverConnection project.
To run the FailOverConnection project, you need Altibase.jar, spring-jdbc.jar, and commons-logging.jar in addition to the Spring library files.
Connecting to Different Versions of Altibase Simultaneously#
A single application can connect to Altibase and earlier versions of Altibase at the same time.
To distinguish it from the existing Altibase.jar, you need Altibase5.jar, the Altibase 5 JDBC driver with a different file name.
The following example loads the drivers for two versions of Altibase using Altibase.jar and Altibase5.jar.
Example: applicationContext.xml in MultiVersionConnection
<!-- DataSource for Altibase 6 -->
<bean id="dataSource1" class="org.springframework.jdbc.datasource.DriverManagerDataSource">
    <!-- JDBC driver class name -->
    <property name="driverClassName" value="Altibase.jdbc.driver.AltibaseDriver"/>
    <!-- connection url -->
    <property name="url" value="jdbc:Altibase://127.0.0.1:20300/mydb"/>
    <!-- DB user account -->
    <property name="username" value="sys"/>
    <!-- DB user password -->
    <property name="password" value="manager" />
</bean>

<!-- DataSource for versions earlier than Altibase 6 -->
<bean id="dataSource2" class="org.springframework.jdbc.datasource.DriverManagerDataSource">
    <!-- JDBC driver class name -->
    <property name="driverClassName" value="Altibase.jdbc.driver.AltibaseDriver"/>
    <!-- connection url -->
    <property name="url" value="jdbc:Altibase://192.168.1.35:21129/mydb"/>
    <!-- DB user account -->
    <property name="username" value="sys"/>
    <!-- DB user password -->
    <property name="password" value="manager" />
</bean>

<!-- Bean configuration for the DAO class -->
<bean id="accountDao1" class="com.altibase.banking.AccountDao">
    <property name="dataSource" ref="dataSource1"/>
</bean>

<!-- Bean configuration for the DAO class -->
<bean id="accountDao2" class="com.altibase.banking.AccountDao">
    <property name="dataSource" ref="dataSource2"/>
</bean>
Example: AccountApp.java in MultiVersionConnection
Resource resource = new ClassPathResource("applicationContext.xml");
BeanFactory factory = new XmlBeanFactory(resource);

AccountDao accountDao1 = (AccountDao)factory.getBean("accountDao1");
AccountDao accountDao2 = (AccountDao)factory.getBean("accountDao2");
To run the MultiVersionConnection example project, you need Altibase.jar and Altibase5.jar in addition to the jar files used earlier.
These files are in the lib directory under the Altibase installation directory, $ALTIBASE_HOME. Use Altibase5.jar from Altibase 5 and Altibase.jar from the earlier version.

Transaction Management#
Spring Framework offers several ways to handle transactions.
First, specify a transaction manager (TransactionManager) in the bean configuration file, and then handle the transactions.
You can implement transaction handling directly in your source code, or handle it declaratively in the bean configuration file.
Spring Framework provides several implementations of the PlatformTransactionManager interface for different data access technologies. You specify one of these classes as the TransactionManager.
For example, to handle local transactions, specify the DataSourceTransactionManager class as the TransactionManager. To handle distributed transactions, specify the JtaTransactionManager class.
After you specify the TransactionManager, define a bean that handles transactions in the bean configuration file to handle transactions declaratively.
Assign the TransactionProxyFactoryBean class to this bean and specify how transactions are handled for each method name.
This chapter explains how to configure the TransactionManager and how to handle transactions declaratively in the bean configuration file.
Configuring DataSourceTransactionManager#
You can use the DataSourceTransactionManager class, one of the PlatformTransactionManager implementations, as the TransactionManager.
In the bean configuration file applicationContext.xml, assign the org.springframework.jdbc.datasource.DataSourceTransactionManager class to the transactionManager bean.
Then, when you handle transactions declaratively, set the transactionManager property of the transaction-handling bean to the transactionManager bean defined above.
Example: applicationContext.xml in DataSourceTransactionManager
<bean id="transactionManager"
      class="org.springframework.jdbc.datasource.DataSourceTransactionManager">
    <property name="dataSource" ref="dataSource"/>
</bean>

<bean id="txProxyTemplate" abstract="true"
      class="org.springframework.transaction.interceptor.TransactionProxyFactoryBean">
    <property name="transactionManager" ref="transactionManager" />
    <property name="transactionAttributes">
        <props>
            <prop key="get*">PROPAGATION_REQUIRED, readOnly</prop>
            <prop key="add*">PROPAGATION_REQUIRED</prop>
        </props>
    </property>
</bean>

<bean id="accountService" parent="txProxyTemplate">
    <property name="target">
        <bean class="com.altibase.banking.AccountService">
            <property name="accountDao" ref="accountDao"/>
        </bean>
    </property>
</bean>
To handle transactions, you need to define not only the transaction manager (TransactionManager) but also how transactions are handled. The example above uses the org.springframework.transaction.interceptor.TransactionProxyFactoryBean class to handle transactions declaratively in the bean configuration file applicationContext.xml.
Declarative Transactions with TransactionProxyFactoryBean#
The TransactionProxyFactoryBean class provides several attributes for handling transactions.
You can handle transactions declaratively by defining a TransactionProxyFactoryBean bean in the bean configuration file applicationContext.xml and specifying how transactions are handled for each method.
The transaction attributes you specify in the <property> elements of the transaction-handling bean are as follows.
target: The target object to which transactions are applied.transactionManager: The TransactionManager defined above.transactionAttributes: The Properties object that defines the transaction attributes. Use a<prop>tag to define the transaction attributes for each method.
Specify the value of the <prop> tag in the following format.
PROPAGATION, ISOLATION_NAME, readOnly, timeout, +Exception, -Exception
Each item in the <prop> tag value is described below.
| Item | Description |
|---|---|
| PROPAGATION | Transaction propagation rule. Required.PROPAGATION_REQUIRED (default),PROPAGATION_REQUIRES_NEW,PROPAGATION_MANDATORY,PROPAGATION_SUPPORTS,PROPAGATION_NOT_SUPPORTED,PROPAGATION_NEVER,PROPAGATION_NESTED |
| ISOLATION_NAME | Transaction isolation level. Optional.DEFAULT,READ_COMMITTED,READ_UNCOMMITTED,REPEATABLE_READ,SERIALIZABLEAltibase supports only READ_COMMITTED, SERIALIZABLE, and REPEATABLE_READ. |
| readOnly | Makes the transaction read-only. |
| timeout | Transaction timeout in seconds. |
| +,-Exception | Rollback rules.+Exception commits even if the exception occurs.-Exception rolls back if the exception occurs. |
The following bean configuration file, applicationContext.xml, defines transaction attributes with the TransactionProxyFactoryBean class.
Example: applicationContext.xml in DataSourceTransactionManager
<bean id="transactionManager"
      class="org.springframework.jdbc.datasource.DataSourceTransactionManager">
    <property name="dataSource" ref="dataSource"/>
</bean>

<bean id="txProxyTemplate" abstract="true"
      class="org.springframework.transaction.interceptor.TransactionProxyFactoryBean">
    <property name="transactionManager" ref="transactionManager" />
    <property name="transactionAttributes">
        <props>
            <prop key="get*">PROPAGATION_REQUIRED, readOnly</prop>
            <prop key="add*">PROPAGATION_REQUIRED</prop>
        </props>
    </property>
</bean>

<bean id="accountService" parent="txProxyTemplate">
    <property name="target">
        <bean class="com.altibase.banking.AccountService">
            <property name="accountDao" ref="accountDao"/>
        </bean>
    </property>
</bean>
Handling Distributed Transactions#
You can handle distributed transactions in Spring with JOTM (Java Open Transaction Manager). To integrate with JOTM, first register the JotmFactoryBean provided by Spring, and then use JtaTransactionManager, which supports distributed transactions, as the TransactionManager.
You also need a DataSource that supports distributed transactions. You can use org.enhydra.jdbc.pool.StandardXAPoolDataSource provided by JOTM, but this document explains how to handle distributed transactions with Altibase.jdbc.driver.AltibaseXADataSource provided by Altibase.
The following example handles distributed transactions with org.springframework.transaction.jta.JtaTransactionManager and Altibase.jdbc.driver.AltibaseXADataSource. The configuration steps are as follows.
- Specify the DataSource with AltibaseXADataSource.
- Specify JotmFactoryBean.
- Specify JtaTransactionManager as the TransactionManager.
- Specify a bean that handles declarative transactions with the
TransactionProxyFactoryBeanclass.
Example: applicationContext.xml in XAConnection
<bean id="dataSource1" class="Altibase.jdbc.driver.AltibaseXADataSource">
    <!-- connection url -->
    <property name="url" value="jdbc:Altibase://192.168.1.35:21129/mydb"/>
    <!-- DB user account -->
    <property name="user" value="sys"/>
    <!-- DB user password -->
    <property name="password" value="manager" />
</bean>

<bean id="dataSource2" class="Altibase.jdbc.driver.AltibaseXADataSource">
    <!-- connection url -->
    <property name="url" value="jdbc:Altibase://127.0.0.1:20300/mydb"/>
    <!-- DB user account -->
    <property name="user" value="sys"/>
    <!-- DB user password -->
    <property name="password" value="manager" />
</bean>

<bean id="accountDao1" class="com.altibase.banking.AccountDao">
    <property name="dataSource" ref="dataSource1"/>
</bean>

<bean id="accountDao2" class="com.altibase.banking.AccountDao">
    <property name="dataSource" ref="dataSource2"/>
</bean>

<bean id="jotm" class="org.springframework.transaction.jta.JotmFactoryBean"/>

<bean id="transactionManager"
      class="org.springframework.transaction.jta.JtaTransactionManager">
    <property name="userTransaction" ref="jotm"/>
</bean>

<bean id="txProxyTemplate" abstract="true"
      class="org.springframework.transaction.interceptor.TransactionProxyFactoryBean">
    <property name="transactionManager" ref="transactionManager" />
    <property name="transactionAttributes">
        <props>
            <prop key="get*">PROPAGATION_REQUIRED, readOnly</prop>
            <prop key="add*">PROPAGATION_REQUIRED</prop>
        </props>
    </property>
</bean>

<bean id="accountService" parent="txProxyTemplate">
    <property name="target">
        <bean class="com.altibase.banking.AccountService">
            <property name="accountDao1" ref="accountDao1"/>
            <property name="accountDao2" ref="accountDao2"/>
        </bean>
    </property>
</bean>
To run the XAConnection example project, you need to add the JOTM jar files in addition to the jar files added earlier.

You can download the JOTM files from the JOTM website.
Extract the downloaded file and add carol-2.0.5.jar, connector-1_5.jar, howl-0.1.11.jar, jotm.jar, jta-spec1_0_1.jar, and xapool-1.5.0.jar to the project. The jar file names may differ depending on the JOTM version you downloaded.
You also need cglib-nodep-2.1.3.jar.
Considerations for Spring Integration#
This chapter describes what to watch out for when integrating Spring with Altibase.
Handling LOB Data#
To handle LOB data in Altibase, you must turn off autocommit mode and manage transactions explicitly.
Therefore, to handle LOBs in Spring, you must specify a TransactionManager bean.
If you use declarative transactions, set propagation to PROPAGATION_REQUIRED, PROPAGATION_REQUIRES_NEW, or PROPAGATION_NESTED.
If you do not specify a TransactionManager, or if you set propagation to any other value with declarative transactions, retrieving LOB data returns null or fails with an error such as java.sql.SQLException: 0:LobLocator can not span the transaction 101858625. Inserting LOB data fails with the same error.
Example: applicationContext.xml in LobConnection
<bean id="transactionManager"
      class="org.springframework.jdbc.datasource.DataSourceTransactionManager">
    <property name="dataSource" ref="dataSource"/>
</bean>

<bean id="txProxyTemplate" abstract="true"
      class="org.springframework.transaction.interceptor.TransactionProxyFactoryBean">
    <property name="transactionManager" ref="transactionManager" />
    <property name="transactionAttributes">
        <props>
            <prop key="get*">PROPAGATION_REQUIRED</prop>
            <prop key="add*">PROPAGATION_REQUIRED</prop>
        </props>
    </property>
</bean>

<bean id="lobSampleService" parent="txProxyTemplate">
    <property name="target">
        <bean class="com.altibase.lob.LobSampleService">
            <property name="lobSampleDao" ref="lobSampleDao"/>
        </bean>
    </property>
</bean>
Appendix - HelloSpring#
This chapter walks through the HelloSpring example in more detail to show how to use Spring. The HelloSpring project was created in Eclipse.
HelloSpring is a simple program that prints a greeting message. It gets the greetingService bean defined in the bean configuration file applicationContext.xml from the Spring container, BeanFactory, and prints the greeting message defined in the bean.
Creating the HelloSpring Project#
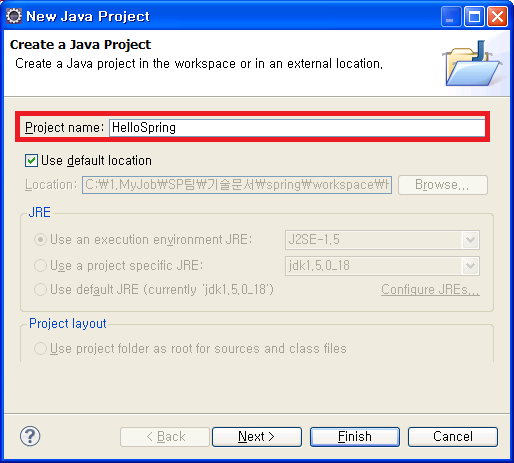
From the menu, click File > New > Java Project. Enter HelloSpring in Project name and click Finish.
Writing the Example Java Files#
Write the following interface and class.
GreetingService interface
This interface defines the service.
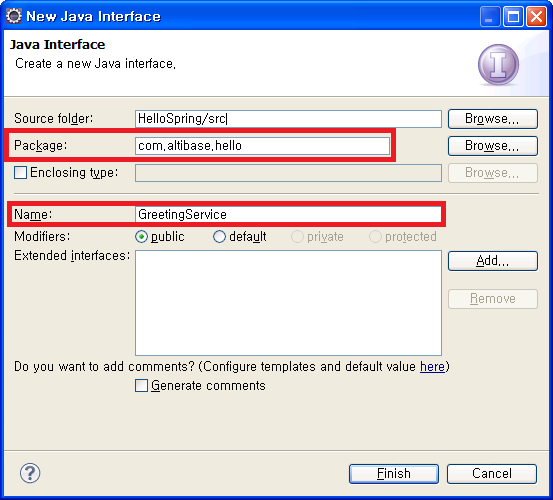
Right-click the src directory of the HelloSpring project and click New > Interface.
Enter com.altibase.hello in Package and GreetingService in Name.
When the GreetingService.java file is created, write the following code.
package com.altibase.hello;

public interface GreetingService {
    public void sayGreeting();
}
GreetingServiceImp class
This class implements the GreetingService interface.
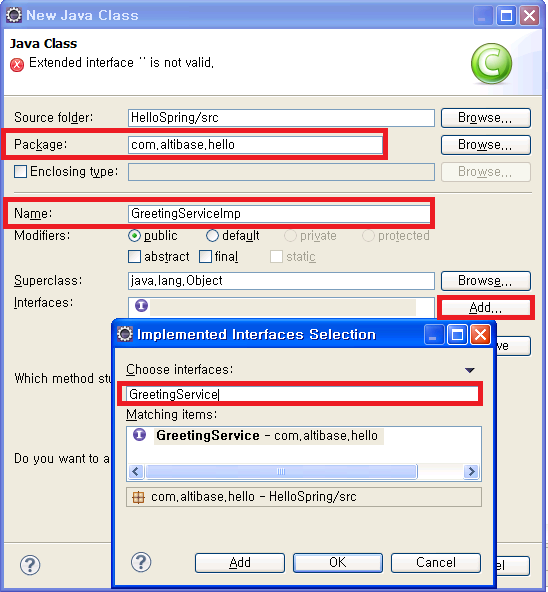
Right-click the src directory of the HelloSpring project and click New > Class.
Enter com.altibase.hello in Package and GreetingServiceImp in Name.
Click Add next to Interfaces, enter GreetingService, and click OK.
When the GreetingServiceImp.java file is created, write the following code.
package com.altibase.hello;

public class GreetingServiceImp implements GreetingService {
    private String greeting;

    public GreetingServiceImp() {
    }

    public GreetingServiceImp(String greeting) {
        this.greeting = greeting;
    }

    public void sayGreeting() {
        System.out.println(greeting);
    }

    public void setGreeting(String greeting) {
        this.greeting = greeting;
    }
}
Defining the Bean Configuration File#
Define the GreetingServiceImp bean in the bean configuration file applicationContext.xml.
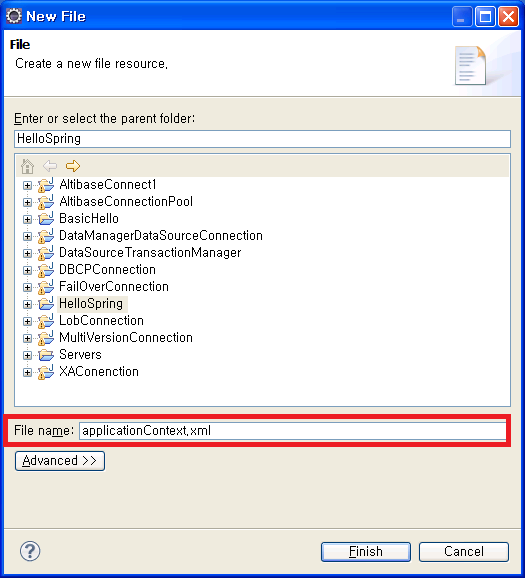
Right-click the HelloSpring project and click New > File.
Enter applicationContext.xml in File name.
Write the following in the applicationContext.xml file.
<?xml version="1.0" encoding="UTF-8"?>
<beans xmlns="http://www.springframework.org/schema/beans"
       xmlns:xsi="http://www.w3.org/2001/XMLSchema-instance"
       xmlns:context="http://www.springframework.org/schema/context"
       xsi:schemaLocation="http://www.springframework.org/schema/beans http://www.springframework.org/schema/beans/spring-beans-3.2.xsd
                           http://www.springframework.org/schema/context http://www.springframework.org/schema/context/spring-context-3.2.xsd">

    <bean id="greetingService" class="com.altibase.hello.GreetingServiceImp">
        <property name="greeting">
            <value>Hello</value>
        </property>
    </bean>

</beans>
greetingService is the name of the bean. A Java program uses this name to get the bean.
In the class attribute, specify the fully qualified name of the GreetingServiceImp class that provides the service. In the property, enter the message to assign to the greeting member variable of GreetingServiceImp.
Defining the HelloApp Class#
HelloApp is the main class. It gets the GreetingServiceImp bean from BeanFactory and calls its service method, sayGreeting().
Right-click the src directory of the HelloSpring project and click New > Class.
Leave Package empty and enter HelloApp in Name.
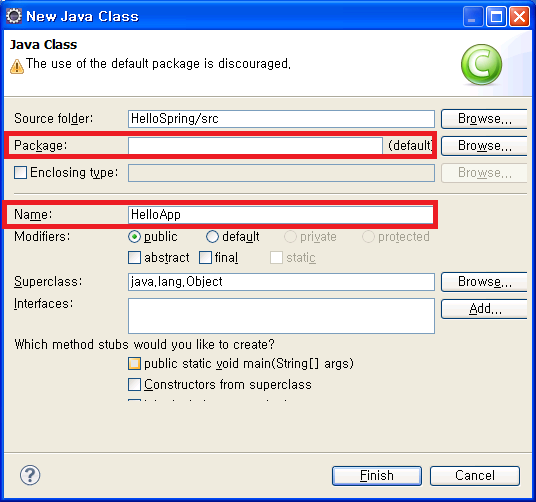
When the HelloApp.java file is created, write the following code.
import org.springframework.context.ApplicationContext;
import org.springframework.context.support.ClassPathXmlApplicationContext;

import com.altibase.hello.GreetingService;

public class HelloApp {

    /**
     * @param args
     */
    public static void main(String[] args) {

        @SuppressWarnings("resource")
        ApplicationContext factory = new ClassPathXmlApplicationContext("applicationContext.xml");

        GreetingService greetingService = (GreetingService)factory.getBean("greetingService");
        greetingService.sayGreeting();
    }
}
In this code, applicationContext.xml is the bean configuration file defined above, and greetingService is the bean name of the GreetingServiceImp class defined in applicationContext.xml.
Adding the JAR Files#
Add the Spring jar files to the HelloSpring project.
Right-click the HelloSpring project, click Properties > Java Build Path > Libraries, and then click Add External JARs to add spring.jar and commons-logging.jar from Spring Framework.
For the location of each file, see Using DriverManagerDataSource.
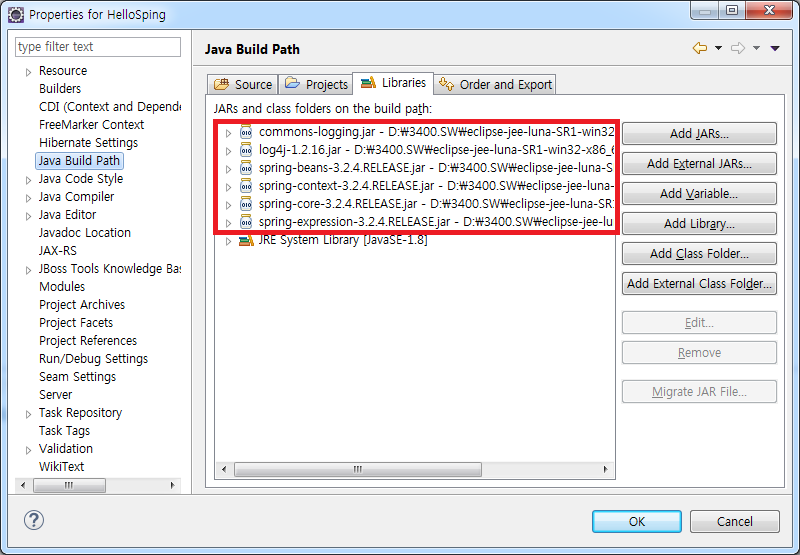
Running the HelloSpring Project#
Select the HelloSpring project, and then choose Run from the menu or click the Run button.
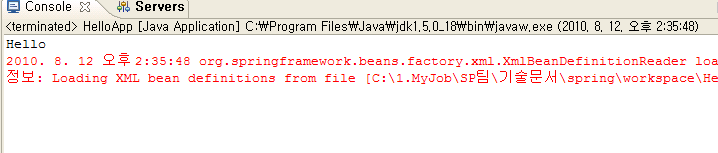
The string Hello is printed in the Console window.