iBATIS Integration Guide for Altibase#
Overview#
This document explains how to integrate Altibase with iBATIS, and with iBATIS and Spring together.
This document is based on iBATIS 2.3.4, Spring Framework 2.5.6, and Altibase 5.3.3, with Eclipse as the development IDE. The examples for each chapter are provided separately from this document.
You may also find the following documents useful during development.
- Altibase Development Guide
- JAVA Developer's Guide
- JBoss Integration Guide for Altibase
- TOMCAT Integration Guide for Altibase
- WebSphere Integration Guide for Altibase
- WebLogic Integration Guide for Altibase
- Spring Integration Guide for Altibase
- Hibernate Integration Guide for Altibase
Info
For errors and improvements related to this document, please contact the technical support portal or technical support center.
- Technical support portal: http://support.altibase.com/en
- Technical support center: +82-2-2082-1114
Info
This document is provided for informational purposes only and is subject to change without prior notice. It may contain errors, and Altibase makes no express or implied warranties of any kind, including but not limited to warranties of merchantability or fitness for a particular purpose.
The development, release, and timing of any features or functionality described for Altibase products in this document are at the sole discretion of Altibase.
Altibase may hold patents, trademarks, copyrights, or other intellectual property rights related to the contents of this document.
iBATIS Overview#
This chapter introduces the concepts and features of iBATIS and explains how to download it.
What Is iBATIS?#
iBATIS is an ORM (Object Relational Mapping) framework that makes it easier for developers to work with databases. It connects database tables with Java objects and handles the persistence layer for you. With iBATIS, you connect database tables with JavaBeans in SqlMap XML files, which makes CRUD (create, read, update, delete) operations simple.
In traditional JDBC programming, SQL statements are embedded in the program source. With iBATIS, you write SQL statements in separate XML files, apart from the program. This reduces the programming effort compared with using JDBC directly. It also makes SQL easy to change: you update the SQL statements in the XML file without modifying the program.
The following figure shows how iBATIS communicates with the database using SQL written in an XML file (SqlMap.xml).

You write the SQL statement for each CRUD operation in a SqlMap XML file and register these files in a SqlMapConfig XML file. The iBATIS API then automatically creates a Statement object for each SQL statement and uses it to run the statement against the database.
For details on the iBATIS architecture, see the Apache iBATIS archive website.
Downloading iBATIS#
To use iBATIS, you need the iBATIS jar file, which you can download from the Apache Archive Distribution Directory. When you extract the downloaded file, the jar file is in the lib directory. Use this jar file to integrate iBATIS. For example, if the iBATIS package is ibatis-2.3.4.726.zip, the lib directory of the extracted directory contains ibatis-2.3.4.726.jar.
Earlier versions of iBATIS required both ibatis-comm.jar and ibatis-sqlmap.jar. Starting with iBATIS 2.3.4, these two files are merged into a single ibatis-2.3.4.x.jar file. This document uses ibatis-2.3.4.726.jar.
Writing Examples with iBATIS#
To process SQL statements with iBATIS, you need to write a SqlMapConfig XML file and a SqlMap XML file. These files let you easily connect JavaBeans with PreparedStatement parameters and ResultSets. This chapter explains how to write the SqlMapConfig and SqlMap XML files and how an application uses them to process SQL. For a step-by-step guide to writing the example program, see the Appendix.
Writing the SqlMap File#
A SqlMap XML file defines the SQL statements to send to the database, how the values passed to PreparedStatement parameters correspond to object properties, and how ResultSet results correspond to object properties.
The following is an example SqlMap XML file, Person.xml, that handles CRUD operations on the PERSON table.
<?xml version="1.0" encoding="UTF-8"?>
<!DOCTYPE sqlMap PUBLIC "-//iBATIS.com//DTD SQL Map 2.0//EN"
    "http://www.ibatis.com/dtd/sql-mapconfig-2.dtd">

<sqlMap namespace="Person">
    <resultMap id="PersonResult" class="examples.domain.Person">
        <result property="id" column="per_id" />
        <result property="name" column="per_name" />
        <result property="birthDate" column="per_birth_date" />
        <result property="weightInKilograms" column="per_weight_kg" />
        <result property="heightInMeters" column="per_height_m" />
    </resultMap>

    <select id="getPerson" parameterClass="int" resultClass="examples.domain.Person">
        <![CDATA[
            SELECT
                PER_ID as id,
                PER_NAME as name,
                PER_BIRTH_DATE as birthDate,
                PER_WEIGHT_KG as weightInKilograms,
                PER_HEIGHT_M as heightInMeters
            FROM PERSON
            WHERE PER_ID = #value#
        ]]>
    </select>

    <insert id="insertPerson" parameterClass="examples.domain.Person">
        <![CDATA[
            INSERT INTO PERSON (PER_ID, PER_NAME, PER_BIRTH_DATE,
                                PER_WEIGHT_KG, PER_HEIGHT_M)
            VALUES (#id#, #name#, #birthDate#,
                    #weightInKilograms#, #heightInMeters#)
        ]]>
    </insert>

    <update id="updatePerson" parameterClass="examples.domain.Person">
        <![CDATA[
            UPDATE PERSON
            SET PER_NAME = #name#,
                PER_BIRTH_DATE = #birthDate#,
                PER_WEIGHT_KG = #weightInKilograms#,
                PER_HEIGHT_M = #heightInMeters#
            WHERE PER_ID = #id#
        ]]>
    </update>

    <delete id="deletePerson" parameterClass="int">
        <![CDATA[
            DELETE PERSON
            WHERE PER_ID = #id#
        ]]>
    </delete>

    <select id="getAllPersons" resultMap="PersonResult">
        <![CDATA[
            SELECT * FROM person
        ]]>
    </select>
</sqlMap>
The <resultMap> tag defines the Map object that holds the ResultSet data after a SELECT statement runs. The <insert>, <update>, <delete>, and <select> tags define the SQL statement for each CRUD operation.
For details on each tag, see the Apache iBATIS archive website or the iBATIS SQL Maps Tutorial.
Writing the SqlMapConfig File#
The SqlMapConfig file is the SQL Maps configuration file. It defines the dataSource for the database connection, the paths of the SqlMap files, and other properties that control SqlMapClient.
The following is an example SqlMapConfig file, SqlMapConfigExample.xml.
<?xml version="1.0" encoding="UTF-8"?>
<!DOCTYPE sqlMapConfig PUBLIC "-//iBATIS.com//DTD SQL Map Config 2.0//EN"
    "http://www.ibatis.com/dtd/sql-map-config-2.dtd">

<sqlMapConfig>

    <properties resource="db.properties" />

    <settings
        cacheModelsEnabled="true"
        enhancementEnabled="true"
        lazyLoadingEnabled="true"
        maxRequests="32"
        maxSessions="10"
        maxTransactions="5"
        useStatementNamespaces="false"
    />

    <transactionManager type="JDBC">
        <dataSource type="SIMPLE">
            <property name="JDBC.Driver" value="${driver}"/>
            <property name="JDBC.ConnectionURL" value="${url}"/>
            <property name="JDBC.Username" value="${username}"/>
            <property name="JDBC.Password" value="${password}"/>
            <property name="Pool.MaximumActiveConnections" value="10"/>
            <property name="Pool.MaximumIdleConnections" value="5"/>
            <property name="Pool.MaximumCheckoutTime" value="120000"/>
            <property name="Pool.TimeToWait" value="500"/>
            <property name="Pool.PingQuery" value="select 1 from dual"/>
            <property name="Pool.PingEnabled" value="false"/>
            <property name="Pool.PingConnectionsOlderThan" value="1"/>
            <property name="Pool.PingConnectionsNotUsedFor" value="1"/>
        </dataSource>
    </transactionManager>

    <sqlMap resource="Person.xml" />

</sqlMapConfig>
The resource attribute of the <properties> tag specifies the classpath location of the external properties file, db.properties. Values defined in this file are referenced in the SqlMapConfig file in the ${name} format, such as ${driver} and ${url}. The <settings> tag specifies attributes that control how SqlMapClient behaves, and the <transactionManager> and <dataSource> tags contain the connection information for the database. The resource attribute of the <sqlMap> tag specifies the path of the SqlMap file you created earlier, Person.xml.
For details on each tag, see the Apache iBATIS archive website or the iBATIS SQL Maps Tutorial.
Writing the SqlMapConfig File for iBATIS.NET#
This section briefly explains how to configure connection information in the SqlMap.config file when iBATIS.NET connects to Altibase through ODBC.
First, install the Altibase ODBC Driver and add a user DSN in the ODBC Data Source Administrator.
For instructions on installing and configuring the ODBC Driver, see the Altibase ODBC Development Guide in Windows Environment.
<!-- Database connection information -->
<database>
    <provider name="Odbc2.0"/>
    <dataSource name="Altibase" connectionString="DSN=Altibase5;USER ID=sys;PASSWORD=manager"/>
</database>
Among the DBMS providers defined in providers.config, use Odbc2.0 to connect to Altibase. Specify Odbc2.0 in the <provider> tag.
In the connectionString attribute of the <dataSource> tag, enter the DSN you added in the ODBC Data Source Administrator.
Writing the Application#
In an application, you use a SqlMapClient instance to perform CRUD operations with objects that correspond to database tables.
To work with the database through iBATIS, first obtain a SqlMapClient object from the SqlMapConfig file. Then call the CRUD methods of the SqlMapClient object to communicate with the database.
The following application example inserts, updates, deletes, and retrieves data in the PERSON table.
Example: PersonApp.java in SimpleConnection
...
String resource ="SqlMapConfigExample.xml";
Reader reader = Resources.getResourceAsReader(resource);
SqlMapClient sqlMap = SqlMapClientBuilder.buildSqlMapClient(reader);

//insert Person
Person newPerson1 = new Person();
...
sqlMap.insert ("insertPerson", newPerson1);
...

//select all Persons
List list = (List)sqlMap.queryForList("getAllPersons");
...

//update Person
sqlMap.update("updatePerson", newPerson1);
...

//get Person
Person person = (Person) sqlMap.queryForObject ("getPerson", personPk);
...

//delete Person
sqlMap.delete ("deletePerson", new Integer(1));
...
First, read the SqlMapConfig file to obtain a SqlMapClient object.
String resource ="SqlMapConfigExample.xml";

Reader reader = Resources.getResourceAsReader(resource);

SqlMapClient sqlMap = SqlMapClientBuilder.buildSqlMapClient(reader);
Then call the SqlMapClient method for each CRUD operation.
sqlMap.insert()
sqlMap.queryForList()
sqlMap.queryForObject()
sqlMap.update()
sqlMap.delete()
For details on each method, see the Apache iBATIS archive website or the iBATIS SQL Maps Tutorial.
Integrating with Altibase#
To integrate iBATIS with Altibase, set up the Altibase JDBC driver and specify a dataSource for Altibase in the SqlMapConfig file.
This chapter explains how to get the Altibase JDBC driver, how to set it up, and how to configure a dataSource in the SqlMapConfig file.
It also covers how to use the FailOver feature, how to connect to multiple versions of Altibase, and how to call stored procedures and functions.
Getting the Altibase JDBC Driver#
The JDBC driver provided by Altibase is Altibase.jar. You can find it in the $ALTIBASE_HOME/lib directory on the server where Altibase is installed.
Starting with Altibase 5, the $ALTIBASE_HOME/lib directory contains both Altibase.jar and Altibase5.jar. Altibase.jar is the standard JDBC driver, and Altibase5.jar is the JDBC driver for connecting to Altibase 5 and earlier versions at the same time. To connect to a single Altibase server, or to multiple Altibase servers of the same version, use $ALTIBASE_HOME/lib/Altibase.jar.
To make sure the Altibase JDBC driver is compatible with the Altibase server you want to connect to, check the version of the JDBC driver.
Run the following command to check the version of the Altibase JDBC driver.
$ java -jar Altibase.jar
JDBC Driver Info :  Altibase Ver = 5.3.3.13 for JavaVM v1.4, CMP:5.6.1, $Revision: 14502 $ Jan 13 2010 14:35:28
The driver is compatible if the CMP value of the Altibase JDBC driver matches the cm protocol version of Altibase. You can check the cm protocol version of Altibase with the following command.
$ altibase -v
version 5.3.3.13 XEON_LINUX_redhat_Enterprise_AS4-64bit-5.3.3.13-release-GCC3.4.6 (xeon-redhat-linux-gnu) Jan 13 2010 14:35:30, binary db version 5.4.1, meta version 5.6.1, cm protocol version 5.6.1, replication protocol version 5.4.1
Newer releases may include fixes for JDBC-related bugs, so we generally recommend using an Altibase JDBC driver that is the same version as your Altibase server or newer.
Configuring the JDBC Driver#
Add the JDBC driver file, Altibase.jar, to the classpath or place it in an appropriate directory on your web server.
If you develop with Eclipse, you can add the Altibase JDBC driver to your project as follows.
In the project, select JRE System Library [J2SE-1.5] > Properties > Installed JREs, select a JRE from the list, and then click Edit > Add External JARs to add Altibase.jar.


Configuring dataSource#
To connect to Altibase, specify the Altibase properties in the <transactionManager> tag of the SqlMapConfig file. You can enter the property values directly in the SqlMapConfig file, or write them in a separate properties file and load them from there.
The following example defines the Altibase connection properties in a db.properties file and reads them in the SqlMapConfig file.
Example: db.properties in SimpleConnection
driver=Altibase.jdbc.driver.AltibaseDriver
url=jdbc:Altibase://192.168.1.35:20300/mydb
username=sys
password=manager
Each property is described below.
| Property | Description |
|---|---|
| driver | Class name of the Altibase JDBC driver |
| url | Connection string for Altibase. Use the format jdbc:Altibase://IP:port_no/db_name. |
| username | Database user account |
| password | Password for the database user account |
Example: SqlMapConfigExample.xml in SimpleConnection
<sqlMapConfig>
    <properties resource="db.properties" />

    <transactionManager type="JDBC">
        <!-- SIMPLE: built-in dataSource type in iBATIS -->
        <dataSource type="SIMPLE">
            <property name="JDBC.Driver" value="${driver}"/>
            <property name="JDBC.ConnectionURL" value="${url}"/>
            <property name="JDBC.Username" value="${username}"/>
            <property name="JDBC.Password" value="${password}"/>
        </dataSource>
    </transactionManager>

    <sqlMap resource="Person.xml" />

</sqlMapConfig>
This file reads the driver, url, username, and password properties from db.properties and assigns them to the JDBC.Driver, JDBC.ConnectionURL, JDBC.Username, and JDBC.Password properties of the dataSource.
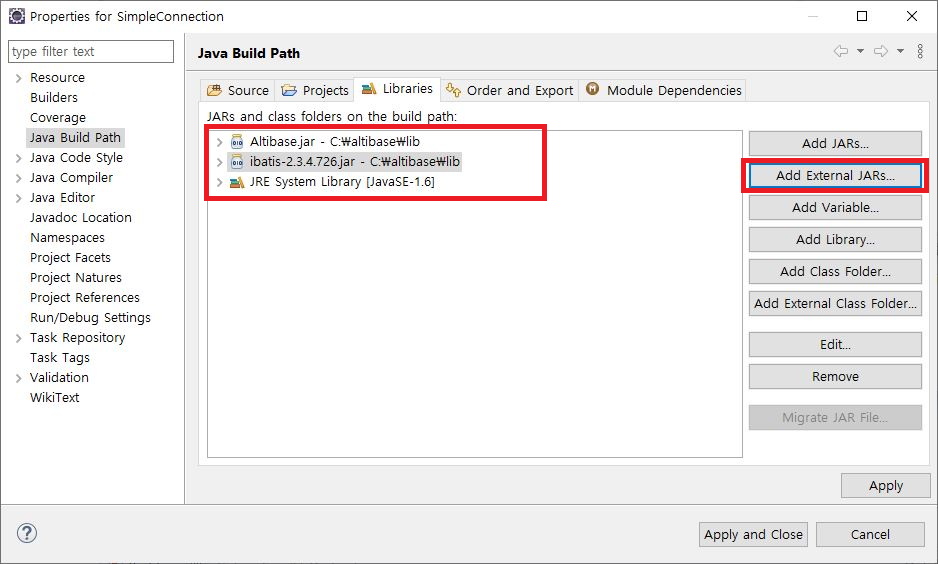
To run the SimpleConnection example project, you need Altibase.jar and ibatis-2.3.4.x.jar.
Connecting with FailOver#
To use the FailOver feature, add the FailOver attributes to the connection URL of the dataSource.
The following example connects to Altibase using FailOver, with the connection URL defined in the db.properties file.
Example: db.properties in FailOverSample
driver=Altibase.jdbc.driver.AltibaseDriver
url=jdbc:Altibase://192.168.6.224:20300/mydb?AlternateServers=(192.168.1.35:20300)&ConnectionRetryCount=1&ConnectionRetryDelay=1&SessionFailOver=off&LoadBalance=off
username=sys
password=manager
The following FailOver properties can be specified in the connection URL.
| Property | Description |
|---|---|
| AlternateServers | Available servers to connect to when a failure occurs, in the format (IP Address1:Port1, IP Address2:Port2,...). |
| ConnectionRetryCount | Number of connection retries when the connection to an available server fails |
| ConnectionRetryDelay | Time in seconds to wait before retrying when the connection to an available server fails |
| LoadBalance | If set to ON, the driver randomly selects from the primary server and the available servers on the first connection attempt.If set to OFF, the driver connects to the primary server first and, if that fails, connects to a server listed in AlternateServers. |
| SessionFailOver | Whether to use STF (Service Time Fail-Over).ON: STF, OFF: CTFCTF (Connection Time Fail-Over) detects a failure when connecting to the DBMS and reconnects to another healthy server. STF detects a failure during service, reconnects to the DBMS on another available node, and restores the session properties so that the user application can run its business logic again. STF performs Fail-Over only for the database connection. Failed transactions must be reprocessed by the user. |
To run the FailOverSample example project, you need Altibase.jar and ibatis-2.3.4.x.jar.
Connecting to Altibase 5 and Earlier Versions Simultaneously#
Starting with Altibase 5, Altibase provides a dedicated Altibase 5 JDBC driver, Altibase5.jar, so that a single application can connect to Altibase 5 and Altibase 4 or Altibase 3 at the same time.
With this driver, you can connect to two different versions of Altibase, such as Altibase 5 and Altibase 4, Altibase 5 and Altibase 3, or Altibase 5.1.5 and Altibase 5.3.3.
You need the dedicated Altibase 5 driver, Altibase5.jar, in addition to the existing Altibase.jar. In the dataSource, you must also specify the Altibase 5 driver class name, Altibase5.jdbc.driver.AltibaseDriver, instead of the usual Altibase.jdbc.driver.AltibaseDriver.
To connect iBATIS to different versions of Altibase, write a separate SqlMapConfig file for each version and have the application read each file.
Note that the program must load Altibase5.jdbc.driver.AltibaseDriver before Altibase.jdbc.driver.AltibaseDriver.
The following example loads the drivers for two versions of Altibase using Altibase.jar and Altibase5.jar.
Example: db.properties1 in MultiVersionConnection
Settings for Altibase 5
driver=Altibase5.jdbc.driver.AltibaseDriver
url=jdbc:Altibase://192.168.6.224:20300/mydb
username=sys
password=manager
Example: db.properties2 in MultiVersionConnection
Settings for versions earlier than Altibase 5
driver=Altibase.jdbc.driver.AltibaseDriver
url=jdbc:Altibase://192.168.1.35:20300/mydb
username=sys
password=manager
Example: SqlMapConfigExample1.xml in MultiVersionConnection
Settings for Altibase 5
<sqlMapConfig>
    <properties resource="db.properties1" />
    <transactionManager type="JDBC">
        <dataSource type="SIMPLE">
            <property name="JDBC.Driver" value="${driver}"/>
            <property name="JDBC.ConnectionURL" value="${url}"/>
            <property name="JDBC.Username" value="${username}"/>
            <property name="JDBC.Password" value="${password}"/>
        </dataSource>
    </transactionManager>
    <sqlMap resource="Person.xml" />
</sqlMapConfig>
Example: SqlMapConfigExample2.xml in MultiVersionConnection
Settings for versions earlier than Altibase 5
<sqlMapConfig>
    <properties resource="db.properties2" />
    <transactionManager type="JDBC">
        <dataSource type="SIMPLE">
            <property name="JDBC.Driver" value="${driver}"/>
            <property name="JDBC.ConnectionURL" value="${url}"/>
            <property name="JDBC.Username" value="${username}"/>
            <property name="JDBC.Password" value="${password}"/>
        </dataSource>
    </transactionManager>
    <sqlMap resource="Person.xml" />
</sqlMapConfig>
Example: PersonApp.java in MultiVersionConnection
String resource1 ="SqlMapConfigExample1.xml";
Reader reader1 = Resources.getResourceAsReader(resource1);
SqlMapClient sqlMap1 = SqlMapClientBuilder.buildSqlMapClient(reader1);

String resource2 ="SqlMapConfigExample2.xml";
Reader reader2 = Resources.getResourceAsReader(resource2);
SqlMapClient sqlMap2 = SqlMapClientBuilder.buildSqlMapClient(reader2);
To load Altibase5.jdbc.driver.AltibaseDriver before Altibase.jdbc.driver.AltibaseDriver, the PersonApp.java example first reads SqlMapConfigExample1.xml, which uses Altibase5.jdbc.driver.AltibaseDriver as JDBC.Driver. Always load the dedicated Altibase 5 driver first.
To run the MultiVersionConnection example project, you need Altibase.jar and Altibase5.jar in addition to ibatis-2.3.4.x.jar.
These files are in the lib directory under the Altibase installation directory, $ALTIBASE_HOME. Use Altibase5.jar from Altibase 5 and Altibase.jar from the earlier version.

Calling Procedures and Functions#
To call a stored procedure or function created in the database from iBATIS, configure its parameter information in the SqlMap file and define the call statement to run through CallableStatement in the <procedure> tag.
The following example calls a stored procedure and a function.
Example: Procedure and function creation statements in ProcedureSample
CREATE OR REPLACE PROCEDURE sum_proc
(
    p_num1 IN NUMBER,
    p_num2 IN NUMBER,
    p_num3 OUT NUMBER
)
AS
BEGIN
    p_num3 := p_num1 + p_num2;
END;
/

CREATE OR REPLACE FUNCTION sum_func
(
    p_num1 IN NUMBER,
    p_num2 IN NUMBER
)
RETURN NUMBER
AS
    v_num NUMBER;
BEGIN
    v_num := p_num1 + p_num2;
    RETURN v_num;
END;
/
Example: SqlMap file Procedure.xml in ProcedureSample
<sqlMap namespace="Procedure">

    <parameterMap id="ProcedureParam" class="java.util.Map">
        <parameter property="p_num1" jdbcType="NUMERIC" javaType="int" mode="IN" />
        <parameter property="p_num2" jdbcType="NUMERIC" javaType="int" mode="IN" />
        <parameter property="p_num3" jdbcType="NUMERIC" javaType="int" mode="OUT" />
    </parameterMap>

    <parameterMap id="FunctionParam" class="java.util.Map">
        <parameter property="p_num3" jdbcType="NUMERIC" javaType="int" mode="OUT" />
        <parameter property="p_num1" jdbcType="NUMERIC" javaType="int" mode="IN" />
        <parameter property="p_num2" jdbcType="NUMERIC" javaType="int" mode="IN" />
    </parameterMap>

    <procedure id="sumProc" parameterMap="ProcedureParam">
        {call sum_proc(?,?,?)}
    </procedure>

    <procedure id="sumFunc" parameterMap="FunctionParam">
        {call ? := sum_func(?,?)}
    </procedure>

</sqlMap>
The <parameterMap> tag defines the type and IN/OUT mode of each procedure or function parameter. The parameterMap attribute of the <procedure> tag specifies the id of the <parameterMap> tag.
The <procedure> tag contains the statement that calls the procedure or function.
To run the ProcedureSample example, you need Altibase.jar and ibatis-2.3.4.x.jar.
Integrating iBATIS, Spring, and Altibase#
When you integrate with Altibase, you can specify the dataSource either in iBATIS or in Spring.
This chapter explains how to integrate with Altibase using each approach.
Configuring dataSource in Spring#
To use iBATIS with Spring, specify the iBATIS SqlMapClientFactoryBean bean in the Spring applicationContext.xml file.
Then configure each DAO bean to reference the SqlMapClientFactoryBean bean. The DAOs can then call CRUD methods through the SqlMapClient object.
To configure the dataSource in Spring in an iBATIS and Spring environment, choose one of the methods described in the Spring Integration Guide for Altibase, specify the dataSource in applicationContext.xml, and specify the SqlMapClientFactoryBean bean for iBATIS integration. In the configLocation property of the SqlMapClientFactoryBean bean, specify the name of the SqlMapConfig file.
The following example specifies a dataSource and a SqlMapClientFactoryBean bean in the applicationContext.xml file.
Example: applicationContext.xml in SpringIbatisConnection1
<!-- Data source configuration using the DriverManagerDataSource class -->
<bean id="dataSource" class="org.springframework.jdbc.datasource.DriverManagerDataSource">
    <!-- JDBC driver class name -->
    <property name="driverClassName" value="Altibase.jdbc.driver.AltibaseDriver"/>
    <!-- connection url -->
    <property name="url" value="jdbc:Altibase://192.168.1.35:20300/mydb"/>
    <!-- DB user account -->
    <property name="username" value="sys"/>
    <!-- DB user password -->
    <property name="password" value="manager" />
</bean>

<bean id="sqlMapClient" class="org.springframework.orm.ibatis.SqlMapClientFactoryBean">
    <property name="dataSource" ref="dataSource"/>
    <property name="configLocation" value="SqlMapConfigExample.xml"/>
</bean>

<!-- Bean configuration for the DAO class -->
<bean id="personDao" class="examples.domain.PersonDao">
    <property name="sqlMapClient" ref="sqlMapClient"/>
</bean>
To run the SpringIbatisConnection1 example project, you need Altibase.jar, ibatis-2.3.4.x.jar, spring-jdbc.jar, spring-orm.jar, spring.jar, and commons-logging.jar.
spring-jdbc.jar, spring-orm.jar, spring.jar, and commons-logging.jar are included in the Spring Framework. For the location of each file, see the Spring Integration Guide for Altibase.

Configuring dataSource in iBATIS#
In an iBATIS and Spring environment, you configure the dataSource in iBATIS the same way as described in Configuring dataSource. Specify the Altibase connection properties in the <transactionManager> tag of the SqlMapConfig file.
However, to integrate iBATIS with Spring, you must still specify the iBATIS SqlMapClientFactoryBean bean in the applicationContext.xml file, as in Configuring dataSource in Spring.
The following example configures the dataSource in iBATIS to integrate with Altibase in an iBATIS and Spring environment.
Example: applicationContext.xml in SpringIbatisConnection2
<bean id="sqlMapClient" class="org.springframework.orm.ibatis.SqlMapClientFactoryBean">
    <property name="configLocation" value="SqlMapConfigExample.xml"/>
</bean>

<!-- Bean configuration for the DAO class -->
<bean id="personDao" class="examples.domain.PersonDao">
    <property name="sqlMapClient" ref="sqlMapClient"/>
</bean>
Example: SqlMapConfigExample.xml in SpringIbatisConnection2
<sqlMapConfig>
    <properties resource="db.properties" />

    <transactionManager type="JDBC">
        <dataSource type="SIMPLE">
            <property name="JDBC.Driver" value="${driver}"/>
            <property name="JDBC.ConnectionURL" value="${url}"/>
            <property name="JDBC.Username" value="${username}"/>
            <property name="JDBC.Password" value="${password}"/>
        </dataSource>
    </transactionManager>

    <sqlMap resource="Person.xml" />

</sqlMapConfig>
In this example, the dataSource is configured in SqlMapConfigExample.xml, and the applicationContext.xml file reads SqlMapConfigExample.xml to set up the SqlMapClientFactoryBean bean.
To run the SpringIbatisConnection2 example, you need Altibase.jar, ibatis-2.3.4.x.jar, spring-orm.jar, spring.jar, and commons-logging.jar. spring-orm.jar, spring.jar, and commons-logging.jar are included in the Spring Framework. For the location of each file, see the Spring Integration Guide for Altibase.

Using Altibase ConnectionPool#
You can use the Altibase ConnectionPool through the AltibaseConnectionPoolDataSource class provided by Altibase. In an iBATIS and Spring environment, define a dataSource bean with the AltibaseConnectionPoolDataSource class in the Spring applicationContext.xml file. Note that you cannot use the Altibase ConnectionPool with iBATIS alone, without Spring.
For configuration details, see the Spring Integration Guide for Altibase.
Example: applicationContext.xml from the Spring Integration Guide for Altibase
<bean id="dataSource" class="Altibase.jdbc.driver.AltibaseConnectionPoolDataSource">
    <!-- connection url -->
    <property name="url" value="jdbc:Altibase://192.168.1.35:20300/mydb"/>
    <!-- DB user account -->
    <property name="user" value="sys"/>
    <!-- DB user password -->
    <property name="password" value="manager" />
</bean>
Transaction Management#
iBATIS handles transactions automatically when you call CRUD methods, and you can also manage transactions explicitly in your application. If you integrate iBATIS with Spring, you can manage transactions in Spring as well.
This section introduces these transaction management methods.
Managing Transactions in iBATIS#
When you specify a dataSource in the <transactionManager> of the SqlMapConfig file, iBATIS automatically calls setAutoCommit(false); whenever a CRUD method defined in the SqlMap file is called. When the method finishes, the transaction is committed and the connection returns to the default autocommit mode.
You can also manage transactions directly in your application.
To start a transaction, call the startTransaction() method of SqlMapClient. To commit, call commitTransaction(). To roll back without committing, call endTransaction().
The following example handles transactions explicitly in an application.
Example: PersonApp.java in TransactionSample
SqlMapClient sqlMap = SqlMapClientBuilder.buildSqlMapClient(reader);

//start transaction
sqlMap.startTransaction();

//insert Person
Person newPerson1 = new Person();
…
sqlMap.insert ("insertPerson", newPerson1);

//commit
sqlMap.commitTransaction ();

Person newPerson2 = new Person();
…
sqlMap.insert ("insertPerson", newPerson2);

// selected 2 rows.
List<Person> list = (List<Person>)sqlMap.queryForList("getAllPersons");
System.out.println("Selected "+list.size()+" records.");
for(int i=0; i< list.size();i++){
    System.out.println(list.get(i));
}

//rollback
sqlMap.endTransaction();

// selected only 1 row.
list = (List<Person>)sqlMap.queryForList("getAllPersons");
System.out.println("Selected "+list.size()+" records.");
for(int i=0; i< list.size();i++){
    System.out.println(list.get(i));
}
To run the TransactionSample example project, you need Altibase.jar and ibatis-2.3.4.x.jar.
Managing Transactions in Spring#
In an iBATIS and Spring environment, you can manage transactions in Spring.
Among the examples in this document, LobSpringIbatisSample handles transactions declaratively in the Spring applicationContext.xml file.
For details, see the Spring Integration Guide for Altibase.
Considerations for iBATIS Integration#
This chapter describes what to consider when integrating iBATIS with Altibase.
Handling LOB Data#
To handle LOBs in iBATIS, you must set jdbcType to CLOB or BLOB for the parameter and result entries in the SqlMap file.
Otherwise, length limits may cause incorrect data to be inserted or retrieved, or errors such as Invalid length may occur. Always specify CLOB or BLOB as the data type for the parameter and result entries.
The following example configures a parameterMap and a resultMap for CLOB data.
Example: SqlMap file LobSample.xml in LobSample
<sqlMap namespace="LobSample">
    <resultMap id="LobSampleResult" class="com.altibase.lob.LobSample">
        <result property="lob_id" column="lob_id" />
        <result property="lobcolumn" column="lobcolumn" jdbcType="CLOB" javaType="java.lang.String" />
    </resultMap>

    <parameterMap id="LobSampleParam" class="com.altibase.lob.LobSample">
        <parameter property="lob_id" />
        <parameter property="lobcolumn" jdbcType="CLOB" javaType="java.lang.String" />
    </parameterMap>

    <select id="getLobSample" parameterClass="int" resultMap="LobSampleResult">
        SELECT lob_id, lobcolumn
        FROM lobsample
        WHERE lob_id = #value#
    </select>

    <insert id="insertLobSample" parameterMap="LobSampleParam">
        INSERT INTO lobsample (lob_id,lobcolumn)
        VALUES (?,?)
    </insert>

    ...
</sqlMap>
Also note that to handle LOB data in Altibase, you must turn off autocommit mode and manage the transaction yourself.
When you configure a dataSource in the <transactionManager> of the SqlMapConfig file, iBATIS internally calls setAutoCommit(false); to turn off autocommit mode, so no extra steps are needed for LOBs. However, if you integrate iBATIS with Spring and Spring manages the transactions, you must specify a TransactionManager bean to handle LOBs.
If you handle transactions declaratively in Spring, set propagation to PROPAGATION_REQUIRED, PROPAGATION_REQUIRES_NEW, or PROPAGATION_NESTED.
If you do not specify a TransactionManager, or if you set propagation to any other value with declarative transactions, retrieving LOB data returns null or fails with an error such as java.sql.SQLException: [DOCKI:0]:LobLocator can not span the transaction 101858625.
Inserting LOB data also fails with the java.sql.SQLException: [DOCKI:0]:LobLocator can not span the transaction 101858625. error.
The following example handles LOB data with declarative transactions in the Spring applicationContext.xml file. For details on declarative transactions, see the Spring Integration Guide for Altibase.
Example: applicationContext.xml in LobSpringIbatisSample
<bean id="dataSource" class="org.springframework.jdbc.datasource.DriverManagerDataSource">
    <property name="driverClassName" value="Altibase.jdbc.driver.AltibaseDriver"/>
    <property name="url" value="jdbc:Altibase://192.168.1.35:20300/mydb"/>
    <property name="username" value="sys"/>
    <property name="password" value="manager" />
</bean>

<bean id="sqlMapClient" class="org.springframework.orm.ibatis.SqlMapClientFactoryBean">
    <property name="dataSource" ref="dataSource"/>
    <property name="configLocation" value="SqlMapConfigExample.xml"/>
</bean>

<bean id="transactionManager" class="org.springframework.jdbc.datasource.DataSourceTransactionManager">
    <property name="dataSource" ref="dataSource"/>
</bean>

<bean id="txProxyTemplate" abstract="true"
      class="org.springframework.transaction.interceptor.TransactionProxyFactoryBean">
    <property name="transactionManager" ref="transactionManager" />
    <property name="transactionAttributes">
        <props>
            <prop key="insert*">PROPAGATION_REQUIRED</prop>
            <prop key="update*">PROPAGATION_REQUIRED</prop>
            <prop key="delete*">PROPAGATION_REQUIRED</prop>
            <prop key="get*">PROPAGATION_REQUIRED</prop>
        </props>
    </property>
</bean>

<bean id="lobSampleDao" parent="txProxyTemplate">
    <property name="target">
        <bean class="com.altibase.lob.LobSampleDao">
            <property name="sqlMapClient" ref="sqlMapClient"/>
        </bean>
    </property>
</bean>
To run the LobSpringIbatisSample example project, you need Altibase.jar, ibatis-2.3.4.x.jar, spring-jdbc.jar, spring-orm.jar, spring.jar, commons-logging.jar, and cglib-nodep-x.x.jar.

Appendix#
This chapter walks through the SimpleConnection example in more detail to show how to integrate iBATIS with Altibase. Eclipse is used as the development IDE.
Creating the Table and Sequence#
Create the following table and sequence in the database.
CREATE TABLE PERSON(
    PER_ID NUMBER (5, 0) NOT NULL,
    PER_NAME VARCHAR (40) NOT NULL,
    PER_BIRTH_DATE DATE,
    PER_WEIGHT_KG NUMBER (4, 2) NOT NULL,
    PER_HEIGHT_M NUMBER (4, 2) NOT NULL,
    PRIMARY KEY (PER_ID)
);

CREATE SEQUENCE PERSON_SEQ;
Creating the Project#
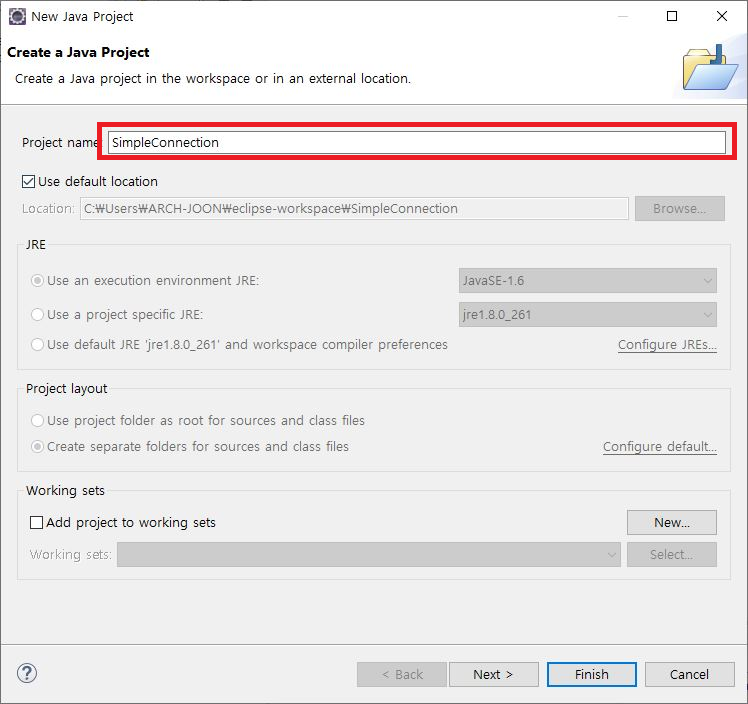
Create a project named SimpleConnection in Eclipse.
- From the menu, click
File>New>Java Project. - In
Project name, enterSimpleConnection. - Click
Finish.
Creating the SqlMap File#
Create the SqlMap file Person.xml, which defines the methods that correspond to the CRUD SQL statements for the PERSON table.
- Right-click the
srcdirectory of the SimpleConnection project and clickNew>File. - In
File name, enterPerson.xml.

Enter the following content in the Person.xml file.
<?xml version="1.0" encoding="UTF-8"?>
<!DOCTYPE sqlMap PUBLIC "-//iBATIS.com//DTD SQL Map 2.0//EN"
    "http://www.ibatis.com/dtd/sql-mapconfig-2.dtd">

<sqlMap namespace="Person">
    <resultMap id="PersonResult" class="examples.domain.Person">
        <result property="id" column="per_id" />
        <result property="name" column="per_name" />
        <result property="birthDate" column="per_birth_date" />
        <result property="weightInKilograms" column="per_weight_kg" />
        <result property="heightInMeters" column="per_height_m" />
    </resultMap>

    <select id="getPerson" parameterClass="int" resultClass="examples.domain.Person">
        <![CDATA[
            SELECT
                PER_ID as id,
                PER_NAME as name,
                PER_BIRTH_DATE as birthDate,
                PER_WEIGHT_KG as weightInKilograms,
                PER_HEIGHT_M as heightInMeters
            FROM PERSON
            WHERE PER_ID = #value#
        ]]>
    </select>

    <insert id="insertPerson" parameterClass="examples.domain.Person">
        <![CDATA[
            INSERT INTO PERSON (PER_ID, PER_NAME, PER_BIRTH_DATE,
                                PER_WEIGHT_KG, PER_HEIGHT_M)
            VALUES (#id#, #name#, #birthDate#,
                    #weightInKilograms#, #heightInMeters#)
        ]]>
    </insert>

    <update id="updatePerson" parameterClass="examples.domain.Person">
        <![CDATA[
            UPDATE PERSON
            SET PER_NAME = #name#,
                PER_BIRTH_DATE = #birthDate#,
                PER_WEIGHT_KG = #weightInKilograms#,
                PER_HEIGHT_M = #heightInMeters#
            WHERE PER_ID = #id#
        ]]>
    </update>

    <delete id="deletePerson" parameterClass="int">
        <![CDATA[
            DELETE PERSON
            WHERE PER_ID = #id#
        ]]>
    </delete>

    <select id="getAllPersons" resultMap="PersonResult">
        <![CDATA[
            SELECT * FROM person
        ]]>
    </select>
</sqlMap>
When the application calls the insert(), update(), delete(), or queryForXXX() method of SqlMapClient, the SQL statement in the <insert>, <update>, <delete>, or <select> tag with the matching id runs automatically.
Creating the SqlMapConfig File#
Creating the Properties File#
Create the properties file db.properties, which defines the Altibase connection properties.
Right-click the src directory of the SimpleConnection project, click New > File, and enter db.properties in File name.
driver=Altibase.jdbc.driver.AltibaseDriver
url=jdbc:Altibase://192.168.1.35:20300/mydb
username=sys
password=manager
Creating the SqlMapConfig File#
In the SqlMapConfig file SqlMapConfigExample.xml, configure the dataSource and SqlMap file for the Altibase integration.
Right-click the src directory of the SimpleConnection project, click New > File, and enter SqlMapConfigExample.xml in File name.
<?xml version="1.0" encoding="UTF-8"?>
<!DOCTYPE sqlMapConfig PUBLIC "-//iBATIS.com//DTD SQL Map Config 2.0//EN"
    "http://www.ibatis.com/dtd/sql-map-config-2.dtd">

<sqlMapConfig>

    <properties resource="db.properties" />

    <transactionManager type="JDBC">
        <dataSource type="SIMPLE">
            <property name="JDBC.Driver" value="${driver}"/>
            <property name="JDBC.ConnectionURL" value="${url}"/>
            <property name="JDBC.Username" value="${username}"/>
            <property name="JDBC.Password" value="${password}"/>
        </dataSource>
    </transactionManager>

    <sqlMap resource="Person.xml" />

</sqlMapConfig>
Creating the Application#
Creating the Person Class#
In the Person.java file, create the Person class, which is the data object for the PERSON table.
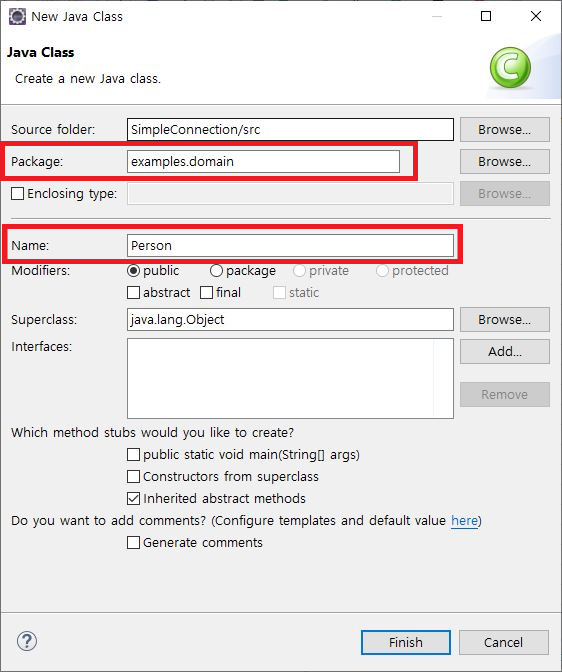
Right-click the src directory of the SimpleConnection project and click New > Class. Enter examples.domain in Package and Person in Name.
Enter the following content in the Person.java file.
package examples.domain;

import java.sql.*;

public class Person {
    private int id;
    private String name;
    private Date birthDate;
    private double weightInKilograms;
    private double heightInMeters;

    public int getId() {
        return id;
    }
    public void setId(int id) {
        this.id = id;
    }
    public void setName(String name) {
        this.name = name;
    }
    public String getName() {
        return name;
    }
    public void setBirthDate(Date birthDate) {
        this.birthDate = birthDate;
    }
    public Date getBirthDate() {
        return birthDate;
    }
    public void setWeightInKilograms(double weightInKilograms) {
        this.weightInKilograms = weightInKilograms;
    }
    public double getWeightInKilograms() {
        return weightInKilograms;
    }
    public void setHeightInMeters(double heightInMeters) {
        this.heightInMeters = heightInMeters;
    }
    public double getHeightInMeters() {
        return heightInMeters;
    }
    public String toString() {
        return "id=" + id + ", name=" + name + ", birthData=" + birthDate
                + ", weightInKilograms= (string literal in sample code)" + weightInKilograms
                + ", heightInMeters=" + heightInMeters;
    }
}
Creating the Main Program#
In the PersonApp.java file, create the main program that runs CRUD operations on the database.
Right-click the src directory of the SimpleConnection project and click New > Class. Enter PersonApp in Name.

Enter the following content in the PersonApp.java file.
import java.io.IOException;
import java.io.Reader;
import java.sql.SQLException;
import java.util.List;
import examples.domain.Person;
import com.ibatis.common.resources.Resources;
import com.ibatis.sqlmap.client.SqlMapClient;
import com.ibatis.sqlmap.client.SqlMapClientBuilder;

public class PersonApp {

    public static void main(String[] args) throws Exception
    {
        String resource ="SqlMapConfigExample.xml";
        Reader reader = Resources.getResourceAsReader(resource);
        SqlMapClient sqlMap = SqlMapClientBuilder.buildSqlMapClient(reader);

        //insert Person
        Person newPerson1 = new Person();
        newPerson1.setName("KIM");
        newPerson1.setBirthDate (new java.sql.Date(1978,1-1,1));
        newPerson1.setHeightInMeters(1.82);
        newPerson1.setWeightInKilograms(80.23);
        sqlMap.insert ("insertPerson", newPerson1);

        Person newPerson2 = new Person();
        newPerson2.setName("LEE");
        newPerson2.setBirthDate (new java.sql.Date(1975,5-1,5));
        newPerson2.setHeightInMeters(1.57);
        newPerson2.setWeightInKilograms(45.23);
        sqlMap.insert ("insertPerson", newPerson2);
        System.out.println();
        System.out.println("insert Person");

        List list = (List)sqlMap.queryForList("getAllPersons");
        System.out.println("Selected "+list.size()+" records.");
        for(int i=0; i< list.size();i++){
            System.out.println(list.get(i));
        }

        //update Person
        newPerson1.setHeightInMeters(1.93);
        newPerson1.setWeightInKilograms(86.36);
        sqlMap.update("updatePerson", newPerson1);
        System.out.println();
        System.out.println("update Person");
        list = sqlMap.queryForList("getAllPersons");
        System.out.println("Selected "+list.size()+" records.");
        for(int i=0; i< list.size();i++){
            System.out.println(list.get(i).toString());
        }
        System.out.println();
        System.out.println("get Person");

        //get Person
        Integer personPk = new Integer(1);
        Person person = (Person) sqlMap.queryForObject ("getPerson", personPk);
        System.out.println(person);

        //delete Person
        sqlMap.delete ("deletePerson", new Integer(1));
        sqlMap.delete ("deletePerson", new Integer(2));
        System.out.println();
        System.out.println("delete Person");
        list = sqlMap.queryForList("getAllPersons");
        System.out.println("Selected "+list.size()+" records.");
        for(int i=0; i< list.size();i++){
            System.out.println(list.get(i));
        }
    }
}
Adding the JAR Files#
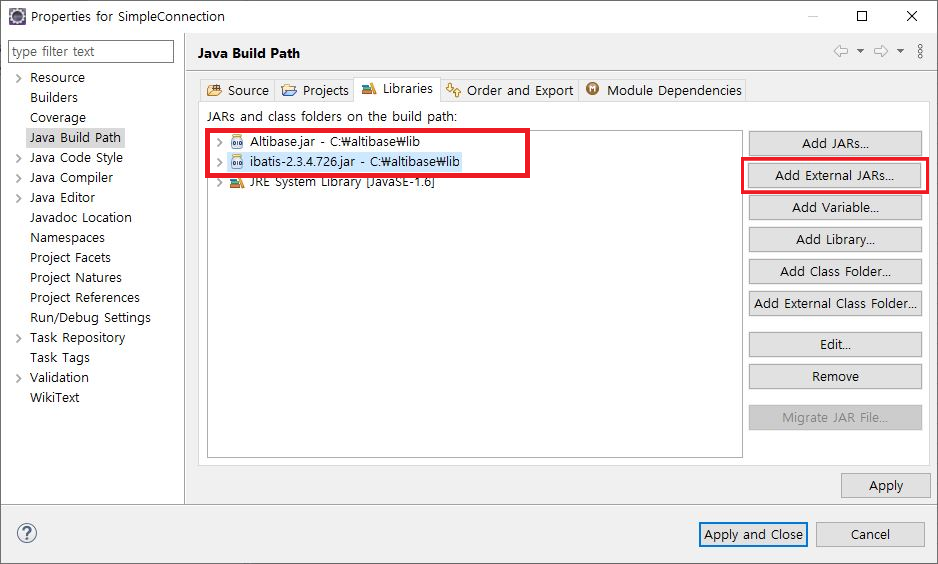
Add Altibase.jar and ibatis-2.3.4.x.jar to the project.
Right-click the SimpleConnection project, click Properties > Java Build Path > Libraries, and then click Add External JARs to add Altibase.jar and ibatis-2.3.4.x.jar.
Running the Application#
Run the SimpleConnection project.
Select the SimpleConnection project, and then choose Run from the menu or click the Run button.
